
Quick Overview
- Most “lawn mower won’t start” problems come down to old gas, a gummed carburetor, or a bad spark plug – all fixable at home in under an hour
- Fuel sitting in a mower for 30+ days starts to break down; after a full winter in storage, drain it and start fresh
- A spark plug costs $3-$8 and takes 10 minutes to swap – check this before anything else on a gas mower
- Battery mowers fail for different reasons than gas mowers; test voltage with a multimeter before assuming the pack is dead
- Low compression, scored cylinder walls, or a cracked carburetor body are signs to stop the DIY and take it to a shop
It’s a Saturday morning in late April. The grass is already two inches too tall. You grab the Toro, give the pull cord a hard yank – nothing. You try again. Maybe a weak sputter. Maybe total silence. That’s when the frustration sets in.
Here’s the thing: a lawn mower won’t start in most cases because of something cheap and fixable. After 15 years of diagnosing these problems – on push mowers, riding mowers, battery mowers, self-propelled models, everything from a basic Craftsman to a Honda HRX – I’d estimate 90% of no-start calls are fuel or spark issues. Both are solvable at home for under $20.
This guide is for homeowners, not mechanics. No special equipment, no shop experience needed. Just the fixes that actually solve the problem, in the order you should try them.
Why Lawn Mowers Refuse to Start
The short answer: gas mowers almost always fail because of old fuel, ignition problems, or a blocked air supply. Start with those three and you’ll cover the vast majority of cases. Battery mowers are a different story – they fail because of the battery pack, charger, or electrical connections.
Gas Mowers vs. Battery Mowers – Different Problems
Gas mowers and battery mowers share almost nothing mechanically, so diagnosing them the same way wastes time.
On a gas mower – a Honda HRX217, a Husqvarna HU700, a Toro Recycler – your first three checks are the spark plug, carburetor, and air filter. On a battery mower like an EGO LM2102SP or a Greenworks 80V, start with the battery voltage and the charging port. Mixing up the process just adds frustration.
How to Tell What’s Actually Wrong Before You Touch Anything
Spend 30 seconds observing before you start pulling things apart. What the mower does tells you where the problem is:
- Dead silence when you pull the cord – likely a safety switch or no fuel
- Cranks but won’t fire – spark or fuel delivery problem
- Fires briefly, then dies within seconds – clogged carburetor
- Hard to pull, cord feels stiff – possible hydrolocking from too much oil
- Battery mower won’t turn on at all – dead battery pack or bad connection
Write down what you hear and feel. That observation cuts your diagnostic time in half.
The Most Common Reasons a Lawn Mower Won’t Start
Fuel problems cause roughly 70% of lawn mower starting failures (Briggs & Stratton, 2023). The other 30% splits between ignition, safety switches, and mechanical failure. Start with fuel every single time.
Old or Bad Gasoline
Gas begins breaking down after about 30 days. After a full winter in storage – say, from November in Minnesota to April – the fuel in your tank has turned into a varnish-like residue that coats everything inside the carburetor.
You can usually smell it. Old gas has a sour, almost lacquer-like odor. Fresh gas smells sharp and chemical. Pull the gas cap and take a sniff. If it smells like nail polish remover, drain the tank before doing anything else.
Modern ethanol blends (E10, E15) break down faster than older pure-gasoline formulas. Ethanol absorbs moisture from the air, which accelerates fuel degradation and causes corrosion inside the carburetor bowl.
Dirty or Clogged Carburetor
The carburetor mixes air and fuel in the right ratio for combustion. When old gas leaves residue inside it, the tiny jets and passages clog. The engine either won’t start at all, or it fires for a few seconds and dies.
This is the single most common mechanical cause of spring no-starts. If the mower sat all winter with gas in the tank, assume the carburetor needs attention before you try anything else.
On small push mowers, cleaning the carburetor without removing it is possible using spray carburetor cleaner. On older Craftsman walk-behinds or riding mowers, removing the carb is usually faster and more thorough.
Spark Plug Problems
The spark plug ignites the air-fuel mixture inside the cylinder. A fouled, worn, or cracked plug won’t produce a reliable spark – and no spark means no start.
Pull the plug and look at it. A black, sooty electrode means it’s fouled with carbon. A melted tip or cracked ceramic means it needs replacing. Even if it looks fine, a plug that’s been in for a full season is worth swapping. They cost $3 to $8 at any hardware store.
On most walk-behind mowers, the plug is right on the front of the engine and visible immediately. You’ll need a spark plug socket – usually 5/8″ or 13/16″. The whole job takes 10 minutes.
Dead or Weak Battery (Electric and Self-Propelled Models)
On battery-powered mowers – EGO, Greenworks, Ryobi – a dead or degraded battery pack is the most frequent failure point. Lithium-ion packs lose capacity over time, especially when stored in an unheated garage all winter.
Check battery voltage with a multimeter. A fully charged 56V EGO battery should read 56-60V. If it reads below 45V and the charger won’t bring it up, the pack is likely done.
On electric start gas mowers like some Honda and Toro models, a 12V starter battery can fail exactly like a car battery. Test it with a multimeter. A fully charged 12V battery reads 12.6V. Below 11V means it needs charging – below 10V and it probably won’t recover.
Clogged Air Filter
The air filter keeps grit out of the engine. A clogged filter restricts airflow, throws off the air-to-fuel ratio, and makes a clean start impossible.
Paper filters need replacing every season. Foam filters can be washed with dish soap and water, then dried completely before reinstalling. On most walk-behind mowers, the air filter sits under a plastic cover on the side of the engine – no tools needed to access it.
If you’ve been mowing in dusty conditions – common in Arizona or anywhere in the dry Southwest – check the filter more frequently. Even mid-season.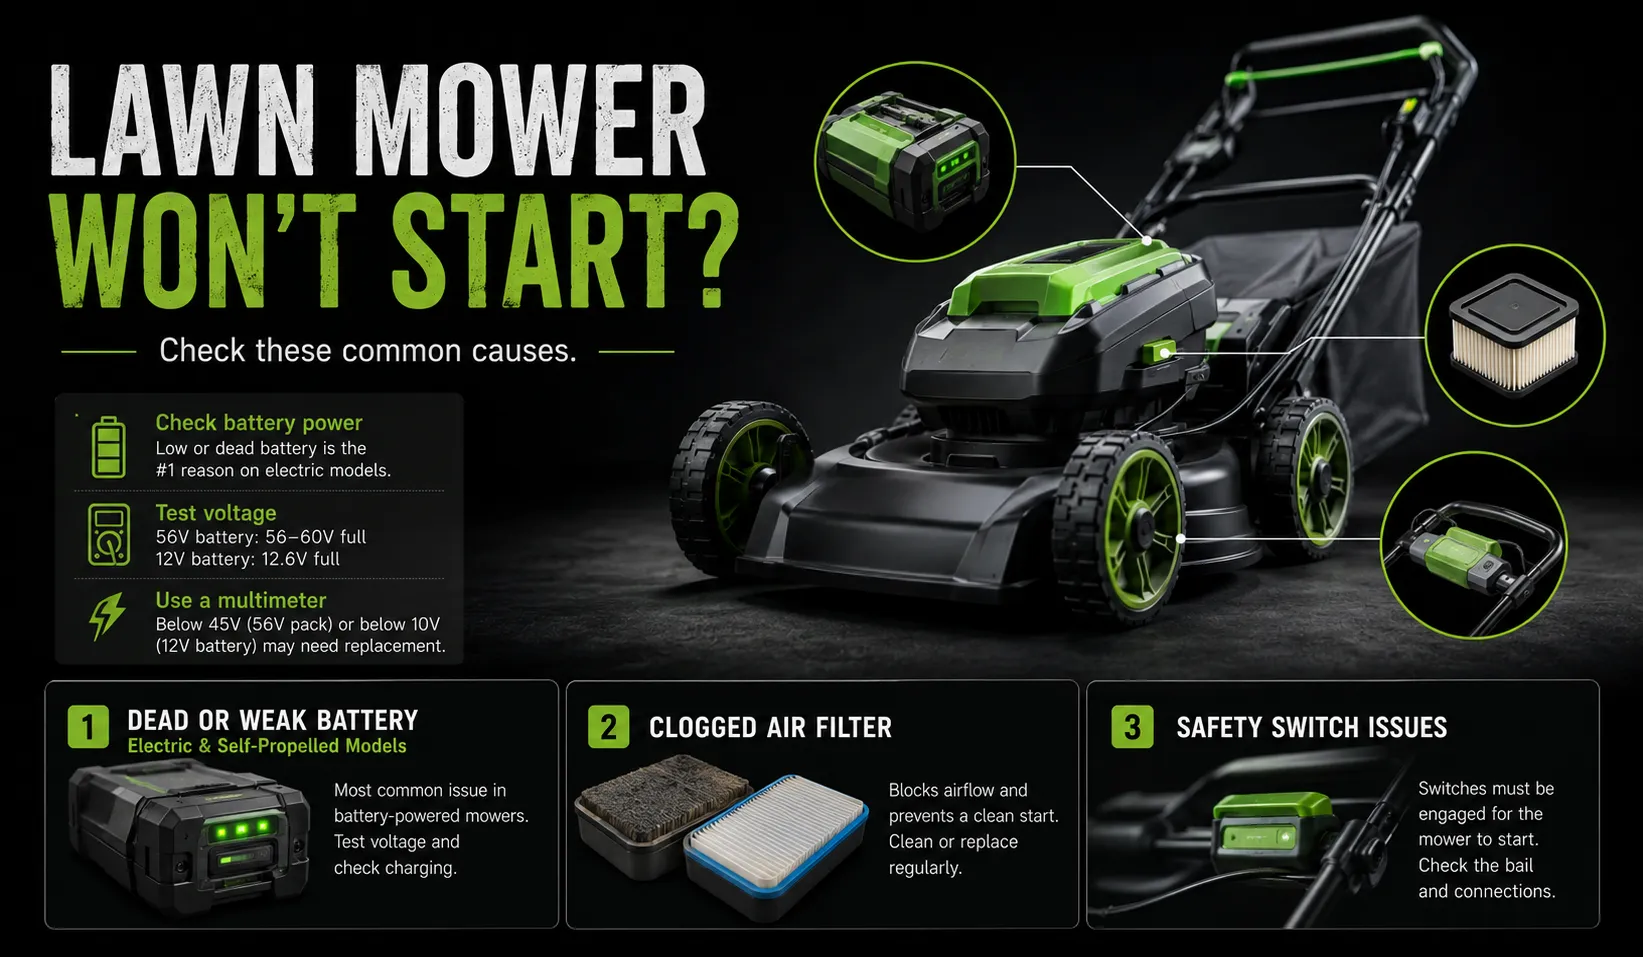
Safety Switch Issues
Modern mowers have safety switches that block starting unless specific conditions are met: the bail handle is pressed (walk-behinds), the operator is in the seat (riding mowers), and the blade engagement is in the off position.
If any switch fails or gets stuck open, the mower won’t start even when everything else is working fine. This is one of those maddening ghost problems where the mower seems completely dead for no obvious reason.
The bail handle switch on walk-behind mowers is the most common one to fail. Hold the bail firmly against the handle and pull the cord. If it still won’t start, check whether the switch is actually making contact.
Symptom -> Likely Cause -> Fix
| Symptom | Likely Cause | Starting Fix |
|---|---|---|
| Dead silence, pull cord moves freely | Safety switch or empty tank | Check bail/seat switch; check fuel level |
| Cranks but won’t fire | Bad spark plug or no fuel flow | Replace plug; inspect carburetor |
| Fires briefly, dies in seconds | Clogged carburetor | Clean or replace carburetor |
| Hard to pull, cord feels seized | Hydrolocked or seized engine | Check oil level; remove plug and pull |
| Battery mower won’t turn on | Dead battery or faulty connection | Test voltage; check charging port |
| Slow cranking on electric start model | Weak 12V starter battery | Charge or replace starter battery |
Step-by-Step Fixes You Can Do at Home
All of these are within reach for any homeowner with basic tools. I’ve done every one of them in driveways and garages with no lifts or specialized equipment.
How to Drain and Replace Old Gas
- If your mower has a fuel shutoff valve – many Honda and Husqvarna models do – turn it to OFF.
- Run the engine until it dies from fuel starvation. This clears the carburetor bowl.
- Use a hand pump or large turkey baster to pull the remaining fuel from the tank.
- Dispose of old gas at a local recycling or hazmat drop-off. Don’t pour it down a drain.
- Refill with fresh 87-octane gas. Avoid E15 on most small engines – use E10 or ethanol-free fuel if available in your area.
One mistake I made early in my career: I skipped running the engine dry and just topped off with fresh gas over old. The new fuel picked up the varnish residue and re-clogged the carburetor within two starts. Run it dry first. That step matters.
How to Clean a Carburetor Without Removing It
- Remove the air filter cover and set the filter aside.
- Spray carburetor cleaner directly into the carburetor throat while cranking the engine (or while pulling the cord repeatedly).
- Let it sit for five minutes, then try a normal start.
- If it fires briefly and dies, repeat – there may be residue deeper in the jets.
For a more thorough clean without full removal: unscrew the bowl at the base of the carburetor (one Phillips or flathead screw on most small engines). Remove the bowl and float. Spray cleaner through every small hole you can see. Reassemble and test.
Checking and Replacing a Spark Plug
- Disconnect the spark plug wire – it pulls straight off the plug terminal. Don’t skip this step.
- Use a spark plug socket to unscrew the old plug counterclockwise.
- Check the gap spec in your owner’s manual. Most small engine plugs use a 0.030″ gap. Confirm with a feeler gauge before installing the new plug.
- Thread the new plug in by hand until snug, then tighten 1/4 turn with the socket. Don’t overtighten.
- Reconnect the wire and test.
Common plugs for walk-behind mowers: Champion RC12YC, NGK BPR6ES. Check your model’s manual for the exact part number.
Testing and Jumping a Mower Battery
For battery mowers: plug the pack into the charger and watch the indicator lights. If the charger shows an error code or doesn’t recognize the battery, the pack may have dropped below the recovery threshold – most lithium chargers refuse to charge a pack below a certain voltage floor.
For 12V electric start mowers:
- Set a multimeter to DC voltage.
- Touch the red probe to the positive terminal, black to negative.
- 12.6V or above means the battery is fine. Below 11V means charge it. If it won’t hold a charge above 12V after a full charge cycle, replace it.
Replacement 12V mower batteries cost $20-$40 at hardware stores. Some Toro and Husqvarna riding mowers use standard automotive-style batteries – check the group size on the label.
Cleaning or Replacing an Air Filter
Paper filter: Tap it on a hard surface to knock loose dirt free. If it’s dark gray, oil-stained, or packed with debris, replace it. New paper filters run $5-$12.
Foam filter: Wash with dish soap and warm water. Rinse until the water runs completely clear. Squeeze dry – don’t wring or twist the foam. Let it air dry for at least two hours. Then work a few drops of clean engine oil through the foam before reinstalling.
One warning from experience: never run the mower without the air filter, even for a short test. Ten minutes without it can pull enough fine grit into the cylinder to cause real wear.
Resetting or Bypassing a Faulty Safety Switch
Warning: Bypassing a safety switch removes a protection feature. Do this only for diagnosis – never leave a switch bypassed permanently.
On walk-behind mowers, locate the bail handle switch (a small plastic or metal switch near where the bail connects to the handle). With the engine off and the spark plug wire disconnected, set a multimeter to continuity mode and test the switch. It should show continuity when the bail is pressed and open when released. If it doesn’t behave that way, the switch is faulty.
Replacement bail switches cost $8-$15 online. Search your mower’s model number on the Toro, Craftsman, or Husqvarna parts diagram to get the exact part.
Fix -> Tools Needed -> Difficulty Level
| Fix | Tools Needed | Difficulty |
|---|---|---|
| Replace old gas | Hand pump, fuel container | Easy |
| Clean carburetor (no removal) | Carb cleaner spray, screwdriver | Easy |
| Replace spark plug | Spark plug socket, feeler gauge | Easy |
| Clean foam air filter | Dish soap, water, engine oil | Easy |
| Test/replace 12V starter battery | Multimeter, wrench | Easy-Medium |
| Remove and clean carburetor | Socket set, carb cleaner, small pick or wire | Medium |
| Replace bail handle switch | Multimeter, screwdriver | Medium |
| Replace battery pack (battery mower) | None | Easy (but expensive) |
How the Problem Changes by Season and Climate
The time of year and where you live changes which problem you’re most likely facing. A no-start in April in Wisconsin is almost never the same problem as a no-start in August in Florida. Knowing the pattern helps you go straight to the right fix.
Spring Startup Problems (Sitting All Winter)
This is the most common scenario I see. The mower sat in a cold garage from October through April. The gas degraded. The carburetor has varnish in it. The oil got thick. Maybe the battery lost its charge sitting on a concrete floor all winter.
Start with the fuel: drain it if it’s been sitting more than 30 days. Then check the spark plug. Then the carburetor. That order solves 90% of spring no-starts without going further.
In cold-climate states like Minnesota, Wisconsin, or the Dakotas, condensation inside the fuel tank is also common after a long storage period. Using ethanol-free fuel or adding a water-separating stabilizer before storage prevents that.
Summer Heat and Vapor Lock Issues
Vapor lock happens when fuel in the line or carburetor bowl vaporizes from heat before it reaches the engine. The mower starts fine in the morning but dies after 20-30 minutes on a hot day – and won’t restart until it cools down.
This is more common in Arizona, inland California, and Texas during peak summer heat. It hits older carbureted mowers harder than newer designs.
If the mower dies mid-mow and won’t restart until you wait 15-20 minutes, then starts right up again once cool, vapor lock is the likely cause. Switching to ethanol-free fuel reduces the problem significantly.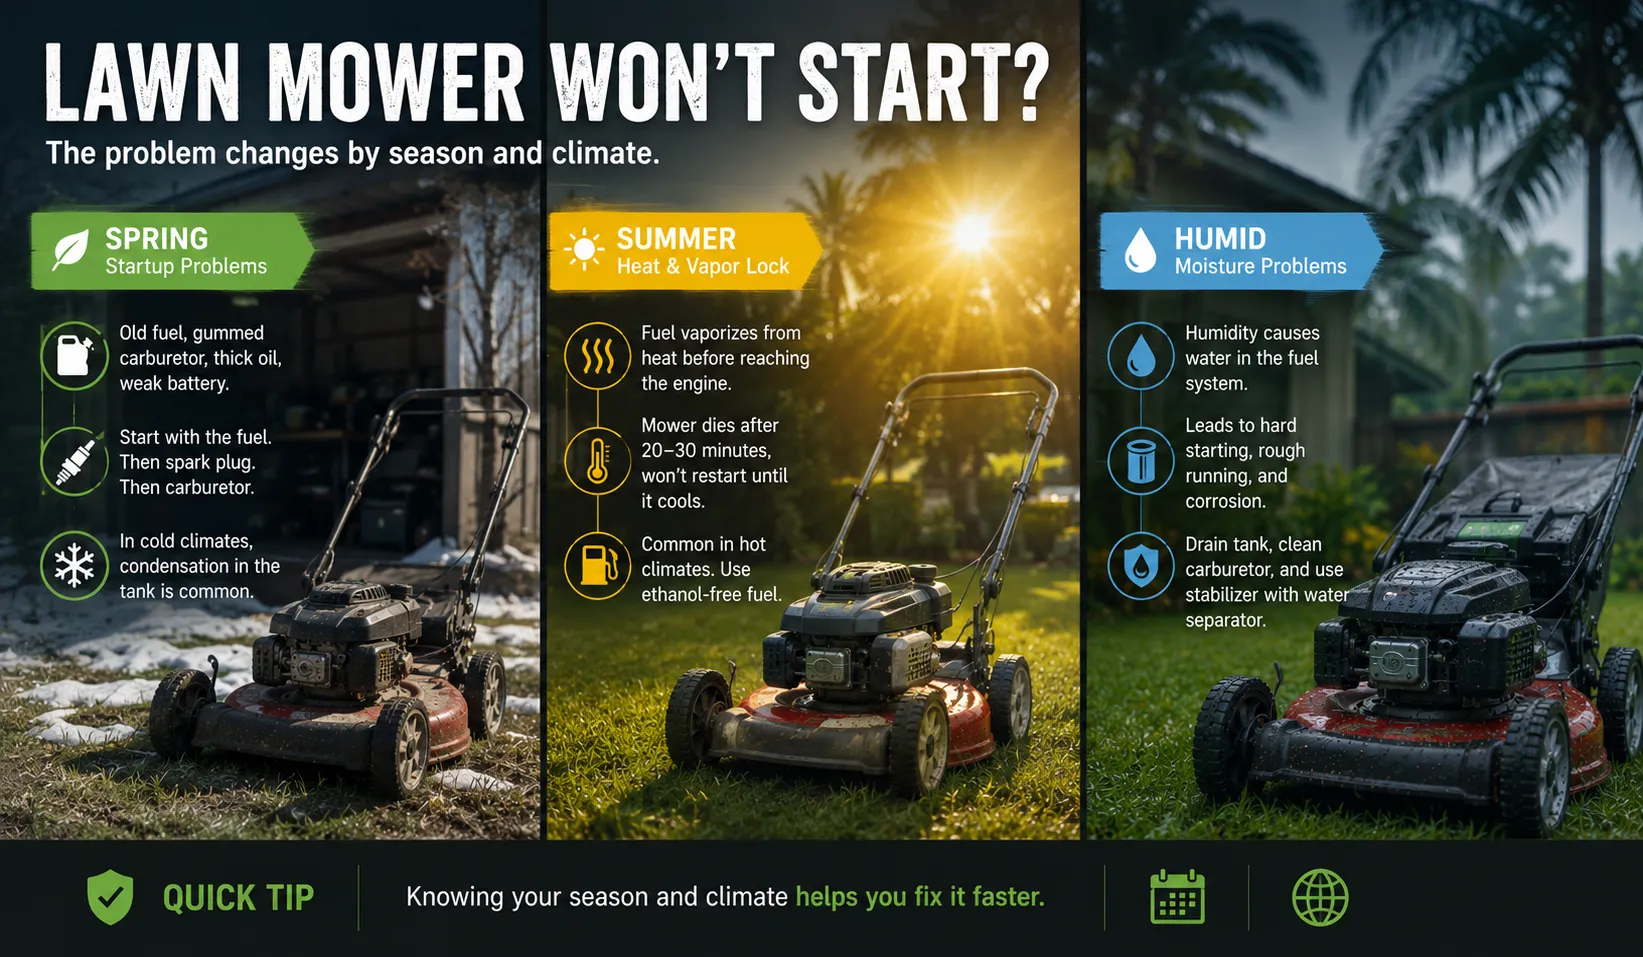
Humid Climates – Moisture in the Fuel System
In Florida, Louisiana, and along the Gulf Coast, humidity is a real enemy of the fuel system. Water enters the tank through condensation – especially in mowers stored in unventilated sheds where temperatures swing between hot days and cool nights.
Water in fuel causes hard starting, rough running, and eventually carburetor corrosion. The fix is draining the tank completely, cleaning the carburetor, and refilling with fresh fuel plus a stabilizer that includes a water separator – Sta-Bil 360 Protection is the one I recommend in those regions.
If you’re in a humid climate, run the tank completely dry at the end of every season. Never leave fuel sitting through the off-season.
Season/Climate -> Common Issue -> Prevention Tip
| Season / Climate | Common Issue | Prevention |
|---|---|---|
| Spring (post-winter storage) | Old gas, gummed carburetor | Drain tank in fall; add stabilizer to fresh fuel |
| Summer (Southwest heat) | Vapor lock | Use ethanol-free fuel; mow in cooler morning hours |
| Humid climate (Gulf Coast, Southeast) | Water in fuel system | Run tank dry before storage; use stabilizer with water separator |
| Fall after summer storage break | Degraded gas, weak battery | Top off with fresh fuel; check battery charge before storing |
When DIY Isn’t Enough – Signs You Need a Mechanic
Most lawn mower problems belong in the driveway, not the shop. But some problems will beat you no matter what you try. Knowing when to stop saves money and prevents making things worse.
Compression and Engine Problems
If you’ve replaced the spark plug, cleaned the carburetor, and the engine still won’t fire – do a compression test. A small engine compression tester costs $15-$20 at any auto parts store and takes two minutes to use.
A healthy small engine should show 90-120 PSI. Below 60 PSI indicates worn piston rings, a burned valve, or scored cylinder walls. Fixing any of those requires full engine disassembly. At that point, the labor cost at a shop is usually less than what you’d spend on your time and parts.
I learned this the hard way with an old Craftsman push mower. Replaced the plug, cleaned the carb twice, fresh gas – still nothing. Compression test came back at 42 PSI. Scored cylinder walls from years of low-oil running. The repair cost would have been more than the mower’s value. I bought a new one and moved on. Sometimes that’s the right call.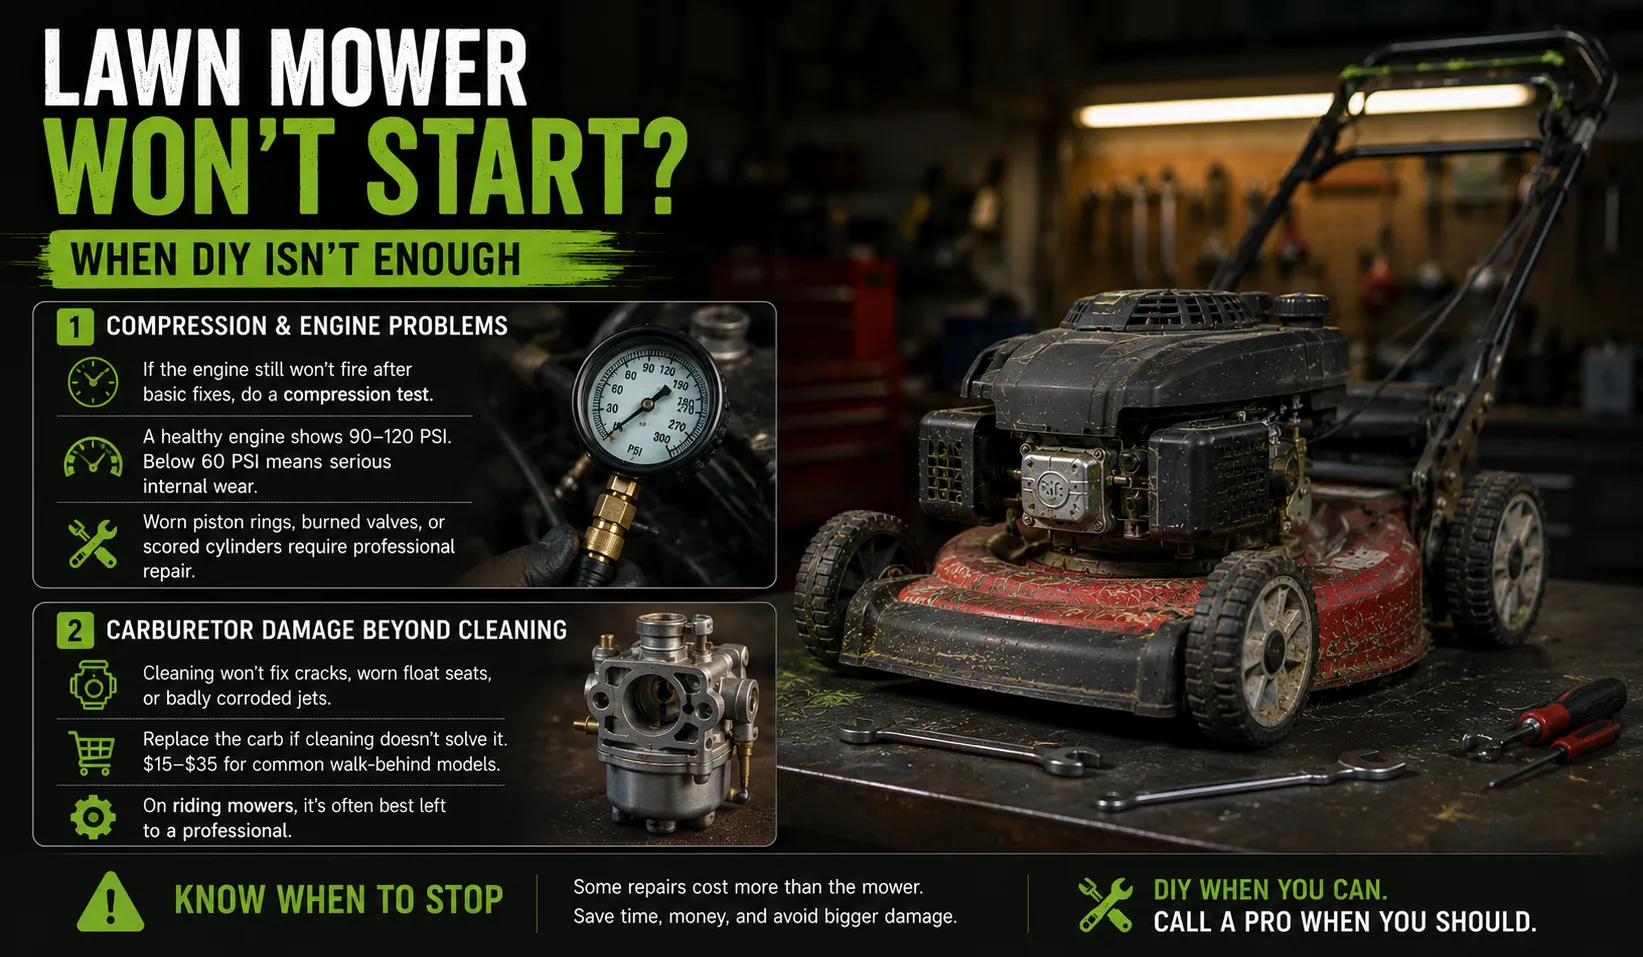
Carburetor Damage Beyond Cleaning
Spray cleaning and bowl cleaning fix a clogged carburetor. They don’t fix a carburetor with a cracked body, a damaged float needle seat, or jets so corroded they won’t flow properly even after cleaning.
If you’ve cleaned the carburetor twice and the mower still dies immediately or runs with black smoke, replace the carburetor rather than keep fighting it. Replacement carbs for common walk-behind mowers run $15-$35 on Amazon or through a dealer parts line. On a riding mower, carburetor replacement is more involved – that one is worth paying a shop for.
Frequently Asked Questions About Lawn Mower Won’t Start
Why won’t my lawn mower start after sitting all winter?
Old gas is the most likely cause. Fuel breaks down after 30 days and leaves varnish-like deposits in the carburetor. Drain the old gas, spray carburetor cleaner into the carb throat, replace the spark plug, and restart with fresh fuel. That sequence fixes most winter storage no-starts without any other work.
What is the first thing to check when a lawn mower won’t start?
Check the fuel first – is there gas in the tank, and is it fresh? If the gas is more than 30 days old, drain it. Then check the spark plug. Those two items together cause the majority of no-start problems and cost almost nothing to address.
How do I know if my lawn mower carburetor is clogged?
The clearest sign is a mower that starts briefly and dies within a few seconds. If it fires for 5-10 seconds then quits, or won’t start at all after a winter of storage with gas left in the tank, a clogged carburetor is the most likely cause.
Can I use starting fluid to start a lawn mower?
Starting fluid (ether spray) works as a diagnostic tool – if the engine fires on ether but dies immediately, you have a fuel delivery problem. But don’t use it regularly. It strips oil from cylinder walls and causes damage with repeated use.
How do I know if my lawn mower battery is dead?
Use a multimeter set to DC voltage. A healthy 12V starter battery reads 12.6V or higher. Below 11V, charge it. If it won’t hold above 12V after a full charge, replace it. For lithium battery packs on EGO or Greenworks mowers, check the indicator lights on the charger. Most manufacturers also build diagnostics into the charger display – a flashing red light usually means the pack is below the recovery threshold.
What does it mean when a lawn mower cranks but won’t start?
Cranks but won’t fire usually means no spark or no fuel reaching the cylinder. Replace the spark plug first – it’s the fastest and cheapest fix. If that doesn’t work, remove the carburetor bowl and check whether gas is actually present inside. No gas in the bowl points to a blocked fuel line or stuck float valve.
How to Prevent This From Happening Again
The time to think about spring startup problems is October, not April. A few minutes of work before you put the mower away eliminates most of what’s in this article.
End-of-Season Storage Tips
- Run the tank dry or drain it completely. Don’t leave gas sitting inside over winter.
- Remove and inspect the spark plug. If it’s seen a full season of use, replace it now so you’re ready in spring.
- Clean the air filter. Replace paper filters; wash and oil foam filters.
- Change the oil if you’re at or near the recommended interval. Most small engines call for an oil change every 50-100 hours or once per season.
- Clean the underside of the deck and remove packed-on grass clippings. They hold moisture and accelerate rust.
- Store in a dry, sheltered location. A cold garage is fine. A wet, unventilated shed is not.
Fuel Stabilizer – What It Is and Why It Matters
Fuel stabilizer is an additive that slows the breakdown of gasoline in storage. Add it to the tank before storing the mower – typically 1 oz per gallon – then run the engine for three minutes so the treated fuel reaches the carburetor float bowl.
Sta-Bil is the most widely available brand in the US. The standard blue-bottle formula works for most climates. For humid regions like Florida or the Gulf Coast, their 360 Protection formula adds a water separator and corrosion inhibitor.
One thing worth repeating: stabilizer does not bring back old gas. It only works when added to fresh fuel at the beginning of storage. Add it in October. Not April.
Simple Maintenance Schedule Any Homeowner Can Follow
| Task | When |
|---|---|
| Check oil level | Before every mow |
| Clean underside of deck | Every 10 hours or monthly |
| Inspect air filter | Every 25 hours or monthly |
| Replace paper air filter | Every season |
| Replace spark plug | Every season or every 100 hours |
| Change oil | Every season or every 50 hours |
| Sharpen blade | Every 25 hours or twice per season |
| Drain or stabilize fuel | Before winter storage |
My Final Take
After 15 years of fixing these things, here’s what I’d tell a neighbor: 90% of lawn mower starting problems are fuel problems. Old gas. A gummed-up carburetor. Gas left in the tank all winter with no stabilizer. That’s it. Drain the tank every fall, add stabilizer to fresh fuel before storage, run the engine for three minutes to pull that treated fuel through the carburetor – and you will almost never have a spring no-start.
The one step most homeowners skip is running the engine dry before storage. They add stabilizer on top of gas that’s already been sitting six weeks, then wonder why the mower won’t start in April. Stabilizer slows breakdown – it does not reverse it. The order matters: fresh fuel first, then stabilizer, then run it for three minutes, then shut it down.
If you’ve done everything in this guide and the mower still won’t fire, do a compression test before spending another dollar on parts. A $15 tester gives you the answer in 30 seconds. If compression is below 60 PSI, the honest fix is often a new mower. That’s not a failure – that’s just the math.
DIY Fixing vs. Taking It to a Shop
| Factor | DIY | Shop |
|---|---|---|
| Cost | $3-$35 for most repairs | $60-$150+ per labor hour |
| Turnaround time | 20 minutes to 2 hours | Drop-off, then 3-7 days wait |
| Tools required | Basic socket set, multimeter, carb spray | None – shop provides everything |
| Best for | Old gas, spark plug, air filter, weak battery | Low compression, carburetor rebuild, engine teardown |
| Risk level | Low if steps are followed carefully | Low – professional handles it |
| Choose DIY when | Problem is fuel, spark, or airflow | Compression under 60 PSI, engine noise, or two failed DIY attempts |