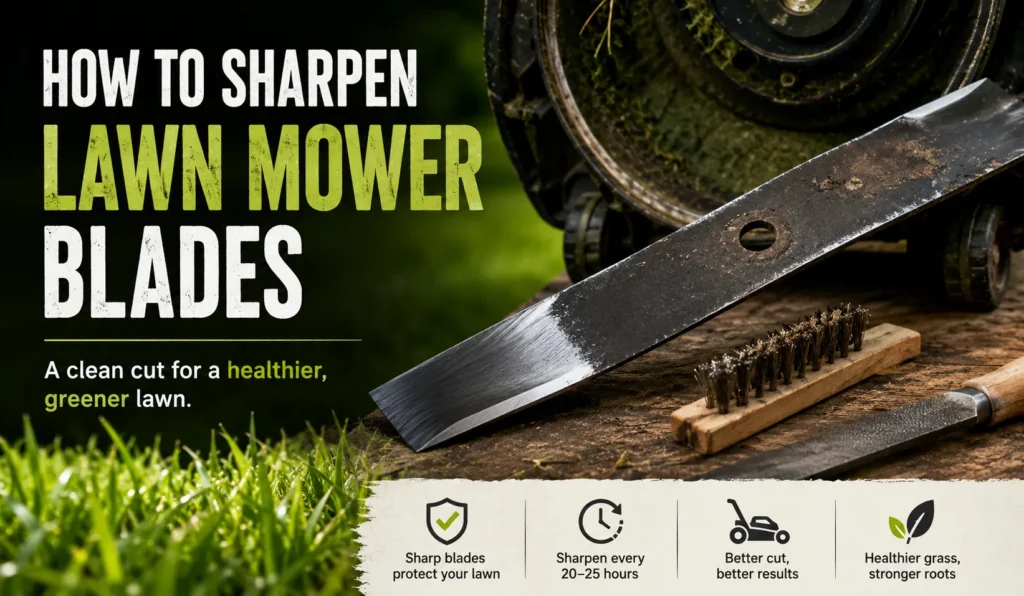
Key Takeaways
- Dull mower blades tear grass instead of cutting it, leaving ragged brown tips that invite disease
- Most homeowners should sharpen blades every 20-25 hours of mowing, or roughly once per season for small yards
- You need only a $6 hand file, a socket wrench, and a blade balancer to do this correctly
- Always disconnect the spark plug (or battery on electric mowers) before touching the blade
- Replace the blade instead of sharpening if you see deep nicks, cracks, or a blade thinner than 0.25 inches at the cutting edge
What a Dull Blade Is Doing to Your Lawn Right Now
I’ve sharpened mower blades on probably 300 lawns over the years – push mowers, riding mowers, zero-turns. The number one thing homeowners get wrong? They wait too long. If you’ve noticed your grass looks a little gray-brown the day after mowing, or the tips look ragged instead of clean, the blade is the reason. That’s not a fertilizer problem. That’s a how to sharpen lawn mower blades problem.
This guide is for homeowners who want to do it themselves – whether it’s your first time or you’ve just always handed the mower off to a shop and want to stop paying for something you can do in 30 minutes. I’ll walk you through every method I’ve actually used, honest about what works and what wastes your time.
Why Blade Sharpness Matters More Than You Think
A sharp blade cuts grass cleanly at the stem. A dull blade rips it. That’s the whole story, but the consequences matter.
What a Dull Blade Actually Does to Your Grass
When a blade tears instead of cuts, each grass stem is left with a ragged, frayed tip. That damaged tissue dries out and turns tan or gray within 24-48 hours. It’s not a watering issue – it’s cellular damage. The plant has to repair itself rather than grow, which weakens roots over time.
Turf pathologists at the University of Georgia (2021) found that lawns mowed with dull blades showed 30% higher rates of fungal disease entry points compared to lawns mowed with sharp blades. A clean cut heals in hours. A torn one stays open longer – and that’s where gray leaf spot and dollar spot move in.
You also burn more fuel with a dull blade. The mower engine works harder to push a blade that’s dragging through grass instead of slicing it.
How Often Should You Really Sharpen?
Sharpen after every 20-25 hours of mowing. For most suburban homeowners mowing a quarter-acre lot once a week, that’s once per season – spring tune-up, done.
If you mow a larger yard, live near a sandy driveway like half the yards I worked in New Mexico, or regularly clip near gravel beds or hardscape edges, sharpen every 10-15 hours. Sandy and rocky soil kills a cutting edge in half the time.
After hitting a rock, root, or any buried debris – sharpen before the next mow. Don’t wait. One strike can roll the entire cutting edge, and running a damaged blade isn’t just bad for the lawn. At 3,000+ RPM, an out-of-balance blade puts real stress on the spindle bearings.
Tools You’ll Need Before You Start
You don’t need a machine shop. Most homeowners can do a good job with tools they already own.
Basic Tools (File Method)
- 10-inch mill bastard file (flat, single-cut) – about $6 at any hardware store
- Socket wrench with the correct size socket (usually 5/8″ for push mowers, 3/4″ for riding mowers)
- A piece of wood or a blade removal tool to hold the blade still
- Blade balancer – $5 at any garden center or Amazon
- Wire brush or putty knife for cleaning
- Penetrating oil like PB Blaster if the blade bolt is rusted
Power Tools (Angle Grinder or Bench Grinder)
- Angle grinder with a flap disc (40-60 grit) – faster and removes more metal per pass
- Bench grinder with an aluminum oxide wheel – best for consistent angle control
- A blade sharpening drill attachment like the Oregon 28-400 – slower than an angle grinder but easier for beginners
I’ve used all three on different setups. Each has a real use case, covered in the methods section below.
Safety Gear You Should Never Skip
- Cut-resistant gloves – mower blades are not sharp like a kitchen knife but the edge can catch skin if you slip
- Eye protection – angle grinders throw sparks and metal fragments
- Hearing protection if using a bench grinder or angle grinder for more than a few minutes
Tool Comparison Table
| Method | Cost | Skill Level | Time per Blade | Edge Quality |
|---|---|---|---|---|
| Hand file | $6-12 | Beginner | 15-20 min | Good |
| Drill attachment | $15-25 | Beginner | 8-12 min | Good |
| Angle grinder | $40-80 (if you don’t own one) | Intermediate | 4-6 min | Very good |
| Bench grinder | $60-120 | Intermediate | 5-8 min | Excellent |
How to Sharpen Lawn Mower Blades – Step by Step
Work through these in order. Don’t skip step 1, no matter how fast you want to move.
The full process takes 30-45 minutes the first time. Once you’ve done it twice, you’re down to 20 minutes.
Step 1 – Disconnect the Spark Plug (or Battery)
Pull the spark plug wire off the plug and tuck it out of reach. On electric mowers, remove the battery pack completely.
This is the one step people argue with me about. “I’m not going to accidentally start it.” Maybe. But the blade can rotate if you grab it and your body weight shifts wrong. It’s happened. Disconnect the plug first, every time.
On a riding mower, also set the parking brake and remove the ignition key.
Step 2 – Remove the Blade Safely
On push mowers, you’ll tip the mower to access the blade. Tip it with the air filter and carburetor side facing UP. Not sideways, not backward – air filter up. Tipping with the carburetor down floods the engine with oil. Tipping with the fuel tank down can leak gas onto hot components.
Block the blade with a piece of 2×4 wedged against the inside of the deck – this keeps it from spinning while you break the bolt free. The bolt is almost always reverse-threaded on push mowers, meaning you turn it clockwise to loosen. Check your manual if unsure.
Use a breaker bar or long-handled ratchet. The bolt is on tight. Don’t use a drill – you’ll strip the head.
Photograph the blade’s orientation before removing it. The cutting edge faces the direction of blade rotation. Reinstalling it upside down is the most common beginner mistake.
Step 3 – Clean the Blade First
Scrape off all the dried grass and dirt with a putty knife or wire brush. You can’t sharpen through buildup and you can’t accurately check for damage if you can’t see the metal.
Look at the blade while you clean it. Check for:
- Deep nicks (deeper than 1/8 inch) – sharpen out if possible, replace if not
- Cracks anywhere along the blade body – replace immediately
- A cutting edge that has been sharpened so many times it’s paper-thin at the bevel – replace
- Heavy corrosion on the blade body – surface rust is fine, deep pitting is not
A standard 2-in-1 blade (lift and cut) and a mulching blade look different but sharpen the same way. Gator blades have serrated edges on the trailing end – you only sharpen the main cutting bevel, not the serrations.
Step 4 – Sharpen at the Right Angle
The factory bevel angle on most residential mower blades is 30-35 degrees. You don’t need a protractor. Hold the file against the existing bevel and match it. If you file at 45 degrees, you create a thinner edge that dulls faster. If you go too shallow, you’re grinding off metal without creating a real cutting edge.
Hand file method: Clamp the blade in a vise or secure it on a workbench. File in one direction only – pushing away from you, along the bevel. Count strokes: 10-15 firm passes, then switch to the other end of the blade. Keep both ends even. You’re not trying to create a razor edge. You want a cutting edge that’s about as sharp as a butter knife – enough to cleanly slice grass, not enough to shave with.
Angle grinder method: Rest the flap disc flat against the bevel and work in slow, even passes across the edge. Let the grinder do the work. Too much pressure removes too much metal. This method creates heat faster, so keep passes short and alternate sides every 30 seconds if the blade gets warm to the touch.
Bench grinder method: Hold the blade at a consistent angle to the wheel. The bench grinder is the most consistent method because you can see the bevel clearly and adjust in real time. The risk is grinding too aggressively and heating the steel enough to change its temper – watch for any blue or straw discoloration on the metal near the edge. That’s a sign you’ve overheated it.
After sharpening, run your thumb (carefully) across the flat back of the edge. You should feel a slight burr – a thin curl of metal pushed over by the sharpening. Flip the blade and make two or three light passes on the flat back side to remove the burr. A burr left in place folds over on the first mow and the blade dulls immediately.
Step 5 – Balance the Blade Before Reinstalling
An unbalanced blade causes vibration. Enough vibration damages spindle bearings, which are $30-80 to replace on a push mower and significantly more on a riding mower.
Hang the blade on a blade balancer (a simple cone-shaped pin that sits on a stand). If one end drops, that end is heavier. Remove a little more metal from the heavy side’s cutting edge – not the back, just the bevel. Recheck until the blade hangs level.
No balancer? Hang the blade horizontally on a nail through the center hole. Same idea. It won’t be as precise as a cone balancer, but it’s far better than skipping the check.
I can tell the difference by sound when a blade is off-balance. The mower runs rough, almost like a car with a bad tire. When it’s right, the engine sound is smooth and consistent.
Step 6 – Reinstall and Test
Put the blade back exactly as it was – cutting edge in the direction of rotation, lift wings (if present) facing up toward the deck. Hand-thread the bolt first, then torque it. Torque spec is in your manual. For most push mowers it’s 30-50 ft-lbs. For riding mowers, 55-70 ft-lbs is common.
Don’t guess. A loose blade is a projectile.
Reconnect the spark plug wire (or battery), start the mower, and run it over a small section of lawn. Clean, even cut with no gray tips? You’re done. Rough-looking cut or visible vibration? Recheck the balance.
Quick-Reference Step Summary
| Step | What You’re Doing | Time Estimate |
|---|---|---|
| 1. Disconnect power | Remove spark plug wire or battery | 1 min |
| 2. Remove blade | Tip mower, block blade, loosen bolt | 5-10 min |
| 3. Clean blade | Remove debris, inspect for damage | 5 min |
| 4. Sharpen | File or grind the cutting bevel | 10-20 min |
| 5. Balance | Check and correct blade balance | 5 min |
| 6. Reinstall | Torque bolt, reconnect power, test | 5 min |
Sharpening Methods Compared – Which One Is Right for You?
The best method depends on how many blades you sharpen per year, what tools you already own, and how much precision matters to you.
Hand File Method (Best for Beginners)
This is where I tell everyone to start. A file costs $6. It’s quiet. You have complete control over angle and pressure. You feel exactly what you’re removing.
The downside: it’s slow and physically tiring if you’re working through a deep nick or a very dull edge. On a blade that’s been neglected for two seasons, a file alone might take 30 minutes of real effort.
Best for: homeowners with one push mower, sharpening once per season.
Angle Grinder Method (Fastest for Most Homeowners)
If you own an angle grinder – and most people who do any home maintenance already have one – this is the method I’d recommend over a file for speed and result quality.
A 40-grit flap disc removes metal fast and creates a clean, consistent bevel. You can sharpen a push mower blade in under five minutes once you know the motion.
The real risk is going too aggressive. A lot of people grip the grinder too hard and press into the blade. Let the disc do the cutting. Light contact, slow passes.
Bench Grinder Method (Best Results, Steeper Learning Curve)
A bench grinder gives you the most control and the cleanest edge – but the learning curve is real. You have to hold a consistent angle by hand, by eye, for the full length of the blade. Mess up the angle and you’ve either created a weak edge or removed too much material.
I’ve used a Rikon 80-805 bench grinder for the last four years. Once you get comfortable with angle and pressure, it’s faster than a file and more accurate than an angle grinder. Worth it if you sharpen 3+ blades per year.
Blade Sharpener Drill Attachment (The Lazy Option – Does It Work?)
Yes, but within limits. The Oregon 28-400 and similar attachments chuck into any drill and have a guide that keeps the angle consistent at a fixed bevel (typically 30 degrees). They work well on moderately dull blades.
They don’t remove material fast enough to work through serious nicks. And the guide wears out after 10-15 uses, which affects angle accuracy.
Honest answer: good for someone who wants a faster alternative to a file, doesn’t own an angle grinder, and mainly needs to touch up a blade that’s not badly dull.
Method Comparison Table
| Method | Cost | Speed | Precision | Best For |
|---|---|---|---|---|
| Hand file | $6 | Slow | High | Beginners, once-a-year sharpening |
| Drill attachment | $15-25 | Medium | Medium | Quick touch-ups |
| Angle grinder | Varies | Fast | Medium-high | Most homeowners |
| Bench grinder | $60-120 | Fast | Excellent | Multiple blades, serious users |
How Sharpening Needs Change by Grass Type and Yard Condition
The grass type in your yard changes how fast a blade dulls – and how sharp it needs to be.
Thick Southern Grasses (Bermuda, St. Augustine, Zoysia)
These grasses are dense and tough-stemmed compared to cool-season varieties. A Bermuda lawn in Georgia or a St. Augustine yard in central Florida will dull a blade faster than a Kentucky bluegrass lawn up north – sometimes twice as fast.
If you’re mowing Bermuda or Zoysia at a low height (under 1.5 inches), which most people do for those grass types, you’re also more likely to clip dirt, rocks, and debris near the soil surface. Plan for every 15-20 hours for southern lawn types.
Cool-Season Grasses (Kentucky Bluegrass, Fescue, Ryegrass)
Fescue and bluegrass are softer-stemmed. A blade sharpened in April can usually carry through a Minnesota or Ohio season – roughly 20-25 hours of mowing – without a mid-season sharpening if you’re mowing at 3-4 inches and not hitting debris.
The exception: if you’re running over dried leaves in fall, you’re running an abrasive over the blade for the whole session. Sharpen before and after heavy leaf season.
Sandy or Rocky Soil That Kills Edges Fast
Sandy soil is an abrasive. If you live near a sandy driveway, a gravel path, or your property has a lot of exposed caliche or rock like parts of the Southwest, your blade is contacting fine abrasive particles with every pass.
I’ve seen blades go dull in 8-10 hours on sandy yards in New Mexico when the same blade would last 25 hours on a Georgia clay-soil lot. If you’re in this situation, check blade sharpness monthly rather than hourly.
Grass and Soil Condition Reference
| Condition | Expected Sharpening Interval |
|---|---|
| Cool-season grass, loam soil | 20-25 hours |
| Southern thick grass, clay soil | 15-20 hours |
| Any grass, sandy/rocky soil | 8-15 hours |
| After any rock or debris strike | Immediately |
Common Mistakes That Ruin Blades (and Lawns)
These are the errors I see constantly. Both of them are easy to avoid.
Sharpening at the Wrong Angle
Filing at too steep an angle (above 45 degrees) creates a thin, weak edge that rolls over after one or two mows. Filing too shallow (under 25 degrees) means you’re removing metal without actually improving the cutting edge.
Match the existing bevel angle. If you can’t see it clearly, the factory standard for most residential blades is 30 degrees. When in doubt, err toward 30-35.
Don’t try to change the bevel angle from what the factory set. If a blade came at 30 degrees and you resharpen it at 45, you’re not improving performance – you’re creating a worse edge that dulls faster.
Skipping the Balance Check
Every time. I mean it. It takes two minutes with a $5 cone balancer and it protects a $40-80 spindle bearing. Unbalanced blades are the most common preventable cause of vibration damage in push mowers.
A blade doesn’t have to be dramatically unbalanced to cause problems. Even a few grams of difference across an 18-inch blade at 3,200 RPM generates enough force to wear bearings prematurely over a season.
Don’t skip it because the blade “looks even.” Look with a balancer, not your eyes.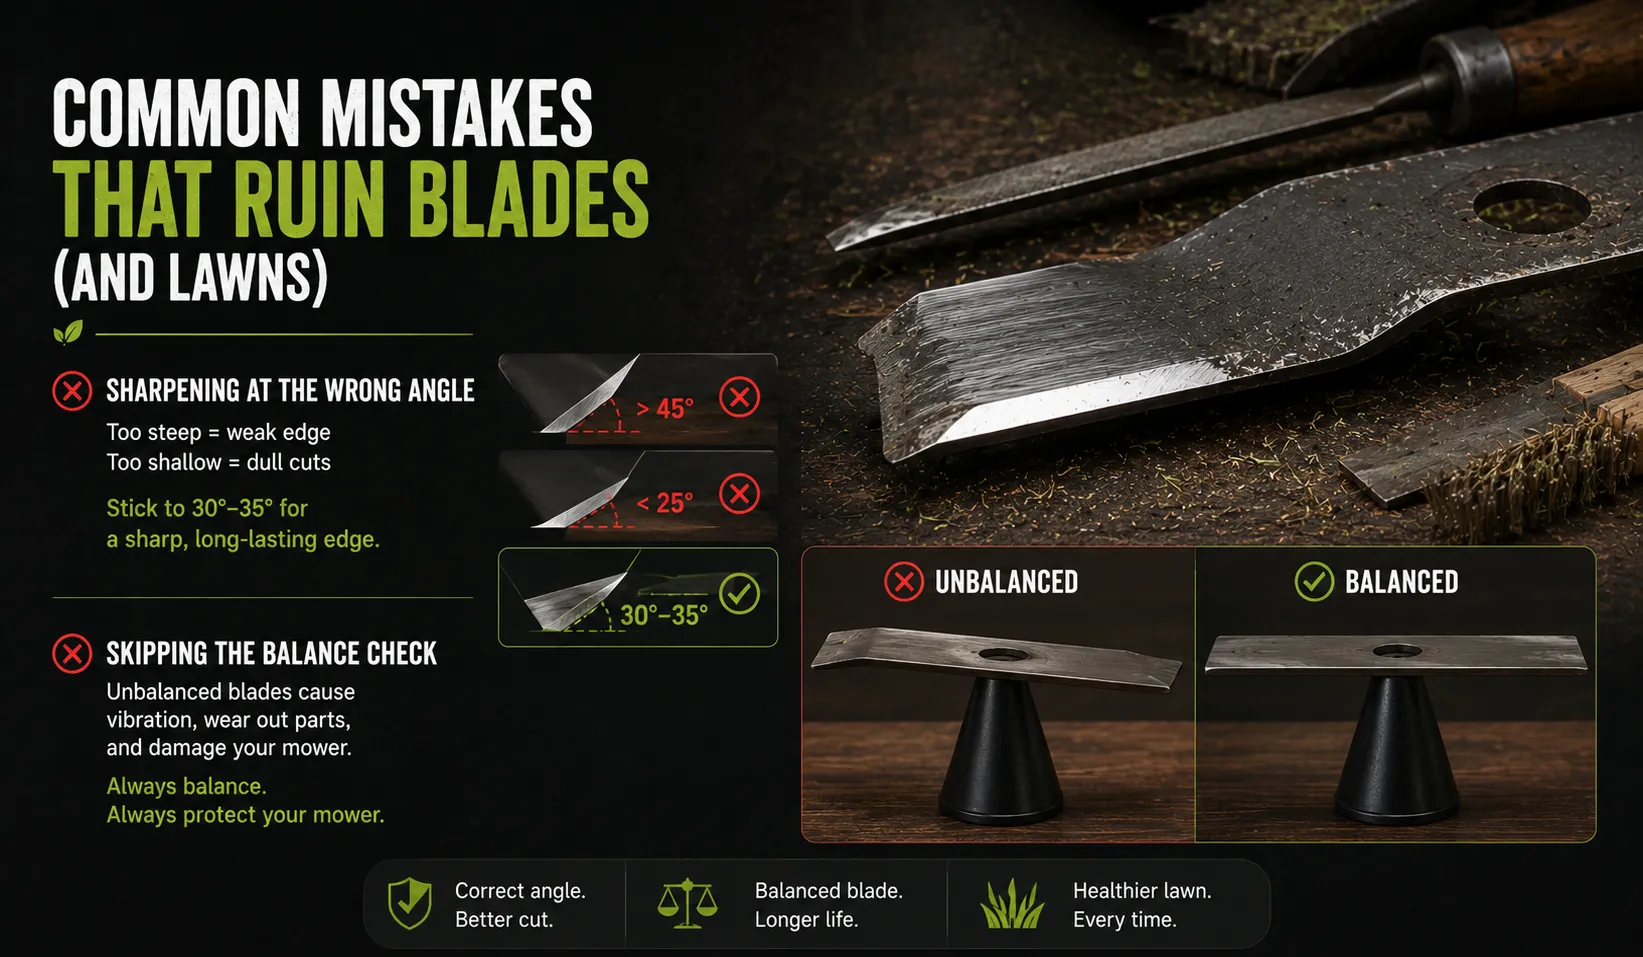
My Final Recommendation
For most homeowners with a single push mower, start with the hand file. Get comfortable with the angle, learn how the bevel should feel, and do it once a season. That’s genuinely enough to keep a Honda or Toro push mower cutting well through a standard suburban lawn.
If you mow a larger yard, sharpen more than once a season, or you already own an angle grinder, use the grinder with a flap disc. It’s faster, the edge quality is good, and once you’ve done it twice it takes less than five minutes.
Know when to replace instead of sharpen. If the blade has a nick deeper than 1/4 inch, a crack anywhere in the body, or you can see the cutting edge is paper-thin from repeated sharpening, buy a new blade. A replacement blade for a push mower runs $15-30. That’s not worth agonizing over. A Husqvarna or EGO replacement blade is cheap insurance compared to what a ruined lawn or damaged spindle costs.
I replace my own blades every two to three seasons regardless of how well I’ve maintained them. Steel fatigues. Edges thin out over many sharpenings. New blades cut cleaner and start in better balance than a blade that’s been sharpened six times.
Pros and Cons Table
| Method | Pros | Cons |
|---|---|---|
| Hand file | Cheap, precise, beginner-friendly | Slow on very dull blades |
| Drill attachment | Easy angle guide, moderate speed | Wears out, limited on deep nicks |
| Angle grinder | Fast, good results, most already own one | Easy to over-grind, creates heat |
| Bench grinder | Best edge quality, consistent | Learning curve, upfront cost |
| Professional sharpening service | No skill required | $10-20 per blade, requires transport |
Frequently Asked Questions About Sharpening Lawn Mower Blades
How often should I sharpen my lawn mower blade?
Sharpen after every 20-25 hours of mowing. For small suburban yards mowed once a week, that’s typically once per season. Mow a larger lot, deal with sandy soil, or run over debris regularly? Sharpen every 10-15 hours.
Can I sharpen a lawn mower blade without removing it?
No. You cannot sharpen a blade accurately or safely while it’s still on the mower. The blade must come off so you can control the angle, clean the surface, and check balance before reinstallation.
What angle should I sharpen a lawn mower blade?
The standard bevel angle for most residential mower blades is 30-35 degrees. Match the factory angle already on the blade – don’t try to change it. Filing at the wrong angle creates a weaker edge that dulls faster.
How do I know if my lawn mower blade needs sharpening?
Your cut grass has ragged, tan or gray tips within 24 hours of mowing. The mower feels like it’s dragging or pushing grass over rather than cutting. You hear a tearing sound rather than a clean cut. Any of these means the blade is due.
Is it better to sharpen or replace a mower blade?
Sharpen if the blade has minor dullness, small nicks under 1/8 inch, and the cutting edge still has enough material. Replace if you see cracks, deep nicks over 1/4 inch, a paper-thin bevel from repeated sharpening, or the blade is bent. Replacement blades cost $15-30 for most push mowers.
What happens if you mow with an unbalanced blade?
An unbalanced blade vibrates at high speed, which puts stress on the spindle shaft and bearings. Over time this causes premature bearing wear, spindle damage, and deck vibration you’ll feel through the handle. Always check balance after sharpening.
Do mulching blades sharpen differently than standard blades?
The main cutting bevel sharpens the same way – same angle, same process. Mulching blades have a curved body and extra cutting surfaces that create lift to re-cut clippings, but none of those secondary surfaces need sharpening. Focus on the primary cutting edge at the tip of the blade.