Quick Overview
- Edging cuts the vertical face of grass where it meets a hard surface or garden bed – mowing alone won’t do this
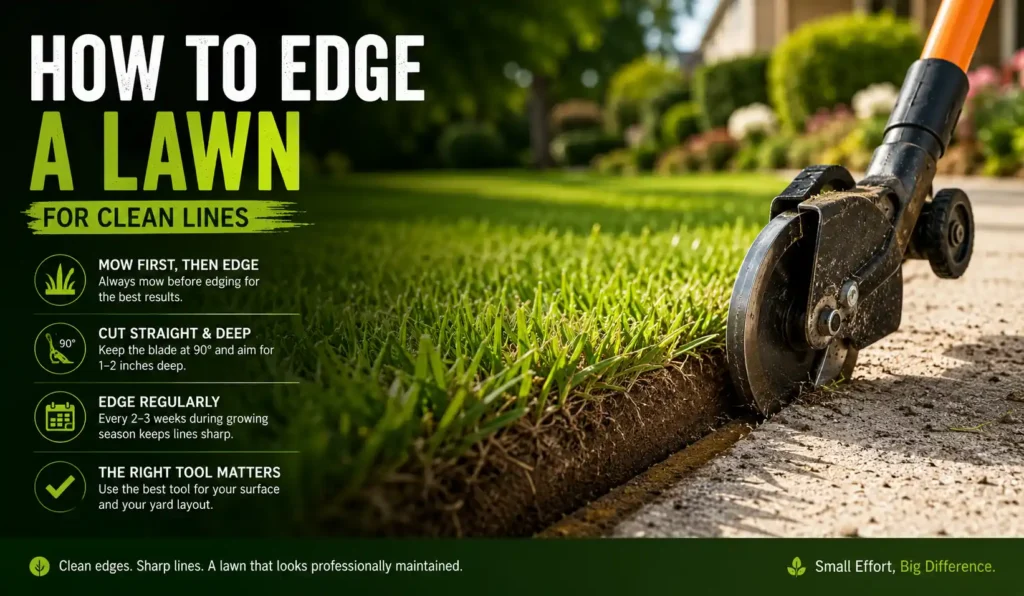
- Always mow first, then edge; it gives you a lower baseline and means one cleanup pass instead of two
- A dedicated lawn edger beats a string trimmer on long concrete runs; a half-moon edger beats both on curved garden beds
- Hold the blade at 90 degrees and aim for a 1-2 inch trench depth to get lines that stay clean longer
- Edge every two to three weeks during the growing season; aggressive spreaders like Bermuda may need weekly attention
Last summer my neighbor knocked on my fence to ask if I’d hired someone. I hadn’t. I’d just edged the day before – something I’d been doing myself for about eight years across three different houses.
That’s what good edging does. A freshly mowed lawn looks fine. A freshly mowed and edged lawn looks like a professional touched it. The difference is that clean, defined border along your sidewalk, driveway, and garden beds.
Learning how to edge a lawn for clean lines takes maybe one afternoon to get right. After that it’s fast, satisfying maintenance. This guide is for anyone who mows their own lawn but keeps getting that scraggly, uneven border – and wants to fix it once, properly.
I’ll walk you through what I do, what tools I’ve tried on different property types, and what actually works on different surfaces. By the end, you’ll be able to do this start to finish with whatever tools you have or plan to buy.
Why Edging Makes or Breaks How Your Lawn Looks
Most people underestimate edging. They mow, they trim, they call it done. The border between grass and hard surface is where the whole yard either comes together or falls apart.
Here’s why that strip matters more than most homeowners realize.
The Difference Between Mowing and Edging
Mowing cuts the top of your grass to a uniform height. Edging cuts the side – the vertical face where grass meets a sidewalk, driveway, or garden bed.
Grass spreads horizontally as it grows. Over weeks it creeps over your sidewalk, into driveway cracks, and over the edge of your flower beds. A mower rolls right over that overhang without touching it. An edger cuts it back clean and leaves a defined vertical wall.
That wall is what gives you the crisp border that makes a lawn look intentional rather than just maintained.
How Often Should You Edge a Lawn?
During active growing season, edge every two to three weeks alongside your regular mow. For aggressive spreaders like Bermuda grass or St. Augustine – common across the South and Southeast – you may need to edge weekly in peak summer. Both spread through stolons just under the soil surface and they move fast.
Cool-season grasses like tall fescue or Kentucky bluegrass spread more slowly. Every three to four weeks is usually enough.
In the off-season, one pass before winter and one at the start of spring is enough to keep your borders from becoming a real project come April.
Tools You Need Before You Start
You don’t need a full shed of equipment to edge well. Picking the right tool for your situation makes a real difference in how the finished line looks – and how long it holds.
Three main categories cover most situations: dedicated lawn edgers, string trimmers used at an angle, and manual edging tools. Each has a genuine place depending on your yard layout and budget.
String Trimmer vs. Dedicated Lawn Edger – Which Is Better?
A dedicated lawn edger has a vertical blade that rolls along a hard surface (sidewalk, driveway, curb) and cuts a straight, consistent trench. Popular options in the US include the WORX WG163, the EGO Power+ EA0800, and the Black+Decker BESTA510. Prices range from about $80 to $200 depending on whether you go corded, battery, or gas.
The results on straight concrete are hard to beat. The blade depth is fixed, the guide wheel keeps you tracking straight, and the cut is clean on the first pass. The limitation: edgers are built for firm, defined edges. They won’t work on curved garden beds or areas without a hard surface to roll against.
A string trimmer turned sideways – held vertically so the string cuts on its edge – gives you more flexibility. You can follow curves, work around trees, and get into corners a wheel-guided edger can’t reach. Most people already own one.
The honest trade-off is that it takes practice to hold a straight line. A shaky hand equals a wobbly edge. For garden beds and irregular borders it’s the better choice. For a long concrete sidewalk, a dedicated edger is faster and more consistent.
Manual Edging Tools: When They Actually Make Sense
A half-moon edger (sometimes called a lawn edging iron or spade edger) is a flat, half-circle blade on a long handle. You push it down with your foot to cut a clean vertical slice through turf.
A rotary edger has a rolling wheel blade you push by hand along the border.
Both are quiet, cheap, and need no power source. I use my half-moon edger around my raised garden beds where I want precise control without the noise or the risk of throwing clippings into the bed. Around tree roots, it also gives me more feel for what’s underground before I push down hard.
The limitation: on longer runs – a 50-foot driveway, say – manual tools are slow and physically tiring. If your whole yard borders concrete on two or three sides, a power tool saves your back.
Comparison Table for Every Tool Type
| Tool | Best For | Avg. Cost | Main Limitation |
|---|---|---|---|
| Dedicated lawn edger | Long concrete sidewalks, driveways | $80-$200 | Only works on hard, straight edges |
| String trimmer (angled vertically) | Curved beds, tree bases, tight spots | $60-$150 | Harder to hold a straight line |
| Half-moon edger | Garden beds, short precise cuts | $20-$40 | Slow on long runs; physically demanding |
| Rotary edger | Light maintenance on already-established edges | $15-$30 | Struggles with thick overhang |
How to Edge a Lawn Step by Step
Good edging is a sequence. Skipping steps is exactly how you end up with an uneven result and wonder where you went wrong.
Here’s the order I follow every single time.
Step 1 – Mow First, Then Edge
Always mow before you edge. Mowing drops the grass height, which makes the overhang along your borders much easier to see and cut accurately.
If you edge first on long grass, you end up cutting twice – once to get the edge, then the mower flattens everything and you realize the border still looks rough. Mow first, edge second. You also only have to clear clippings once that way, which saves real time on larger yards.
Step 2 – Mark Your Edge Line
On an established lawn with a clear existing border, this step is just about finding the line again. Walk the edge and look for where the last clean cut was. That’s your guide.
On a new edge – or an overgrown one you’re resetting – lay a garden hose or a rope along the path you want to cut. This gives you something to track without eyeballing it the whole way.
I did this when I moved into my first house. The previous owners hadn’t edged in years. The grass had crept about four inches over the sidewalk on both sides of the front path. Laying out the hose first saved me from cutting a crooked line I’d have had to live with all season.
Step 3 – Cut the Edge at the Right Angle
For concrete edges (sidewalks, driveways, curbs), keep the blade vertical – 90 degrees to the ground. This creates a clean, straight wall of turf that holds its shape between maintenance sessions.
Tilting the blade outward leaves a sloped edge that looks sloppy and grows back faster because the angled surface gives spreading grass somewhere to creep. Tilting it inward digs under the turf and can destabilize the border entirely.
The trench you’re cutting should be 1 to 2 inches deep. Deep enough to create visible definition, shallow enough not to damage the root system. If your grass is thin or your soil is sandy, stay closer to 1 inch. If you’re dealing with Bermuda or Zoysia spreading aggressively, go to 2 inches – the deeper wall slows the regrowth.
For garden beds, I tilt the blade slightly inward toward the lawn, about 10 to 15 degrees. This creates a gentle bevel that drains water toward the bed rather than letting it pool along the edge.
Step 4 – Clear the Clippings
After cutting, there’s a strip of loose soil and grass clippings sitting in or along the trench. Don’t leave it.
Clippings left in place settle back in, re-root, and your clean edge blurs within a week. I use a stiff broom or a leaf blower on low to sweep them off. On dry days, brushing with my foot works fine for short sections. Bag them or toss them in the compost. Don’t rake them back into the lawn – they’re clumped and wet and won’t break down cleanly at that size.
This five-minute step is the difference between an edge that lasts two weeks and one that lasts four.
Step 5 – Define the Border with a Finishing Pass
Once the trench is cut and the clippings are gone, step back and look at the line. On long runs, small wobbles become visible now that the mess is cleared.
If there are spots where the edge wandered, correct them with a second pass. This is easier with a half-moon edger or a manual tool than going back over with a powered edger – you have more control over short, precise fixes.
On garden beds, I finish with a quick brush along the bed side to clear any soil that shifted onto the mulch. That contrast between dark mulch and the clean grass edge is what makes the border look sharp.
How to Edge Different Surfaces Without Ruining Them
The technique shifts depending on what you’re edging against. Concrete, garden beds, and tree roots each need a slightly different approach.
Edging Along Concrete Sidewalks and Driveways
This is the most common situation, and where a dedicated edger earns its cost fastest.
Run the guide wheel along the concrete while the blade drops into the grass side. Keep your pace slow and steady – about the speed of a relaxed walk. Going faster means the blade can skip or hop over thick overhang.
On older sidewalks where the concrete has heaved or cracked, watch the guide wheel. It can drop into gaps and throw your line off. I slow down near cracks and walk those sections more carefully. On really damaged concrete, I’ll hold the edger lightly by hand through the problem area rather than letting the wheel guide.
Edging Around Garden Beds and Flower Borders
A string trimmer held vertically or a half-moon edger works better here than a wheel-guided power edger.
The goal is to follow the natural curve of the bed. Keep the blade just inside the grass line – don’t go into the mulch or soil. The edge should be a clean wall of turf with no wide gap exposing bare soil.
If you’re establishing a new bed border, lay your hose first to plot the curve, cut in sections, and stand back regularly to check the line. Rushing this is how you end up with a wobbly curve that’s hard to correct without reshaping the whole bed outline.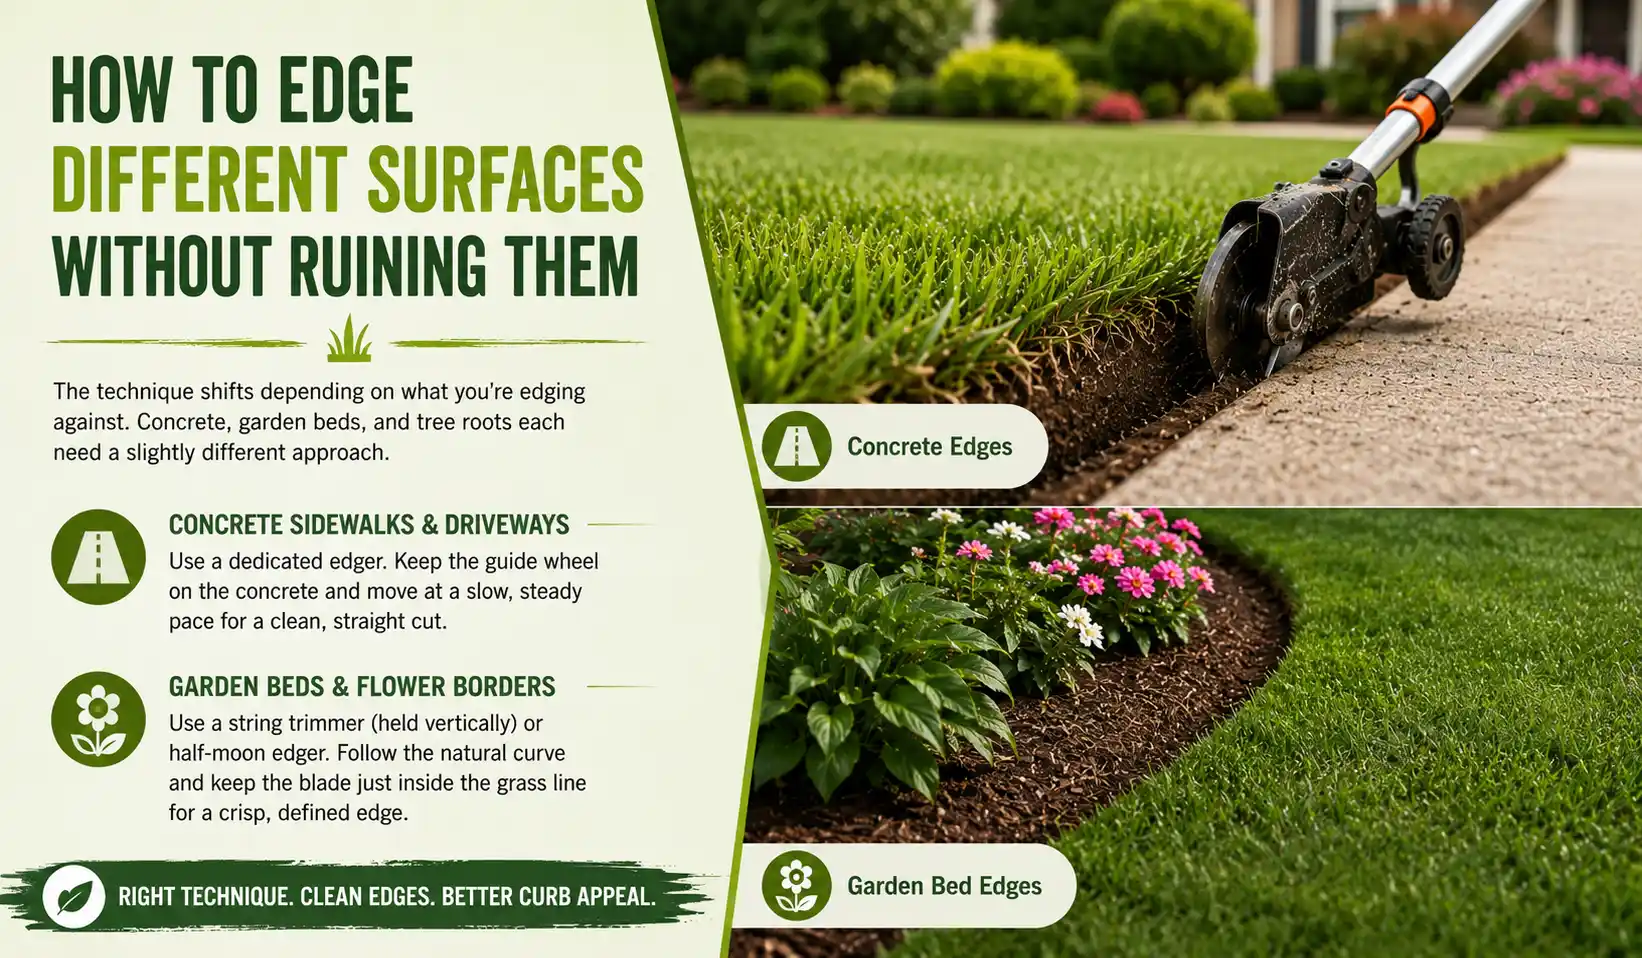
Edging Near Tree Roots and Uneven Ground
Tree roots are where I’ve done the most damage over the years – both to the tools and to the tree.
Keep blades well away from exposed roots. Surface roots from maples, oaks, and similar trees can be nicked by edger blades, and a cut root is an entry point for disease and pests. In these areas I use the half-moon edger and work slowly, feeling for resistance before I push down. If a root is too close to edge safely, I install a plastic or metal lawn border strip instead. It defines the edge without cutting at all.
On uneven ground – sloped lawns, bumpy soil near old driveways – your trench depth will vary. That’s fine. Focus on keeping the vertical cut angle consistent rather than the depth.
Comparison Table by Surface Type
| Surface | Best Tool | Watch Out For |
|---|---|---|
| Concrete sidewalk | Dedicated lawn edger | Heaved or cracked sections |
| Asphalt driveway | Dedicated edger or string trimmer | Soft asphalt in summer heat can chip |
| Garden bed border | String trimmer or half-moon edger | Going too wide; disturbing mulch |
| Near tree roots | Half-moon edger or border strip | Nicking surface roots |
| Sloped or uneven ground | String trimmer | Variable trench depth on inclines |
How to Get Crisp Lines That Last Longer
Getting a clean edge once is straightforward. Keeping it clean through a full growing season is where most DIYers fall short.
The Depth and Angle That Actually Works
One to two inches is the right trench depth for most lawn types. For Bermuda and Zoysia, which spread through stolons just under the surface, go to 2 inches. This makes it harder for the grass to creep back over the border between sessions.
For fescue or bluegrass, 1 to 1.5 inches is enough. Cutting deeper than needed doesn’t add much benefit and leaves the turf more exposed to drying out along the edge in dry summer stretches.
The vertical 90-degree angle is what makes edges look professionally done. A sloped cut fills back in after a week of growth because the angled face gives creeping grass a surface to spread across. A vertical wall holds the shape longer.
How to Fix Ragged or Uneven Edges
If your edges have gotten ragged from skipped maintenance or wobbly past cuts, one good reset session fixes it.
Mow the lawn short first. Lay your guide hose or rope along your intended line. Cut the edge fresh at 90 degrees along that line, even if you’re cutting into soil to get a clean start. Clear everything out completely. After that reset pass, the edge is much easier to keep up with on a regular schedule. The first cleanup session is the time investment. Maintenance after that is quick.
Mistakes That Make Your Edges Look Worse
Most edging problems come from a handful of habits. These are the ones I run into most often.
Going Too Deep on the First Pass
Cutting too deep on an overgrown edge removes too much turf at once and can leave a gap that looks bald rather than sharp. It also weakens the grass along the border, making it more prone to drying out in summer or washing out in heavy rain.
On the first pass over a badly overgrown edge, take it in two cuts. Make a shallow cut first to remove the overhang, then a second pass at full depth for the final trench. You have more control and the finished line is cleaner.
Skipping the Cleanup After Edging
This is the most common mistake. Someone cuts a clean edge, feels good about it, and walks away without clearing the clippings.
Loose grass left in the trench re-roots within days. The edge looks clean for about a week, then the border starts to blur again. Cleanup takes five minutes and makes the edge last twice as long. Don’t skip it.
My Honest Recommendation on Tools and Frequency
If your yard has more than 30 linear feet of concrete border – a standard suburban driveway plus a sidewalk run – buy a dedicated cordless edger. I’ve used the EGO EA0800 for two seasons and it’s held up well. The WORX WG163 is a solid cheaper option if the EGO is outside your budget. Either will pay back the cost in time saved within one growing season.
For garden beds, get a half-moon edger. It costs about $25, lasts for years, and gives you more control on curved edges than any power tool. I use mine roughly once a month on my raised beds. It takes about ten minutes and everything stays sharp.
On frequency: during peak growing season I edge every two to three weeks. My front yard is Bermuda and needs the more frequent schedule. The mixed fescue in back can go three weeks without looking bad. If you’re coming back from badly overgrown edges, block off one afternoon for the reset pass, then start the regular schedule from there. The reset takes real time. Keeping it up after that doesn’t.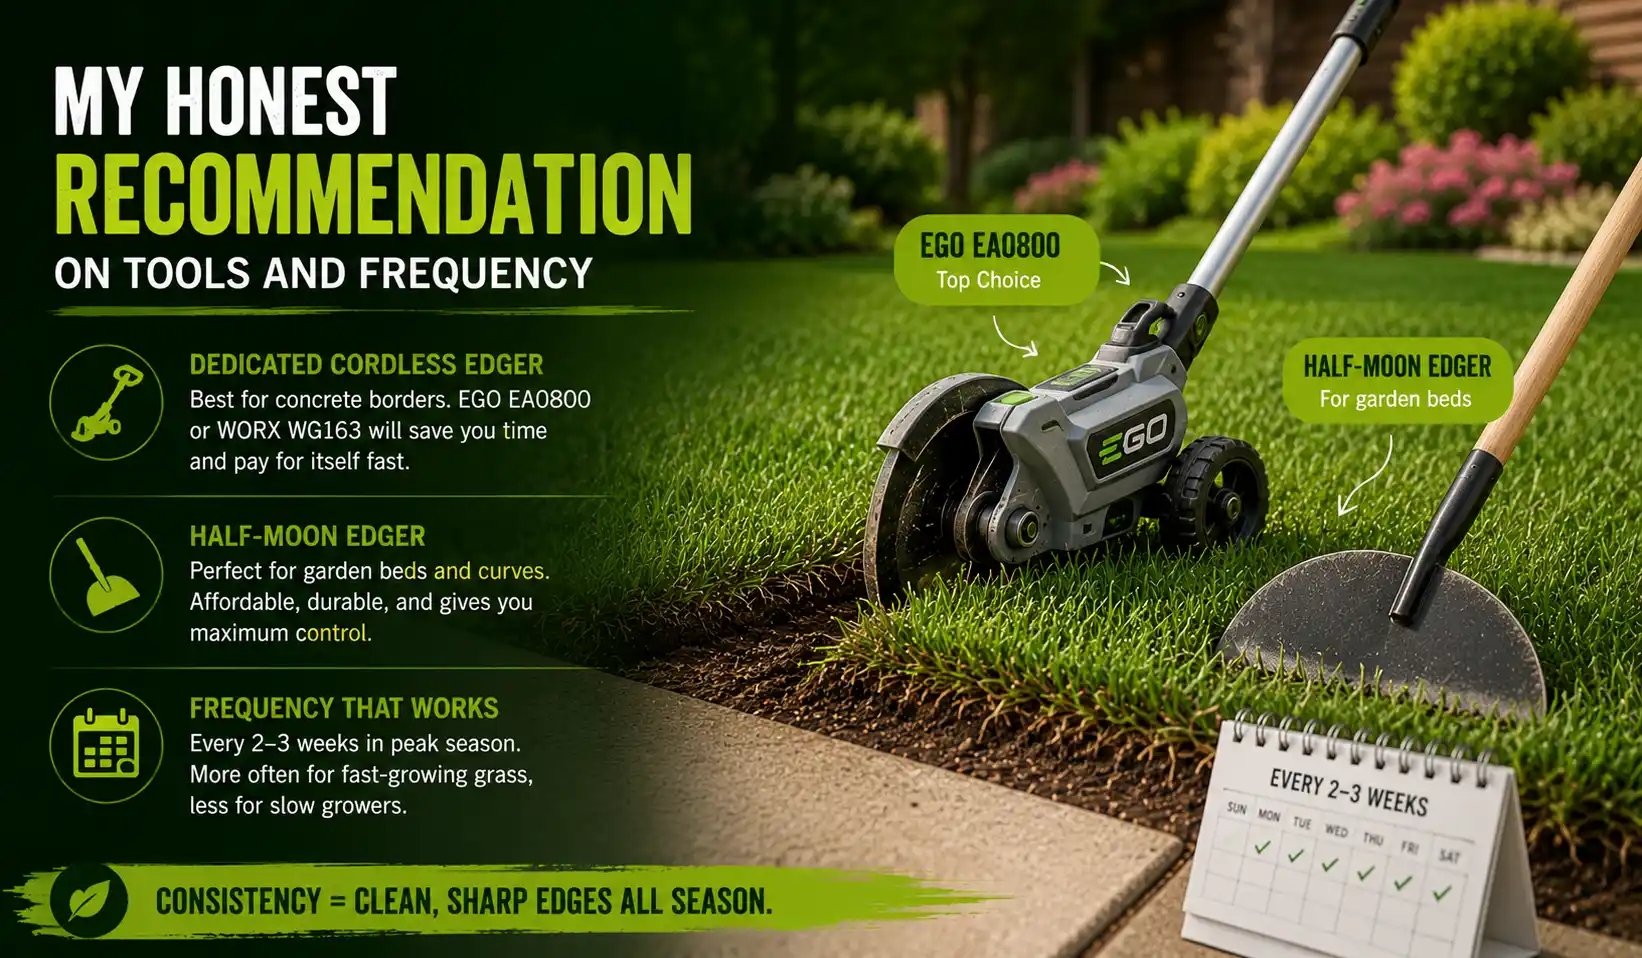
Pros and Cons of Each Edging Approach
| Approach | Pros | Cons |
|---|---|---|
| Dedicated lawn edger | Straight, consistent results; fast on long runs; low learning curve | Higher upfront cost; only works on hard-edged surfaces; single-purpose tool |
| String trimmer (vertical) | Handles curves; you likely already own one; versatile | Harder to hold a straight line; takes practice; less consistent trench depth |
| Manual half-moon edger | Precise control; quiet; no power needed; very cheap | Slow on long runs; physically tiring over large areas |
Frequently Asked Questions About How to Edge a Lawn for Clean Lines
What is the best tool for edging a lawn for clean lines?
A dedicated lawn edger gives the most consistent results along concrete sidewalks and driveways. For curved garden beds, a string trimmer held vertically or a manual half-moon edger works better. Most homeowners benefit from owning a power edger for concrete runs and a half-moon edger for bed borders.
How deep should you cut when edging a lawn?
Cut between 1 and 2 inches deep. For aggressive spreaders like Bermuda or St. Augustine, 2 inches slows regrowth. For cool-season grasses like fescue or bluegrass, 1 to 1.5 inches is enough. Cutting deeper than 2 inches weakens the turf edge without improving the look.
How often should you edge a lawn?
Every two to three weeks during the growing season for most grass types. Bermuda and St. Augustine can need edging weekly in peak summer. Cool-season grasses like tall fescue can typically go three to four weeks between sessions.
Can I edge a lawn without a dedicated edger?
Yes. A string trimmer held vertically at 90 degrees will cut a clean edge, though it takes practice to keep the line straight. A manual half-moon edger also works well for smaller areas or garden bed borders. A dedicated edger just makes the process faster and more consistent on long concrete runs.
What angle should I hold an edger for the best results?
Keep the blade at 90 degrees to the ground – perfectly vertical – for concrete and driveway edges. This creates a vertical wall of turf that holds its shape between sessions. For garden bed borders, a slight inward angle of about 10 to 15 degrees helps water drain into the bed rather than pooling along the edge.
Why do my lawn edges keep going ragged after a week?
Usually because the clippings weren’t cleared after edging. Loose grass left in the trench re-roots quickly and blurs the edge within days. Clear all clippings after every session. If edges still deteriorate even with cleanup, the trench may be too shallow – cutting to a full 2 inches slows regrowth noticeably.