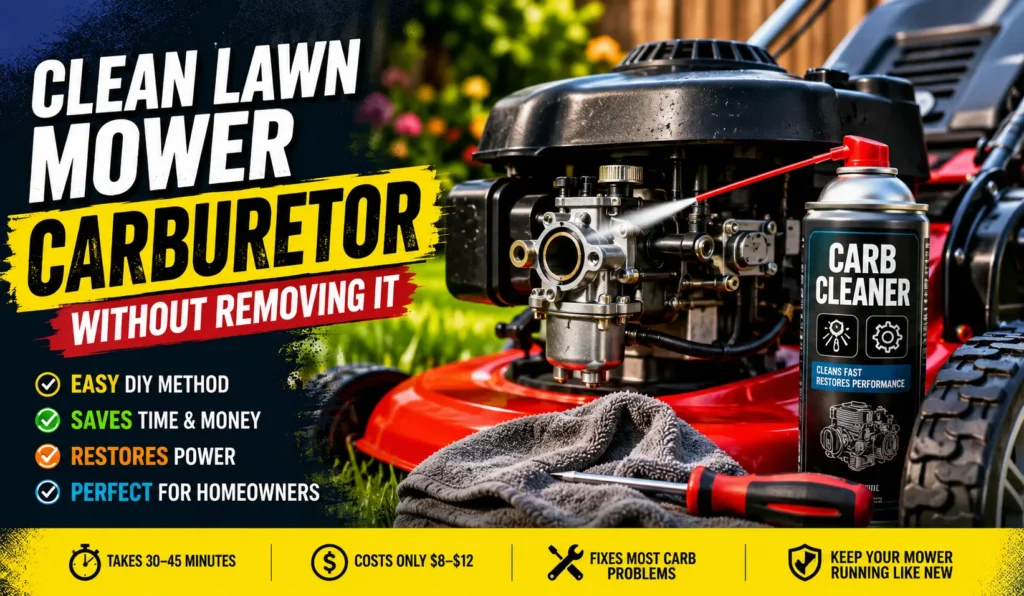
Quick Overview
- You can clean a lawn mower carburetor without removing it – carb cleaner spray does most of the work
- Ethanol-blended gas (E10/E15) is the leading cause of clogged carburetors in stored mowers
- The full process takes 30-45 minutes and costs about $8-12 in supplies
- This method fixes roughly 7 out of 10 carburetor problems on residential push mowers (based on common small engine repair estimates)
- If the mower still surges or dies after two cleaning attempts, a rebuild kit ($10-20) is the next step – not a new mower
My neighbor Dave almost bought a new mower last spring. His Craftsman push mower would crank, run for about 10 seconds, then die. He’d already taken it to a shop once, paid $85, and the same problem came back three months later.
I walked over, popped the air filter cover, sprayed some carb cleaner into the throat of the carburetor, let it run through the system – and the mower idled smooth for the first time in two years. Total time: 22 minutes. Total cost: the $9 can of Gumout I already had in my garage.
That’s how to clean a lawn mower carburetor without removing it. It’s not always a permanent fix, but it’s the right first step every single time. This guide is for homeowners – not mechanics. You don’t need to know what a main jet is to get through this. I’ll explain every part as we go.
Why the Carburetor Gets Dirty in the First Place
The carburetor mixes air and fuel in the right ratio so your engine can run. When it’s dirty or partially blocked, that ratio gets thrown off – and the engine runs badly or not at all. There are two main reasons this happens.
Old or Ethanol-Blended Gas Is the Main Culprit
Most gas sold at US pumps is E10 or E15 – meaning 10% or 15% ethanol blended in. Ethanol absorbs water from the air, and over time it separates from the gasoline and settles at the bottom of the fuel system.
When that fuel sits in a carburetor bowl, the gasoline evaporates and leaves behind a sticky, amber residue called varnish. Varnish builds up on the main jet, the float needle, and the tiny passages inside the carb body. Once those passages are even partially blocked, fuel delivery gets inconsistent.
I once drained the carb bowl on a Honda GCV160 after it sat through a Texas summer in someone’s shed. The fuel that came out looked like dirty motor oil – dark brown and thick. The main jet was almost completely sealed with a varnish plug. That mower hadn’t even been stored for a full year.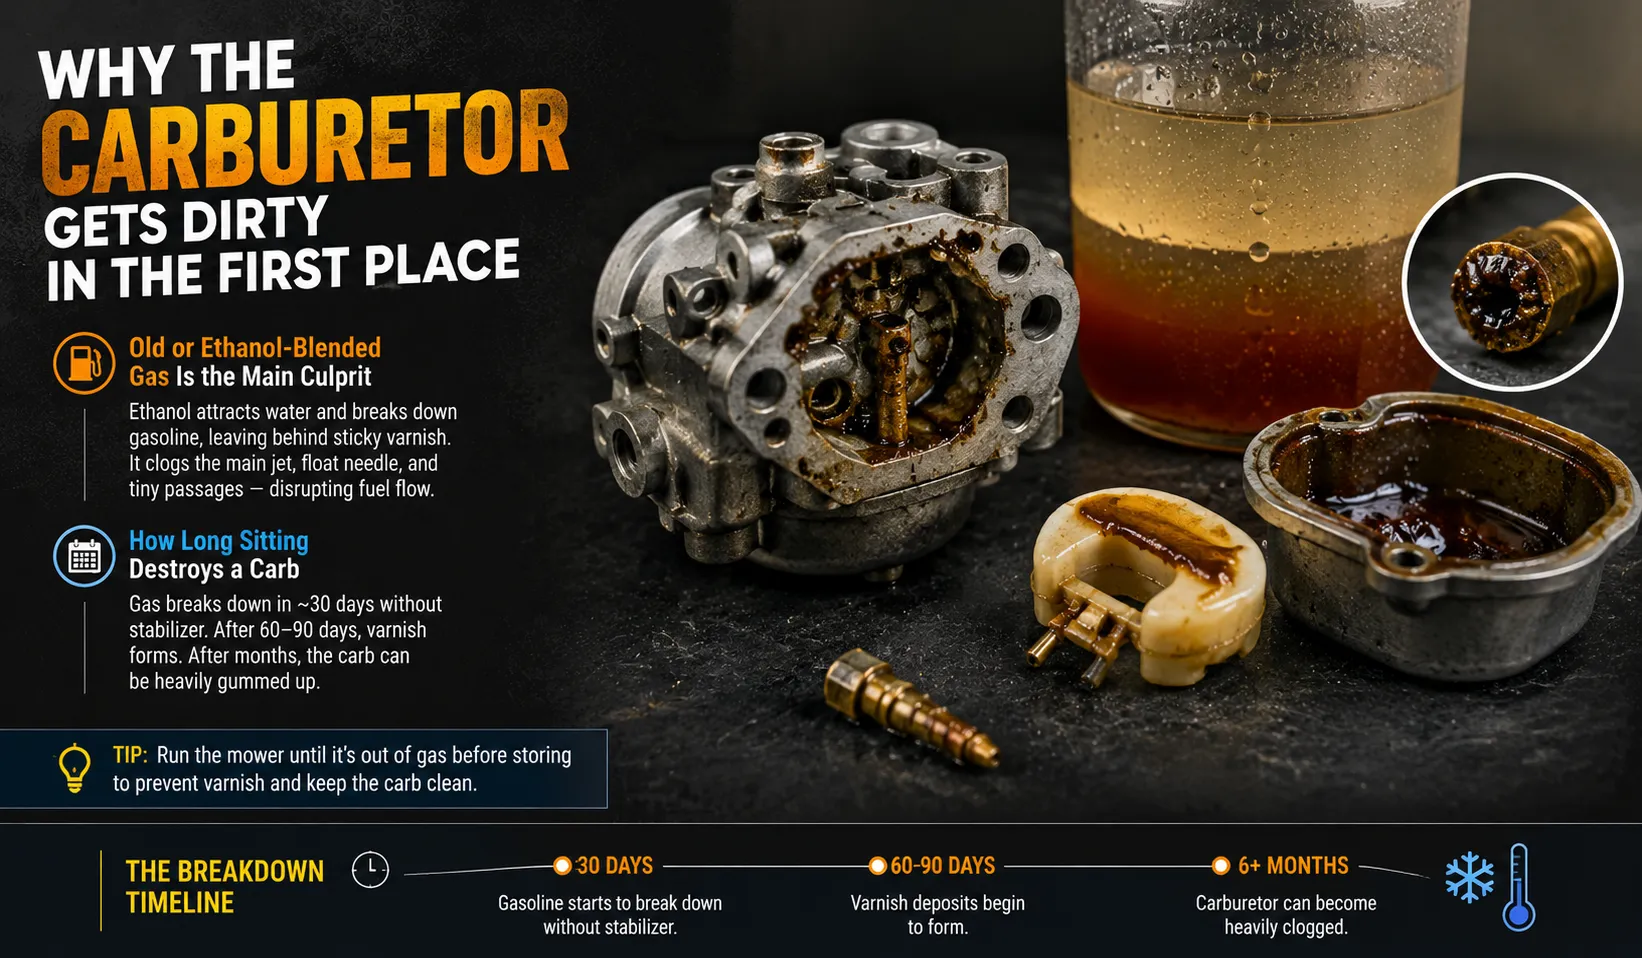
How Long Sitting Destroys a Carb
Gasoline starts breaking down in about 30 days without a stabilizer (Briggs & Stratton, 2023). After 60-90 days, the varnish deposits are already forming. After a full winter in a cold garage – say, six months in Minnesota – the carb can be heavily gummed up.
The problem isn’t cold weather, exactly. It’s the condensation cycle. Temperatures drop, moisture gets into the fuel, and the ethanol pulls it in. When temperatures rise, that water evaporates and leaves mineral deposits behind.
If you run the mower until it’s completely out of gas before storing it, this problem mostly goes away. Most people don’t do that.
Signs Your Carburetor Needs Cleaning (Not Replacing)
Before you go buy a new carb, check whether your symptoms match a dirty carb. Most of the time they do.
It Starts Then Dies
This is the most common carburetor symptom, and it’s exactly what was happening to Dave’s mower. The engine fires up on the fuel sitting in the throat of the carb – then starves out when it tries to draw from the main circuit.
A partially blocked main jet or a stuck float needle can cause this. Both are fixable with a good cleaning.
It Runs Rough or Surges
If the engine hunts – speeding up and slowing down in a rhythmic cycle, like it can’t find a steady idle – that’s usually a lean fuel condition. The carb is letting in too much air relative to fuel because a passage is partially blocked.
Surging sometimes responds to adjusting the idle screw. But if the underlying passage is gummed up, adjusting the screw is just masking the problem. Clean first, adjust after.
It Won’t Start at All
This one gets misdiagnosed as a spark plug problem more often than it should. Yes, check the plug first – it takes 30 seconds. But if the plug looks okay and you’re not getting any response from the engine (not even a brief pop or sputter), a fully blocked carburetor is likely.
Spray a small shot of carb cleaner directly into the carb throat. If the engine fires for a few seconds then dies, the carb is your problem.
What You’ll Need Before You Start
Gather everything before you open anything up. It keeps the job faster and means you’re not leaving a half-disassembled mower on the driveway while you run to the hardware store.
Tools and Supplies List
- Carburetor cleaner spray (more on this below)
- Flathead and Phillips screwdrivers
- A pair of needle-nose pliers
- Clean rags or shop towels
- Small wire or a carb cleaning tool (a twist tie works)
- Safety glasses
- Nitrile gloves
- A small container to catch fuel drips
You don’t need a torque wrench. You don’t need anything special. This is all hardware-store stuff.
Safety Steps You Shouldn’t Skip
Work in a well-ventilated area – outdoors is best. Carb cleaner is highly flammable and the fumes build up fast in an enclosed garage. Keep all flames and ignition sources away.
Disconnect the spark plug wire before you touch anything inside the engine area. It takes three seconds, and it prevents the mower from starting accidentally while your hands are near the blade or throttle linkage.
Let the engine cool completely before you start if it’s been running recently. Fuel on a hot engine is a fire hazard.
Carb Cleaner Products Compared
| Product | Best Use | Spray Force | Plastic-Safe | Price (approx.) |
|---|---|---|---|---|
| Gumout Carb & Choke Cleaner | General cleaning, light to moderate varnish | Strong | No – keep off plastic | ~$8 |
| WD-40 Specialist Carb Cleaner | Light deposits, everyday maintenance | Moderate | Yes | ~$9 |
| Berryman B-12 Chemtool | Heavy varnish, stuck jets, long-term storage damage | Very strong | No | ~$10 |
| CRC Carb & Choke Cleaner | General use, good for choke plates | Strong | No | ~$8 |
For most residential mowers with one season of neglect, Gumout or WD-40 Specialist is enough. If the mower sat for two or more years, reach for Berryman B-12 – it’s the strongest solvent of the four.
How to Clean a Lawn Mower Carburetor Without Removing It – Step by Step
This process works on most single-cylinder push mowers and riding mowers with Briggs & Stratton, Honda, or Kawasaki engines. The layout varies slightly by model, but the core steps are the same.
After each step, I’ll note what you’re looking for and what a normal result looks like.
Step 1 – Locate and Access the Carburetor
On a standard push mower, the carburetor sits directly behind the air filter housing – which is usually the plastic box on the side of the engine. On a riding mower, you may need to remove a panel or side cover to reach it.
Look for the air filter cover (usually held by one to two screws or a wing nut). Remove it. Behind the foam or paper air filter, you’ll see either a square or round carburetor body with a throttle linkage connected to it.
If you can reach the carb throat (the opening where air enters), you’re in the right position. That’s all you need for the first cleaning pass.
Step 2 – Remove the Air Filter and Housing
Take out the air filter and set it aside. Check it while it’s in your hands – if it’s gray with dirt or clogged with debris, replace it before you do anything else. A blocked air filter causes the same symptoms as a dirty carb, and people mix them up constantly.
If the foam filter just looks dusty, tap it against your shoe to knock out loose dirt. Don’t use compressed air on a foam filter – it tears the foam. A paper filter that’s gray or discolored needs to go in the trash.
With the housing off and the filter removed, you now have clear access to the throat of the carburetor.
Step 3 – Spray Carb Cleaner Into the Throat
Here’s the main cleaning step. With the engine off and cooled, spray a 2-3 second burst of carb cleaner directly into the carburetor throat – the opening you’re looking into from the front.
The cleaner soaks through and starts dissolving varnish deposits on the main jet, the throttle plate, and the internal passages. You’ll see the cleaner dripping through to the bottom.
Wait two minutes. Then try to start the mower. It may start briefly, run roughly, and produce some white smoke – that’s the cleaner burning off. That’s normal.
Spray a second burst into the throat while the engine is running (if it starts). Hold the can 4-6 inches away. The running engine pulls the cleaner through the fuel system and into passages you can’t reach directly.
Repeat this two to three times, letting the engine run between passes.
Step 4 – Clean the Choke Plate and Throttle Linkage
With the engine back off, look inside the carb throat again. You’ll see a small plate – the choke plate – that opens and closes when you move the choke lever. It should open and close smoothly.
If it’s sticky or slow, spray carb cleaner directly on the choke plate hinge and the throttle plate linkage (the thin rod connected to the throttle). Work each one by hand so the cleaner gets into the pivot points.
Wipe off any residue with a clean rag. Move the linkage back and forth several times to distribute the cleaner into the hinge.
Step 5 – Run the Engine and Flush It Through
Now reconnect the spark plug wire and start the mower. Let it run for five full minutes if it stays running.
What you’re listening for: a smooth, even idle that doesn’t hunt or surge. What you’re watching for: any black smoke (rich mixture) or white smoke that persists beyond the first 30 seconds.
If the engine surges for a minute then smooths out – that’s the cleaner working through the system. Let it run.
If it starts then dies again within 10-15 seconds, do one more pass with the carb cleaner, this time through both the throat and the air intake with the engine running.
Step 6 – Reassemble and Test
Put the air filter back in (or install the new one you just noticed it needed). Reinstall the air filter housing and snug the screws back down – don’t overtighten plastic housings.
Run the mower at full throttle for three to five minutes. Cut a patch of grass if you can – loading the engine under real working conditions is the best test of whether the cleaning worked.
If the idle is steady and the engine handles throttle changes without stumbling, you’re done.
How to Clean Specific Parts Without Full Removal
Sometimes the main pass isn’t enough and you need to get a little more specific. You can still do this without pulling the whole carb off the engine.
Cleaning the Bowl and Needle Valve From the Bottom
The carburetor bowl is the small cup at the bottom of the carb body – it holds a small reservoir of fuel. It’s usually held on by a single bolt in the center.
Place a rag under the carb to catch fuel. Loosen that bolt slowly – fuel will drip out. Once the bowl is off (it just drops down on the bolt), you can spray carb cleaner directly into the bowl seat and the exposed float needle area.
The float needle controls fuel flow into the bowl. If it’s stuck open, the engine floods. If it’s stuck closed, it starves. Spray cleaner around the needle seat and move it gently with your finger – it should float freely.
Wipe the bowl clean, reinstall it, and snug the bolt back down. Don’t cross-thread it.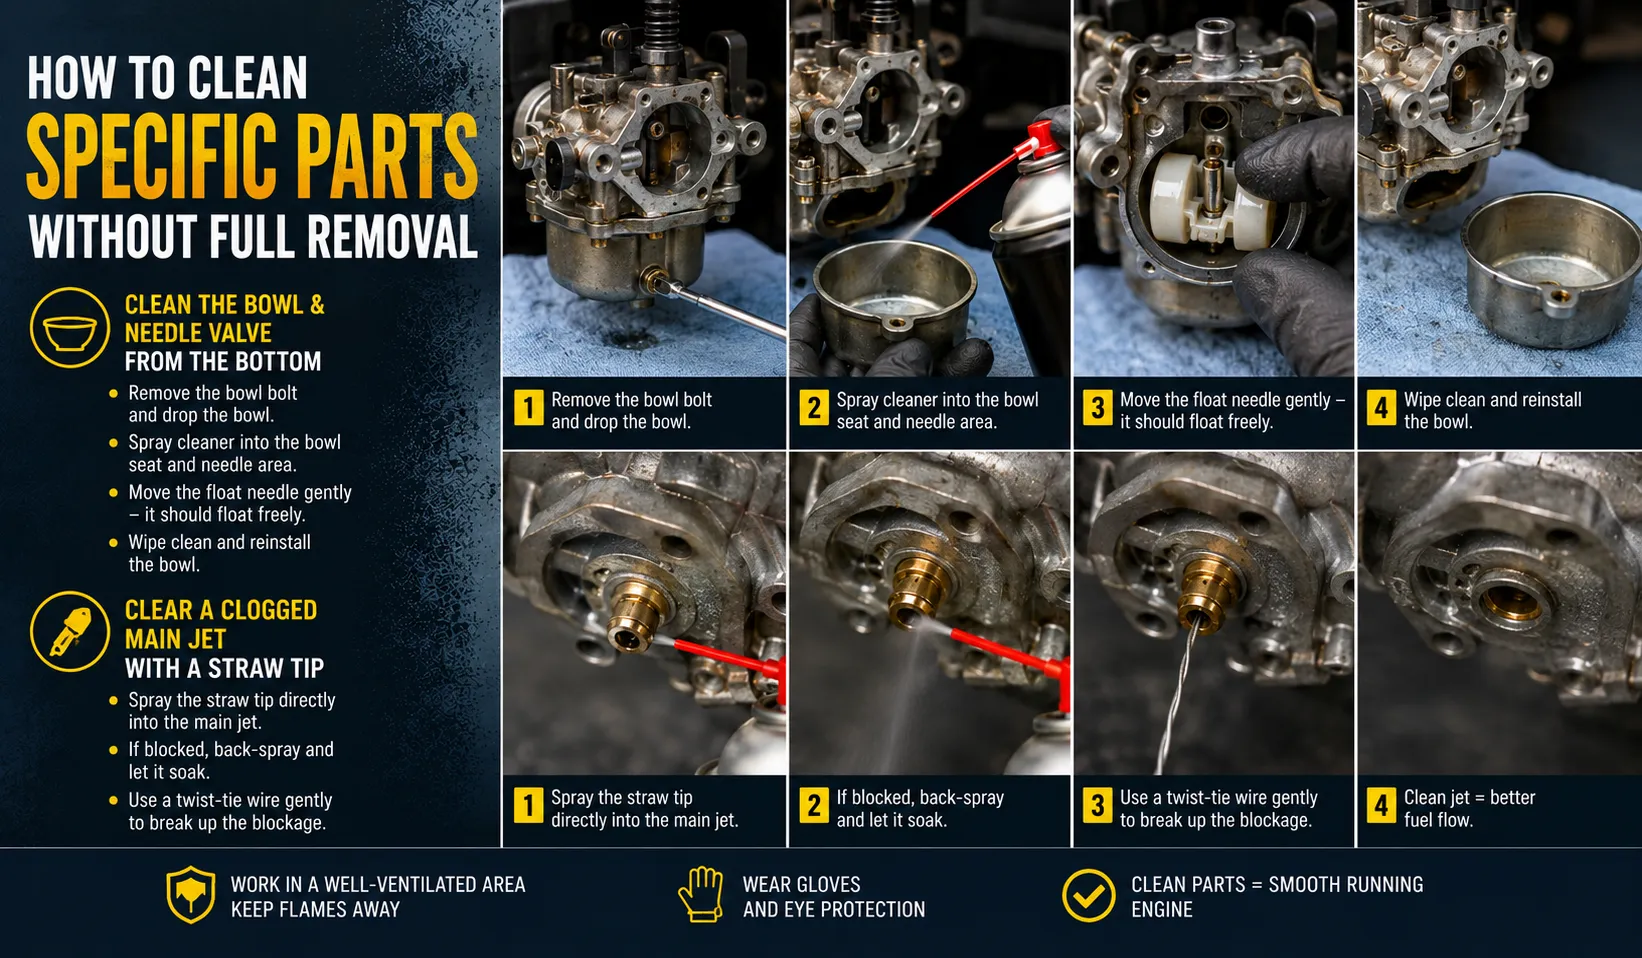
Clearing a Clogged Main Jet With a Straw Tip
Most carb cleaner cans come with a thin red straw. Use it.
The main jet is a small brass fitting with a tiny drilled hole – usually visible once the bowl is off, threaded into the bottom of the carb body. Spray the straw tip directly into the jet hole and give a two-second burst.
If the jet is blocked, you’ll see the cleaner struggle to pass through. Back-spray with the straw, let it soak for a minute, then spray again. A standard twist-tie wire (without the paper coating) is thin enough to pass through the jet hole to physically break up the blockage – use it gently, you’re not drilling, just poking.
When Each Method Works Best
| Symptom | Best Method | Expected Result |
|---|---|---|
| Starts then dies – light varnish | Throat spray + run through | Fixed in one session |
| Surging at idle | Throat spray + idle screw adjustment | Improved after 2-3 passes |
| Won’t start at all | Bowl removal + main jet cleaning | Fixed if jet was blocked |
| Floods / always runs rich | Float needle check + bowl clean | Fixed if needle was stuck open |
| Long-term storage (2+ years) | All of the above + Berryman B-12 | May need full rebuild after |
Mistakes That Make It Worse
I’ve seen people turn a 30-minute fix into a two-hour headache. Here’s what to avoid.
Using Too Much Carb Cleaner at Once
More is not better. A long blast of carb cleaner can hydraulic-lock the engine – that means liquid fills the cylinder and the engine won’t turn over at all.
Use short 2-3 second bursts. Wait for the cleaner to drain before you try to start the engine. If you hear a heavy, wet cranking sound when you pull the cord, stop – pull the spark plug out and let the cylinder drain before trying again.
Skipping the Air Filter Check
This happens constantly. Someone cleans the carb, the mower still runs rough, and they assume the cleaning failed. Then I show up, pull the air filter, and it’s completely clogged with debris.
A choked air filter causes rich running conditions, rough idle, and hard starting – exactly the same symptoms as a dirty carb. Always check the filter first.
Forgetting to Drain Old Gas First
If the mower has old gas in the tank – anything sitting more than 60 days without stabilizer – that old gas will immediately re-varnish your freshly cleaned carb.
Drain the tank into an approved container before you clean the carb. Then add fresh gas. If you want to protect it for next season, add a fuel stabilizer (Sta-Bil or Sea Foam) and run the engine for two minutes to get the stabilizer through the fuel system.
When Cleaning Won’t Fix It – And What To Do Next
I’ll be straight with you: the no-removal method has real limits.
If the main jet has a hard deposit that won’t dissolve with solvent – sometimes you get calcified mineral buildup, not just varnish – you need to remove the carb and clean the jet mechanically. That’s a 45-minute job with a rebuild kit, and it’s still well within what a homeowner can do.
If the float is cracked or the float needle seat is worn, no amount of cleaner fixes that. A rebuild kit for a Briggs & Stratton 550EX runs about $12 on Amazon and comes with every replaceable internal part. The repair is straightforward once the carb is off the engine.
And sometimes – maybe one mower in ten – the carb body itself is cracked or corroded beyond repair. At that point, a new OEM carb for a common Briggs & Stratton or Honda engine costs $15-35. That’s the right call when everything else checks out and the mower still won’t run right.
The rule I use: clean it once with the method above, rebuild it if that doesn’t work, replace it only if the carb body is physically damaged. You’ll almost never need to replace the whole mower over a carburetor issue.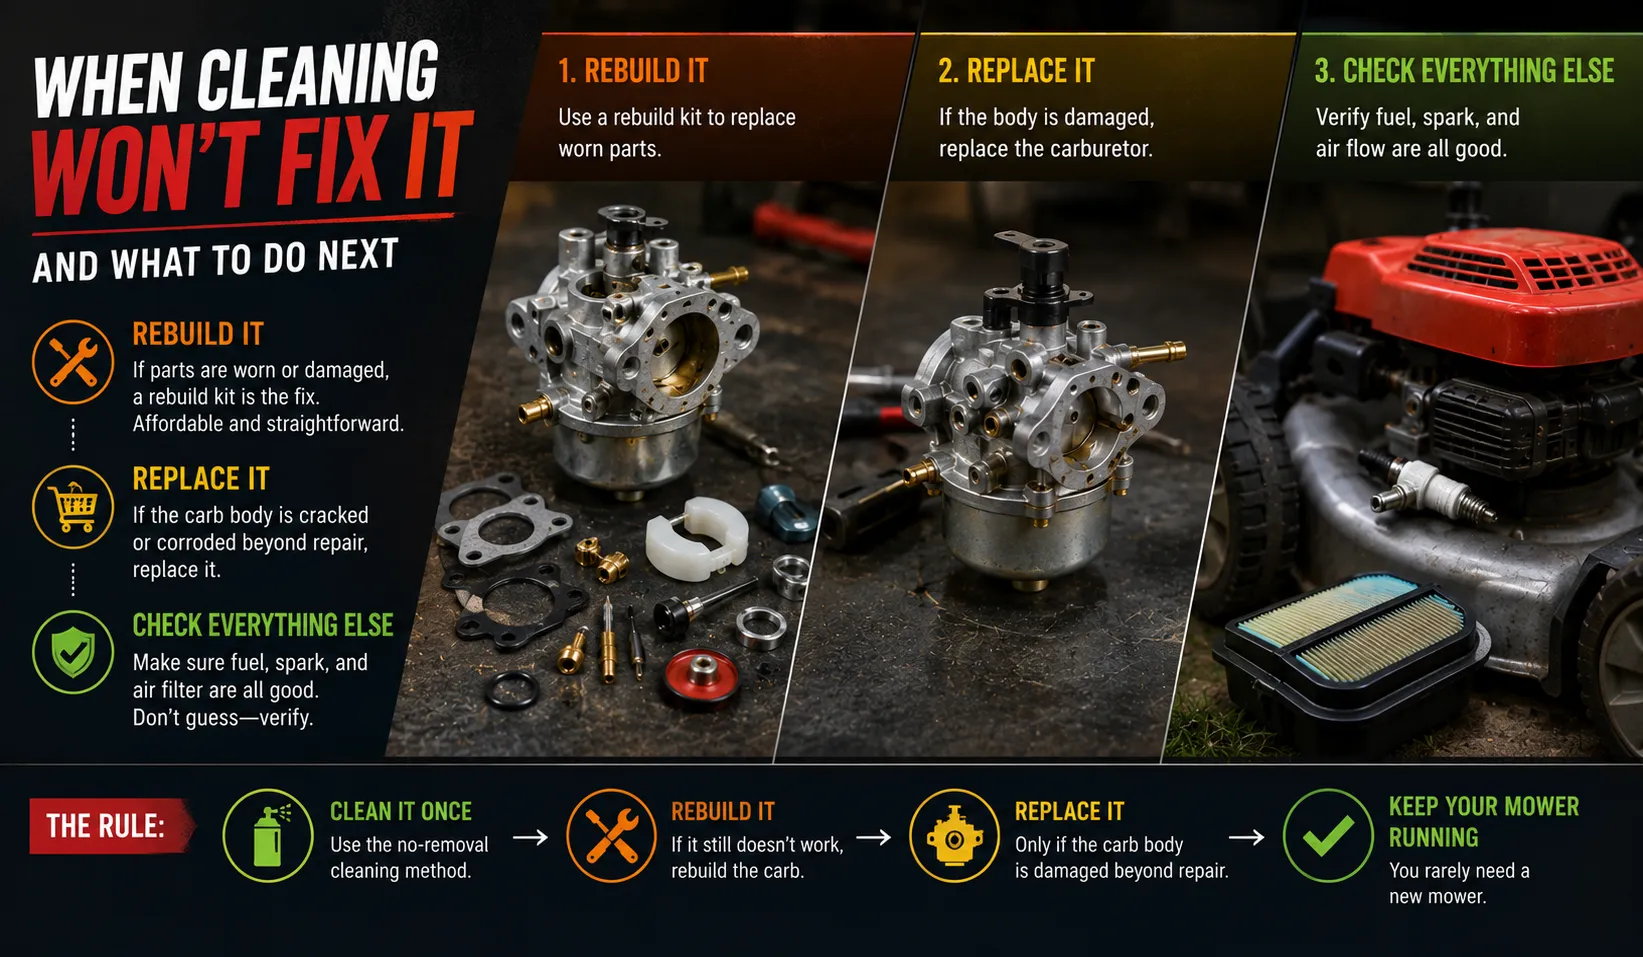
Cleaning Without Removal vs. Full Removal and Rebuild
| Factor | Clean Without Removing | Full Removal and Rebuild |
|---|---|---|
| Time required | 30-45 minutes | 60-90 minutes |
| Skill level needed | Beginner | Beginner-intermediate |
| Cost | $8-12 (cleaner only) | $10-25 (rebuild kit) |
| Fixes varnish deposits | Yes, in most cases | Yes, completely |
| Fixes worn needle valve | No | Yes |
| Fixes cracked float | No | Yes |
| Fixes blocked jet (hard deposits) | Sometimes | Yes |
| Best for | One or two seasons of neglect | Long-term storage, persistent issues |
Frequently Asked Questions About Cleaning a Lawn Mower Carburetor
Can I clean a lawn mower carburetor without removing it?
Yes. Spraying carb cleaner directly into the carburetor throat – with the air filter removed – dissolves varnish and clears partially blocked passages without taking the carb off the engine. This works for most residential mowers with one to two seasons of neglect.
How long does it take to clean a carburetor without removing it?
The process takes 30-45 minutes from start to finish, including prep and the post-cleaning run time. If you need to clean the bowl and main jet separately, add another 15 minutes.
What is the best carb cleaner for a lawn mower?
Berryman B-12 Chemtool is the strongest for heavy varnish from long-term storage. For routine cleaning after one season, Gumout Carb and Choke Cleaner is effective and widely available. WD-40 Specialist Carb Cleaner is a safe option when plastic components are nearby.
Why does my lawn mower start then die after cleaning the carburetor?
If the mower still starts and dies after cleaning, the main jet may have a hard deposit that solvent alone didn’t clear. Remove the carb bowl and spray cleaner directly through the jet, or use a thin wire to clear the passage. If that still doesn’t hold, a full rebuild kit is the next step.
How do I prevent the carburetor from getting dirty again?
Two things: use a fuel stabilizer (Sta-Bil or Sea Foam) whenever you store the mower for more than 30 days, and run the engine dry before long-term storage by letting it run until it shuts off from fuel starvation. These two habits eliminate about 90% of carburetor problems.
Does Sea Foam clean a lawn mower carburetor?
Sea Foam added to the gas tank will help dissolve light deposits over several uses – but it won’t clear an already-blocked jet the way direct carb cleaner spray will. Use Sea Foam as a preventative maintenance additive, and reach for carb cleaner spray when you already have a problem.
When should I replace the carburetor instead of cleaning it?
Replace the carburetor if the body is physically cracked or corroded, if the throttle shaft bore is worn to the point of creating an air leak, or if the mower still runs poorly after a full carb cleaning and rebuild. For common engines like the Briggs & Stratton 550EX or Honda GCV160, replacement carbs cost $15-35 and are a straightforward swap.