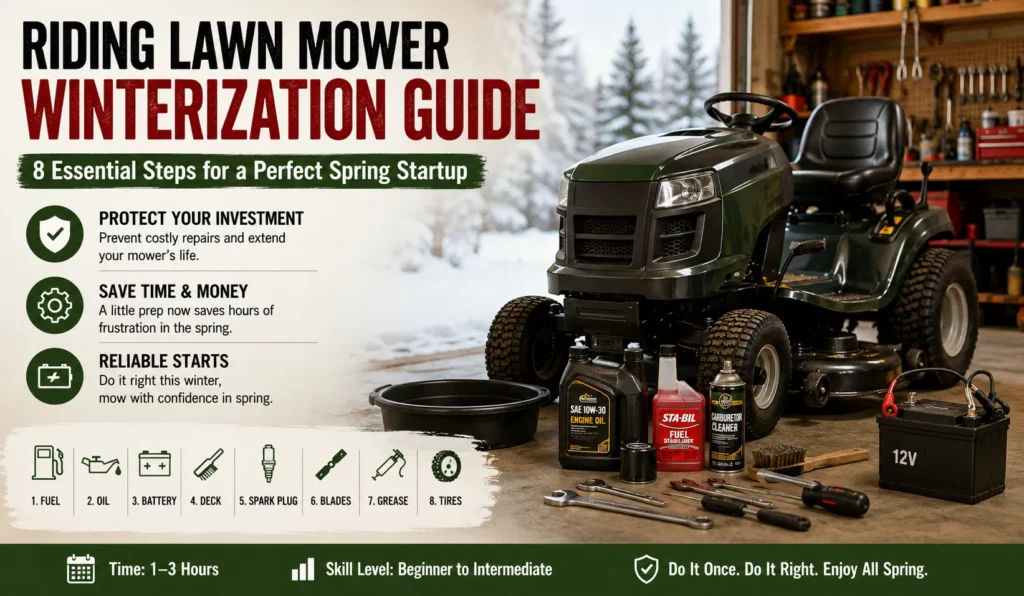
Quick Overview
- Winterizing a riding lawn mower takes 1-3 hours and can save you hundreds in spring repairs.
- The two biggest mistakes are skipping the oil change and leaving old fuel in the tank or carburetor.
- Ethanol-blended fuel (E10 common across most US states) breaks down in 30 days and destroys carburetors if left sitting all winter.
- Battery removal or a trickle charger is not optional in cold states – a dead battery is the #1 spring startup failure.
- This guide covers all 8 winterization steps with exact tools, times, and difficulty ratings.
Why Winterizing Actually Matters (I Learned the Hard Way)
I’ll be honest – I skipped winterization once. Just once. Spring came, I pulled the cord on my Craftsman T210, and nothing. Dead battery, gummed carburetor, oil that looked like mud.
That repair bill came to $340. The full winterization I skipped would have taken two hours and cost about $30 in supplies.
That was my last shortcut.
What Happens If You Skip It
Old fuel is the real killer here. Gasoline starts breaking down in 30 days (STA-BIL, 2023). Over a six-month winter, it leaves a sticky varnish inside the carburetor. That varnish clogs the tiny jets. Your engine won’t start, or it runs rough and dies after 30 seconds.
Beyond fuel, sitting oil turns acidic over winter. It eats away at engine seals and cylinder walls. A battery left in a cold garage loses charge every week and can freeze and crack if it drops below about 32°F with a low charge.
Tire pressure drops too – roughly 1 PSI per 10-degree temperature drop (Tire Rack, 2022). Flat-spotted tires by spring are common if you don’t check pressure before storage.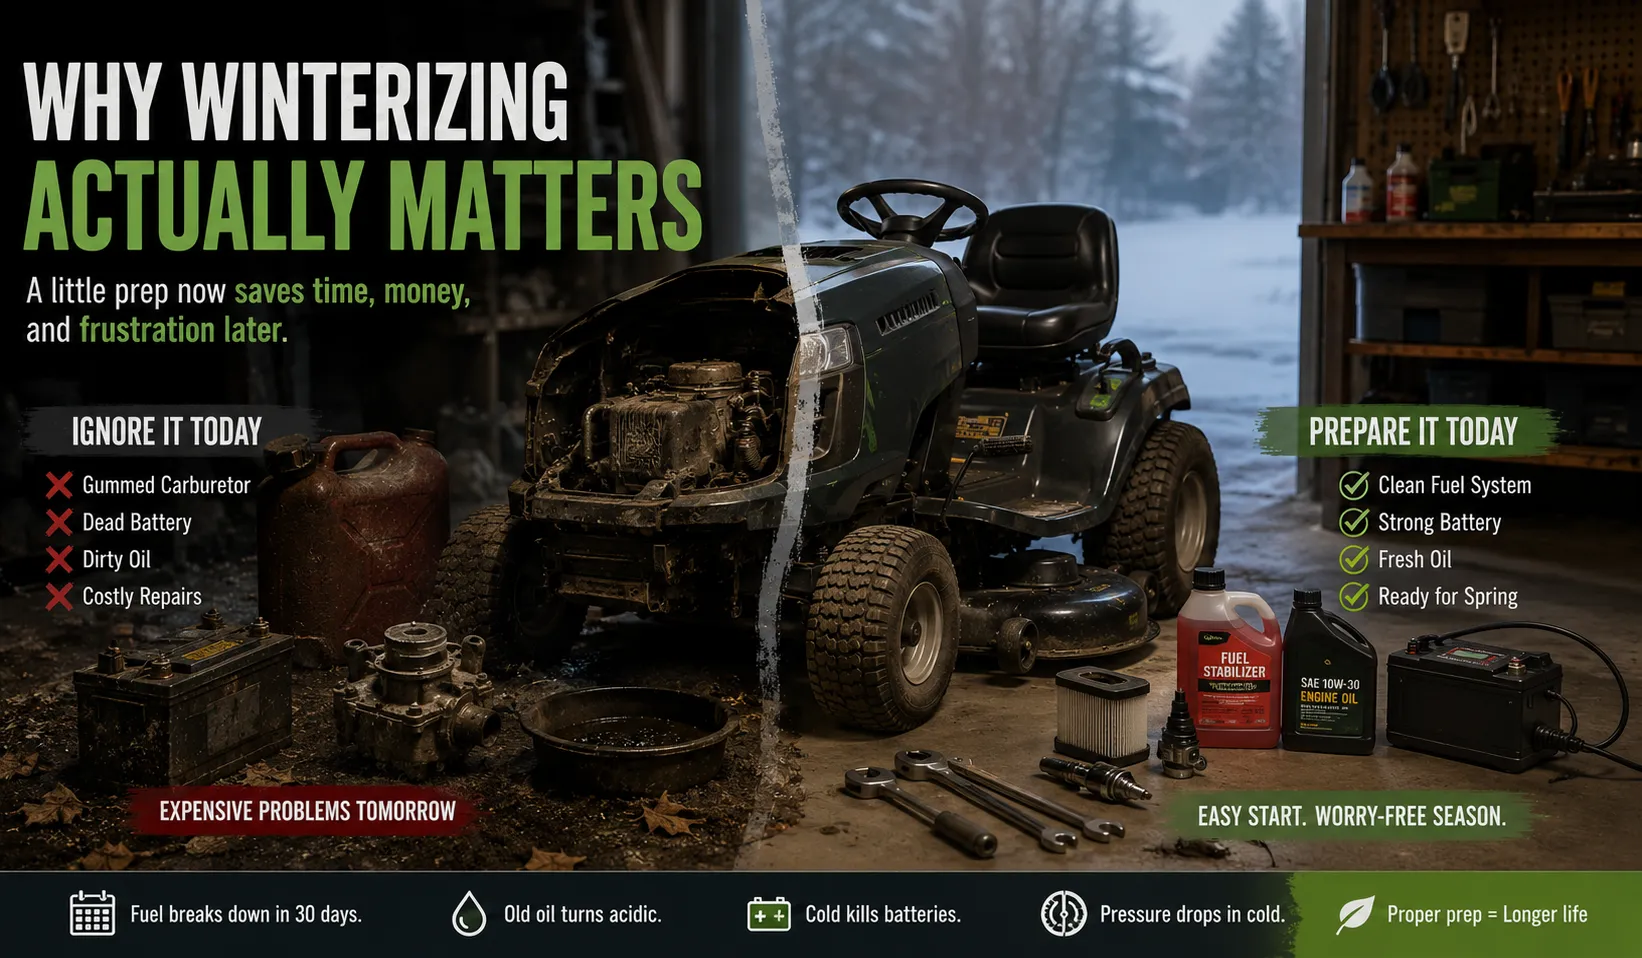
How One Winter Ruined My Old Mower
My neighbor Dave in Woodbury, Minnesota had a John Deere E130 for eight years without a single issue. He got busy one fall and left it as-is in an unheated garage. The fuel was E10 from a local gas station.
By April, the carburetor was toast. The rebuild kit cost $85, and after three failed attempts to clean it himself, he paid a shop $210 in labor. He sold the mower that summer, frustrated with it.
The mower was fine. The carburetor just needed 90 minutes of proper winterization to survive.
What You’ll Need Before You Start
Gathering everything before you start saves at least one annoyed trip to the garage mid-task. Here is the full list.
Tools and Supplies Checklist
Fluids and chemicals:
- Fresh engine oil (check your manual – most riding mowers use SAE 10W-30)
- Fuel stabilizer (STA-BIL or Sea Foam are both solid options)
- Carburetor cleaner spray
Tools:
- Socket wrench set and an oil drain pan
- Spark plug socket (usually 5/8″ or 13/16″)
- Wire brush and a stiff deck brush
- Blade removal tool or a torque wrench
- Grease gun with multi-purpose grease
Battery and storage items:
- Battery tender or trickle charger (Battery Tender Junior is the one I use)
- Jack stands or a mower lift if you want to do the blades safely
- Tire pressure gauge
How Long the Whole Process Takes
Plan for two hours if you have everything ready and the mower is in decent shape. Add another 30-45 minutes if the deck is caked in grass or the blades need sharpening instead of just removal.
I usually do it on a Saturday afternoon in late October. The garage is still warm enough to work in, and the oil drains faster when the engine is warm.
How to Winterize a Riding Lawn Mower – Step by Step
Before anything else, run the mower for 5-10 minutes. Warm oil drains faster and cleaner. Do this in the driveway, not an enclosed space.
Step 1 – Run Down or Stabilize the Fuel
You have two options here. Pick one based on how much fuel is in the tank.
Option A – Add fuel stabilizer: If the tank is more than half full, add fuel stabilizer at the ratio on the bottle (usually 1 oz per 2.5 gallons). Then run the mower for 10 minutes so the stabilized fuel reaches the carburetor. This is the easier option for most people.
Option B – Run the tank dry: If the tank is low, just run it until it stalls. Then crank it a few more times to pull any remaining fuel out of the carburetor bowl. This is what I do when I have less than a quarter tank left.
Do NOT leave untreated fuel in the tank over winter. That is the single step that causes the most spring failures.
Step 2 – Change the Oil While It’s Warm
Warm oil drains in 2-3 minutes. Cold oil takes 10-15 minutes and leaves more residue.
Place your drain pan under the mower, remove the drain plug, and let it empty. Old oil has combustion byproducts and moisture in it. Sitting in an engine all winter, that stuff is corrosive.
Replace the oil filter if your model has one (check the manual – not all riding mowers do). Refill with fresh oil to the dipstick’s full mark.
This step alone extends engine life more than any other single thing you can do.
Step 3 – Remove and Inspect the Battery
The battery is the most common reason riding mowers won’t start in spring. Cold kills batteries faster than most people think.
Disconnect the negative cable first, then the positive. Remove the battery and bring it inside or into a heated space. Check for cracks or corrosion on the terminals. If the terminals are white or blue-green, clean them with a baking soda and water solution and a wire brush.
Store the battery on a Battery Tender or similar trickle charger set to maintenance mode. This keeps it at full charge all winter without overcharging it. A battery stored at full charge lasts 2-3x longer than one stored partially discharged (Battery Tender, 2022).
If you leave the battery in the mower in Minnesota or Wisconsin – expect to replace it by spring.
Step 4 – Clean and Inspect the Deck
The deck is where people get lazy. I get it. It is dirty and annoying.
But grass clippings hold moisture. Moisture under the deck causes rust. Rust leads to holes, and holes mean a new deck at $300+.
Use a stiff brush or a plastic scraper to knock off packed-on clippings. A garden hose with a spray nozzle handles the rest. Let it dry completely before storage – trapped moisture under a cover all winter is worse than leaving the deck dirty and uncovered.
While you are under there, look at the deck belt. If it is cracked, frayed, or glazed over, replace it now. Parts are cheaper in fall than spring.
Step 5 – Replace or Check the Spark Plugs
Pull the spark plug with your spark plug socket. Look at the tip.
A tan or light gray tip is good – normal combustion. Black and sooty means the engine has been running rich. White or blistered means it ran too hot. Either of those last two deserves a look at the air filter and carburetor before you store it.
Replace the plug if it has been in there more than two seasons. A new spark plug costs about $4. A hard-start diagnosis at a shop costs $80.
Gap the new plug to spec (check your manual – common range is 0.030″-0.035″) before installing. Snug it hand-tight, then a half-turn with the socket. Over-tightening strips the threads.
Step 6 – Sharpen or Remove the Blades
Dull blades tear grass instead of cutting it, which leads to disease in your lawn. Fall is a good time to sharpen so the mower is ready to go in spring.
To remove the blades: block them with a piece of wood so they don’t spin, then remove the center bolt. Keep track of how the blade was oriented (there is a right side and a wrong side).
Sharpen with an angle grinder or a file at roughly 45 degrees. You do not need razor-sharp – more like butter-knife sharp. Balance the blade on a nail or a blade balancer before reinstalling. An unbalanced blade causes vibration that damages bearings over time.
If you do not want to deal with sharpening now, at least remove the blades and store them flat in the garage. They will not rust as fast off the mower.
Step 7 – Lubricate Moving Parts
Grease fittings (also called zerk fittings) are small nipples on the front axle, steering components, and spindle housings. Your mower manual shows where they are.
Use a grease gun with multi-purpose grease. Give each fitting 2-3 pumps. If grease comes out the side of the fitting, it is full.
Also spray a light coat of WD-40 or a similar lubricant on the throttle and choke cables, the deck height lever, and any exposed metal pivot points. This prevents rust from forming and makes those parts easier to move in spring.
This step takes about 15 minutes. Most people skip it and spend 45 minutes in April trying to loosen seized parts.
Step 8 – Store It the Right Way
The goal is a dry, stable environment. Concrete floors are cold but fine. Dirt floors are not – ground moisture wicks up into everything.
Inflate tires to the high end of the recommended range (usually 12-14 PSI for most riding mowers). They will lose pressure over winter. Starting at the top of the range means they will still be close to correct in spring.
Use a breathable mower cover, not a plastic tarp. Plastic traps moisture underneath it. A canvas or polyester cover lets air move while keeping dust and debris off.
Do NOT park it against an outside wall of an unheated garage in a cold climate. That is the coldest spot. If you have an interior wall, use it.
Step-by-Step Summary Table
| Step | Task | Time Needed | Tools Required | Difficulty |
|---|---|---|---|---|
| 1 | Run down or stabilize fuel | 10-15 min | Fuel stabilizer | Easy |
| 2 | Change the oil | 20-30 min | Socket set, drain pan, fresh oil | Easy |
| 3 | Remove and store the battery | 10-15 min | Wrench, trickle charger | Easy |
| 4 | Clean and inspect the deck | 20-30 min | Brush, hose, scraper | Easy |
| 5 | Check or replace spark plugs | 10-15 min | Spark plug socket, new plug | Easy |
| 6 | Sharpen or remove blades | 20-30 min | Wrench, angle grinder or file | Moderate |
| 7 | Lubricate moving parts | 15 min | Grease gun, WD-40 | Easy |
| 8 | Cover and store correctly | 5-10 min | Breathable cover, tire gauge | Easy |
How Climate Affects Your Winterization Routine
The 8 steps above apply everywhere. But depending on where you live, some steps matter more than others. Here is what I have seen working in different regions.
Cold and Snowy States (Minnesota, Wisconsin, Michigan)
These states get months of hard freezes. Your mower might sit at -20°F in a garage. Battery survival is the #1 concern here.
Do not leave the battery in the mower. Ever. Even with a trickle charger attached, a battery in an unheated Minnesota garage can freeze at very low states of charge. Bring it inside, put it on a Battery Tender, and check it once a month.
Fuel stabilizer is also non-negotiable here. The season stretches from October to April or May – that is 6-7 months. No fuel survives that untreated.
If you have a metal deck, spray the underside with a light coat of rust-inhibiting spray paint each fall. The freeze-thaw cycle speeds up rust fast.
Mild but Wet Winters (Virginia, Tennessee, Pacific Northwest)
Moisture is your enemy here, not cold. Temperatures rarely stay below freezing long, but humidity and rain create rust and mold conditions that last months.
Cover storage is more important in wet climates than cold ones. A breathable cover keeps dampness off the engine, battery, and deck.
You can usually leave the battery in the mower in Virginia. Freezing is rare. But still put it on a trickle charger – the battery discharges slowly over winter even in mild temperatures.
Watch the deck carefully in wet climates. Grass breaks down slowly in damp conditions and holds moisture against the metal longer than in drier states.
Dry and Cold Climates (Colorado, Utah, Montana)
Dry winters are easier on the mower. Rust is a smaller concern. But cold is still real – Denver averages 25 nights below 10°F each winter (National Weather Service, 2023).
The main risk here is dry air pulling moisture out of seals, cables, and rubber parts. Lubrication is more important in dry climates than most people think. Hit every grease fitting and every cable before storage.
Tires can also crack in dry, cold conditions. Check for sidewall cracking in fall, and consider storing the mower on jack stands if the tires are older than 5 years.
Climate Zone Comparison Table
| Climate Zone | States | Key Risks | Extra Steps |
|---|---|---|---|
| Cold and snowy | MN, WI, MI, ND | Battery freeze, long fuel sit | Remove battery, always use stabilizer |
| Mild and wet | VA, TN, OR, WA | Rust, mold, deck corrosion | Prioritize deck cleaning, use breathable cover |
| Dry and cold | CO, UT, MT | Cracked seals, tire damage, cable dryness | Extra lubrication, inspect tires for cracking |
Fuel and Battery – The Two Things People Get Wrong Most
These are the two causes behind at least 80% of spring no-starts I have seen. They both have simple fixes.
Ethanol Fuel and Why It Destroys Carburetors
Most pump gas in the US is E10 – 10% ethanol, 90% gasoline. Some stations in corn-producing states sell E15. Ethanol absorbs water from the air. In a sealed fuel tank over winter, that water eventually separates from the fuel and sinks to the bottom.
That water-ethanol mix hits the carburetor first when you try to start in spring. It corrodes the small brass jets and passages. It also leaves a varnish residue as it evaporates that clogs those same jets.
The fix is simple: either add a quality fuel stabilizer (STA-BIL is the most common, Sea Foam works well too) or run the tank dry before storage. Fuel stabilizer keeps E10 stable for up to 24 months (STA-BIL, 2023). Running dry removes the problem entirely.
If you consistently have carburetor problems, consider buying ethanol-free fuel (sometimes labeled “rec fuel” or “clear fuel”) for the last tank of the season. It costs more but contains no ethanol and stores much better.
Should You Remove the Battery or Use a Trickle Charger?
Both work. The right answer depends on your storage setup.
Remove the battery and store it inside if your garage is unheated and temperatures regularly drop below 20°F. Bring it into the basement or any heated space. A Battery Tender Junior ($25-30) keeps it at full charge without overcharging.
Leave it in the mower and connect a trickle charger if your garage stays above 20°F or you have an outlet near the mower. This is the more convenient option and works well in moderate climates.
What you should never do is leave the battery in the mower, disconnected, with no charger, in a cold garage. That is how you walk out in April to a battery with 0% charge and a cracked case.
Common Winterization Mistakes I See Every Year
Three mistakes come up over and over. They are all easy to avoid.
Skipping the Oil Change Before Storage
“I’ll just do it in spring” is the most common thing I hear. The problem is that used oil has moisture, combustion acids, and metal particles in it. Sitting in the engine all winter, those contaminants keep working on the metal surfaces.
Fresh oil has the right additives to protect the engine. Used oil does not. Change it in fall, not spring.
Leaving the Deck Dirty
A dirty deck is more than cosmetic. Packed grass holds moisture. Moisture against metal means rust. And rust on the deck underside starts as surface corrosion and eventually eats through.
It takes 20 minutes to clean the deck. A new deck costs $250-$400. This one is an easy call.
Not Checking Tire Pressure Before Storage
Tires lose pressure over winter. Starting at the correct pressure – or the high end of the range – means they might still be usable in spring. Starting at low pressure means flat spots after six months on a cold concrete floor.
Flat-spotted tires do not always recover. Riding mower tires are $30-$60 each. A tire gauge costs $5. Check the pressure before you close the garage door.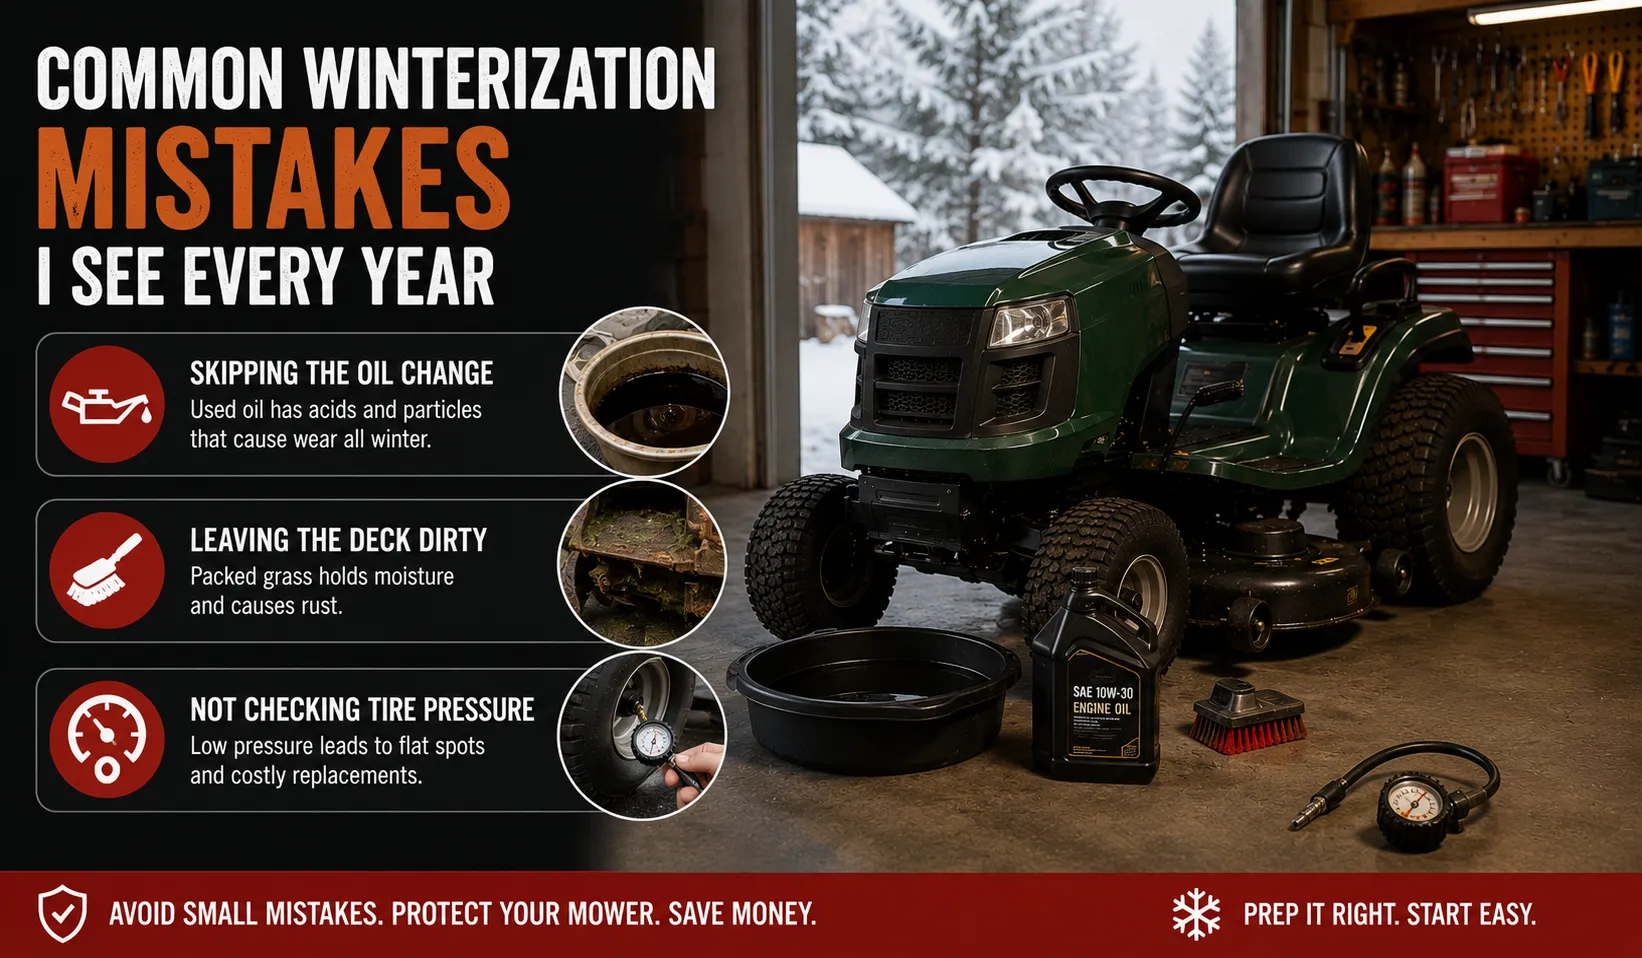
My Final Recommendation
If you only have one hour this fall, spend it on steps 1, 2, and 3 – the fuel, the oil, and the battery. Those three are responsible for more spring failures than everything else combined. Do those three right and your mower will almost certainly start in April.
If you have two hours, do all eight steps. The full process is not complicated. It is mostly straightforward mechanical work with a few cheap supplies. The payoff is a mower that starts on the first or second pull every spring, for years.
I have been doing this since I bought my first Husqvarna YTH24V48 in 2011. It still runs clean. That mower has never needed a carburetor cleaning. I am not sure it is a coincidence.
Winterization Checklist Table: DIY vs. Shop Service
| Task | DIY Cost | DIY Time | Shop Cost | Shop Notes |
|---|---|---|---|---|
| Fuel stabilizer or drain | $5-10 | 15 min | $0 (often included) | Usually part of a tune-up package |
| Oil and filter change | $15-25 | 20 min | $30-50 | Standard service item |
| Battery removal and charging | $25-30 (charger, one-time) | 10 min | $10-15 | Shops charge for storage in some cases |
| Deck cleaning | $0 | 20 min | $20-30 | Worth DIY – just time and effort |
| Spark plug replacement | $4-8 | 10 min | $15-25 | Shops often mark up parts |
| Blade sharpening | $0-10 (file or grinder) | 20 min | $15-30 per blade | Good option if you have multiple blades |
| Lubrication | $5-10 (grease and spray) | 15 min | Usually included in tune-up | Easy to DIY once you find the fittings |
| Full tune-up package (shop) | – | – | $100-200 | Covers most of the above in one visit |
When the shop makes sense: If the mower has a mechanical problem you cannot diagnose, go to the shop. If the carburetor is already gummed or the deck belt is shredded, a shop can do the repair and winterization together. Otherwise, DIY is straightforward and saves $70-$150 per season.
Frequently Asked Questions About How to Winterize a Riding Lawn Mower
What is the right time of year to winterize a riding lawn mower?
Winterize after the last mow of the season, when temperatures in your area consistently drop below 40°F at night. For most of the northern US, that is October or early November. For milder states like Virginia or Tennessee, late November or December is typical.
How long does it take to winterize a riding lawn mower?
The full 8-step process takes about 2 hours with all supplies on hand. If you skip blade sharpening or the deck is clean, it can be done in 90 minutes. First-timers should plan for closer to 2.5 hours.
Do I have to change the oil before storing a riding lawn mower?
Yes. Used oil contains moisture, acid, and combustion byproducts that corrode engine parts during long storage. Changing the oil in fall – not spring – protects the engine through winter and means it is ready to run clean when you start it up in April.
What happens if I leave old gas in my riding lawn mower over winter?
Gasoline, especially E10 ethanol blends, starts to break down in about 30 days (STA-BIL, 2023). Over a 4-6 month winter, it leaves a varnish inside the carburetor that clogs jets and passages. The result is a no-start or rough-running engine in spring. Either add fuel stabilizer or drain the tank completely.
Can I leave my riding lawn mower outside over winter?
You can, but it is not a good idea in cold or wet climates. Exposure to freeze-thaw cycles, rain, and snow accelerates rust on the deck and body, drains the battery, and allows moisture into the engine. If you must store it outside, use a weatherproof breathable cover and remove the battery to store indoors.
Is a trickle charger really necessary for the battery?
If temperatures in your storage area drop below 20°F, yes. A discharged or partially charged battery can freeze and crack at low temperatures. A Battery Tender or similar maintainer ($25-$35) keeps the battery at full charge all winter and prevents this. In milder climates, it is still worth doing – it extends battery life significantly.
What fuel stabilizer do most lawn mower owners use?
STA-BIL Fuel Stabilizer is the most widely used product in the US for small engine storage. Sea Foam Motor Treatment is a popular alternative that also cleans the fuel system. Both are available at any hardware or home improvement store and cost $8-$15 for a bottle that lasts several seasons.