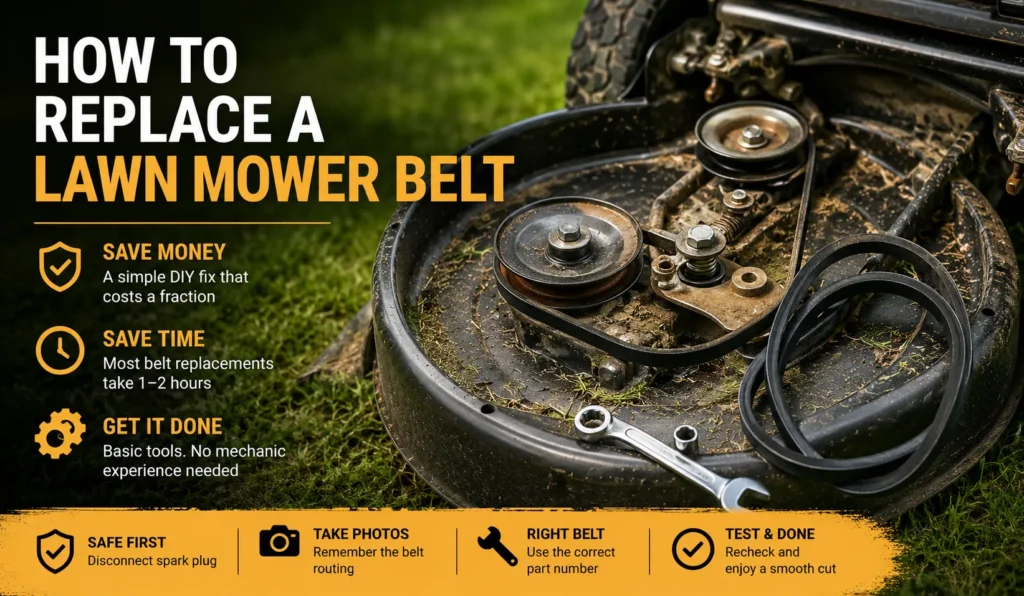
Quick Overview
- You can replace a lawn mower belt yourself in 1-2 hours with a basic socket set
- The clearest signs of a bad belt: the mower won’t drive, blades won’t spin, or you smell burnt rubber while mowing
- Always disconnect the spark plug wire before you touch anything under the deck
- Find your correct belt number printed on the side of the old belt, or look it up by your mower’s model number
- Parts cost $15-$40. A repair shop charges $80-$160 for the exact same job
A few years back, my neighbor called me over to look at his Craftsman riding mower. It had stopped driving mid-yard on a Saturday morning. He figured the transmission was gone. He got a quote from a local shop: $280 to diagnose and fix it.
I walked over, lifted the seat, and found a snapped drive belt. The replacement part was $22 at Home Depot. We had it running in 90 minutes.
That’s the thing about learning how to replace a lawn mower belt. The job looks intimidating. It really isn’t. I’ve done it on walk-behinds, self-propelled mowers, riding mowers, and zero-turns. Brands like John Deere, Husqvarna, Troy-Bilt, and Craftsman. The process is the same every time once you understand the basics.
This guide is for homeowners, first-time DIYers, and anyone who got a repair quote that felt too high. You don’t need a mechanic’s background. You need the right belt, a socket set, and about an hour.
Why Lawn Mower Belts Break (And How to Know Yours Has)
A belt that’s failing will usually tell you before it snaps completely. Knowing what to look for saves you from getting stuck halfway through your yard.
Common Signs Your Belt Needs Replacing
These are the signs I look for first when someone brings me a mower that “just stopped working”:
- The mower won’t move forward, or it drives slower than it used to
- The blades won’t engage when you pull the deck lever
- You hear a high-pitched squeal or a rhythmic slapping under the deck
- You smell burnt rubber after mowing for a few minutes
- The mower shakes more than it used to at normal blade speed
The most obvious sign is a complete snap. You hear a loud crack and then either the mower stops moving or the blades quit. It happened to me on a Troy-Bilt walk-behind while going up a slight slope. One second the mower was running fine. The next, nothing.
Sometimes the belt is still in one piece but glazed or cracked along the inside edge. That’s when you get slipping. The mower runs, but the drive feels weak. The blades start up, then cut out after a few passes.
If you see cracks running across the belt’s width, or the belt looks shiny and hard on the inside surface instead of matte and slightly rough, replace it. A glazed belt will slip under load even if it hasn’t snapped yet.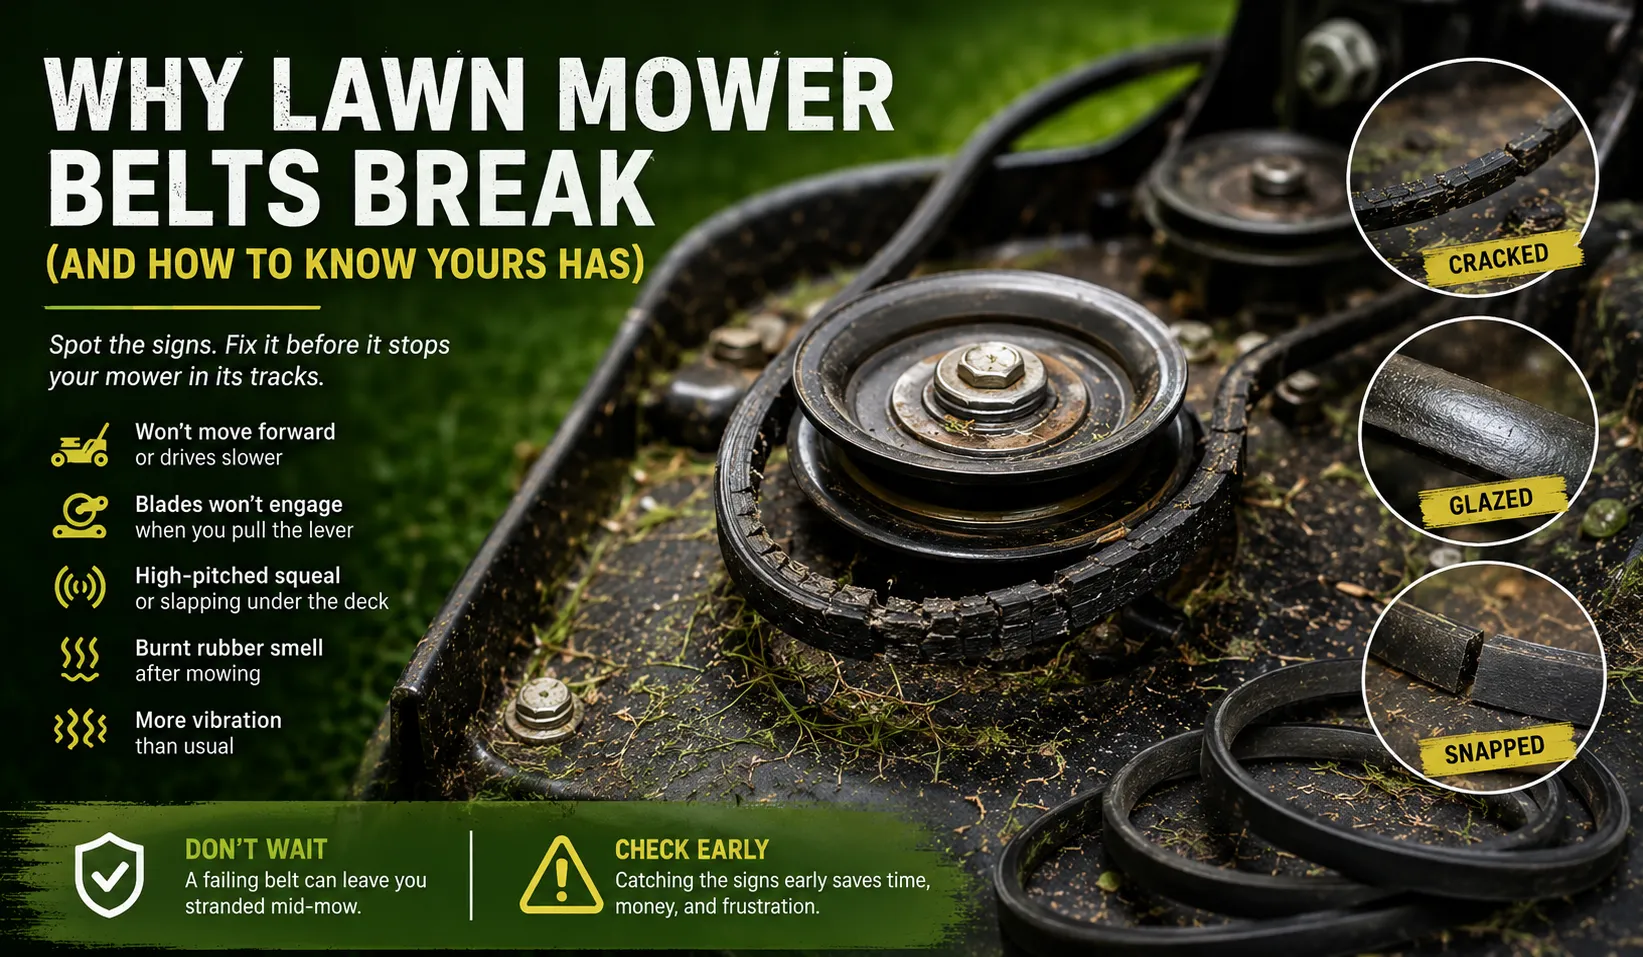
What Actually Causes Belt Failure
Most belts fail for one of four reasons, and it helps to know which one you’re dealing with before you buy the new belt.
Age is the most common cause. A belt on a mower used every week for a suburban yard will last about 2-4 mowing seasons before it needs replacing (Husqvarna Operator’s Manual, 2022). If yours is older than that, the failure isn’t a surprise.
The second cause is a worn or damaged idler pulley. If the pulley is bent, its bearing is seized, or it wobbles as it spins, it puts uneven pressure on the belt. The belt wears fast on one spot and breaks there.
Third is grass and debris buildup under the deck. Wet clippings pack in around the pulleys and belt path. The friction from debris caught between the belt and a pulley generates heat. That heat burns the belt from the inside out. You’ll smell it before you see it.
The fourth cause is the wrong belt. A belt that’s a half-inch too long will slip constantly under load. Each slip generates heat, and the belt breaks within a season. I’ll cover how to get the right fit in the next section.
What You Need Before You Start
Get everything together before you start pulling things apart. Nothing slows down a belt job like stopping mid-repair to hunt for a 13mm socket.
Tools You’ll Need
- 3/8-inch drive socket set with 10mm, 13mm, and 15mm sockets
- Flat-head and Phillips screwdrivers
- Needle-nose pliers
- Work gloves
- Safety glasses
- A phone or camera to photograph the belt routing
That last item matters more than any of the tools. Before you pull the old belt off, take three or four photos of exactly how it’s routed around the pulleys. You will forget once the belt is off. I did it wrong once on a John Deere D105 because I didn’t take photos, and I spent 20 minutes staring at a routing diagram before I figured out which side of the idler arm the belt went on.
How to Find the Right Replacement Belt
The belt number is stamped or printed on the side of the old belt. It will look something like “5L430” or “954-04050.” Write it down before you remove the belt.
If the belt is already snapped or missing, find your mower’s model number. On most riding mowers it’s on a sticker under the seat. On walk-behinds, it’s usually on the engine housing or the frame near the rear wheels. Type that model number into the search bar on Amazon, Home Depot, or Lowe’s, and the correct belt will come up.
OEM belts are worth the extra few dollars. Generic belts are cheaper, but I’ve had them run slightly off-size or made from softer rubber that wears fast. An OEM belt from Husqvarna, Craftsman, or John Deere is made to fit that exact deck and pulley system. It lasts longer.
Safety Steps Before You Touch Anything
Do these every time. No exceptions.
- Turn the mower off and let the engine run down completely
- Remove the ignition key, or disconnect the battery on an electric mower
- Pull the spark plug wire off the spark plug – grab the rubber boot and pull it straight off
- Tuck the wire back so it can’t contact the plug accidentally
- Let the engine cool for at least 15 minutes before you reach under the deck
- Park the mower on a flat, solid surface – not grass, not gravel
The spark plug wire step is the one people skip. Don’t skip it. If a blade contacts something while you’re working under the deck, the engine can fire. It’s rare, but the risk is zero if you disconnect the wire.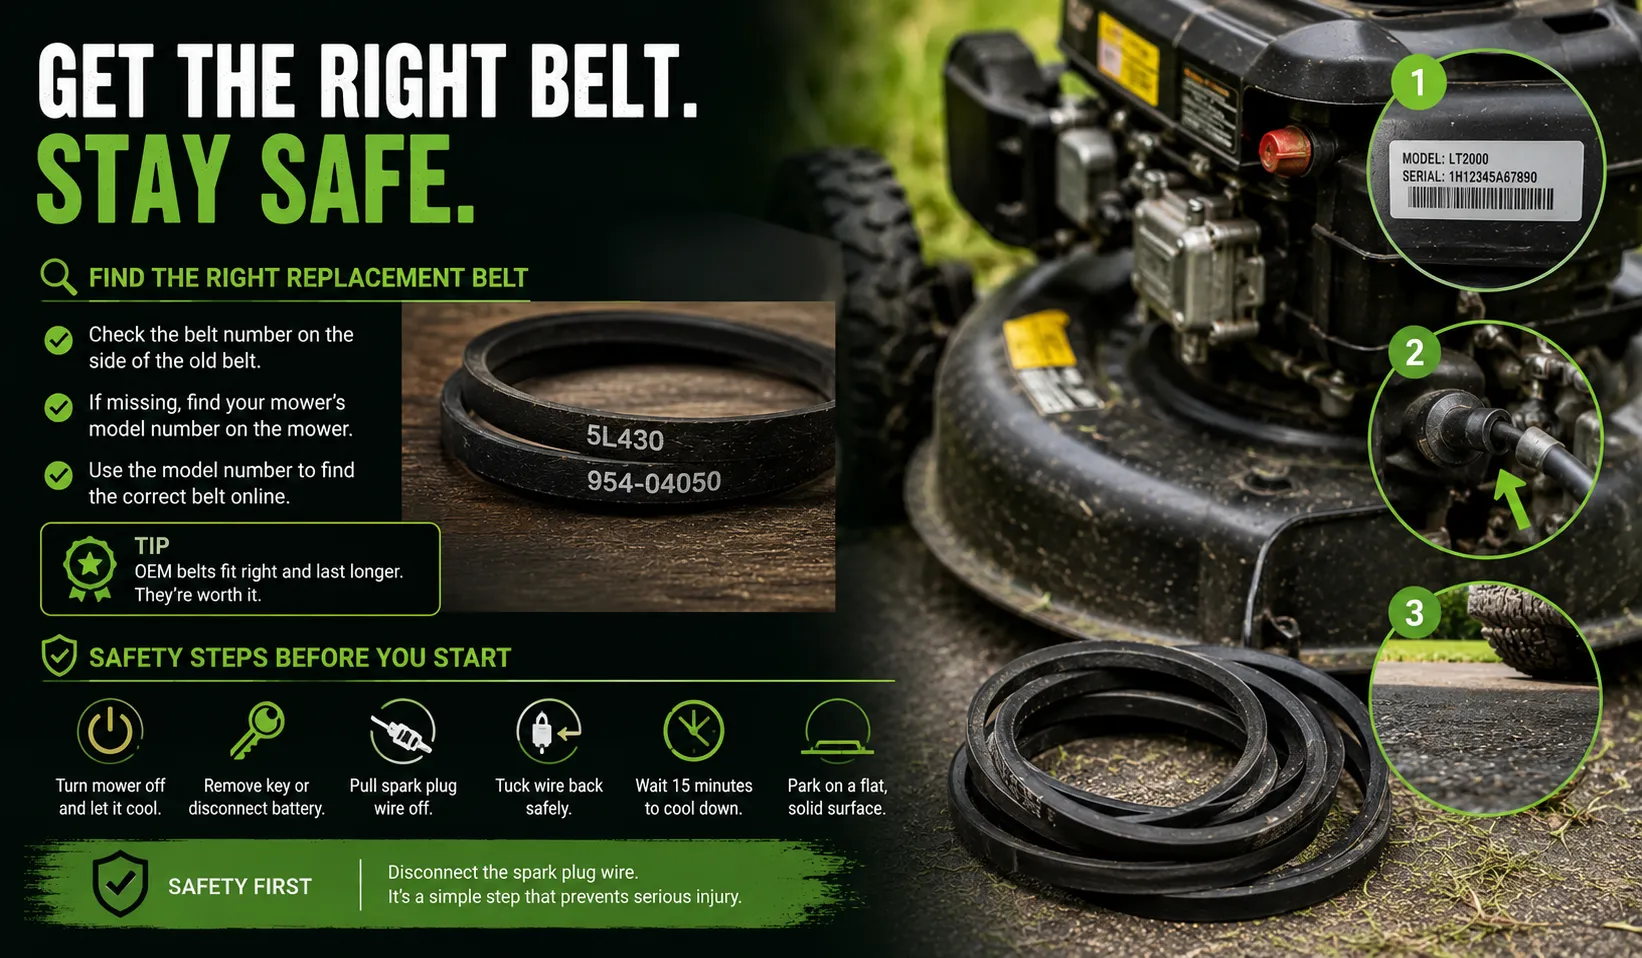
Belt Types by Mower Type
| Mower Type | Belt Name | What It Does | Typical Width |
|---|---|---|---|
| Walk-Behind Push Mower | Blade belt | Spins the cutting blade | 3/8″ – 1/2″ |
| Self-Propelled Mower | Drive belt | Powers the rear wheel system | 3/8″ |
| Riding Mower | Deck belt | Spins the cutting blades | 1/2″ – 5/8″ |
| Riding Mower | Drive belt | Moves the mower forward and back | 1/2″ |
| Zero-Turn | Deck belt | Spins the cutting blades | 5/8″ |
Riding mowers can have two separate belts. The deck belt is the one that breaks most often. The drive belt fails too, but less frequently.
How to Replace a Lawn Mower Belt – Step by Step
This section covers the core process that applies to most mower types. The next section goes into the specific differences for walk-behinds, riding mowers, and zero-turns.
Step 1 – Disconnect the Spark Plug
Pull the rubber boot straight off the spark plug. The plug is on top of the engine. Bend the wire back so it can’t flop onto the plug while you work.
This takes about 10 seconds. Do it first, every single time.
Step 2 – Access the Deck or Drive System
On a walk-behind or self-propelled mower, tip the mower on its side. Always tip it with the air filter pointing up. If you tip it the wrong way, engine oil flows into the carburetor, and now you have a second problem to fix.
On a riding mower, lower the deck to its lowest cutting position. Look underneath the mower frame. On most Craftsman, Troy-Bilt, and Husqvarna models, the deck hangs from two or three metal lift pins. Pull those pins out, unhook the belt engagement linkage rod, and slide the deck out to the side. Set it on the ground where you can work on it.
On a zero-turn, the process is the same but the deck is wider and heavier. A second set of hands helps when sliding it out.
This step takes the most time on a riding mower, especially your first time. Budget 20-30 minutes. I once spent 45 minutes getting a deck off a John Deere D130 because one lift pin had rusted into the bracket. A few minutes of penetrating oil and a rubber mallet solved it, but I wasn’t expecting the delay.
Step 3 – Remove the Old Belt
Look at your photos. Trace the path the belt takes: around the engine pulley, around the idler pulley, and around the blade mandrel pulleys if you’re on a deck belt.
To release tension on the belt, find the idler pulley arm. It’s spring-loaded. Push the arm to the side (away from the belt) and the belt goes slack. Use a flat-head screwdriver to hold the arm in the slack position while you work the belt off with your other hand.
Slide the belt off one pulley at a time. Start with the smallest pulley. Work your way around the system.
If the belt snapped, this step is easy. If it’s still in one piece, it may be snug against the pulleys. Work it off slowly rather than forcing it.
Once the belt is off, spin each pulley by hand. It should spin freely, with no side wobble and no rough or gritty feeling in the bearing. A bad pulley bearing feels like it catches or grinds as it spins. If any pulley is worn, bent, or its bearing is rough, replace it now. A worn pulley destroys a new belt fast. I put this off once on a Husqvarna LT151 and was back replacing the belt again six weeks later.
Step 4 – Route and Install the New Belt
Look at your photos and the belt routing diagram. Most mowers have a sticker on the deck showing the routing path. If yours doesn’t, your owner’s manual has a diagram. For older mowers, a YouTube search for your model number almost always turns up a video showing the exact routing.
Start routing the new belt from the engine pulley. Work toward the blade mandrel pulleys. Route the idler pulley last, since that’s where you’ll apply tension.
Pay attention to belt keepers. These are small metal tabs or brackets near the pulleys that hold the belt in its track. The belt has to sit inside these tabs. If you miss one and the belt runs outside a keeper, it will jump off the pulley the first time you engage the blades.
Once the belt is fully routed, release the idler arm. The spring will pull it tight against the belt.
Press the belt with your finger between two pulleys. A correctly tensioned belt has about 1/2 inch of deflection under moderate pressure. Too much slack and it will slip. Too tight and the belt and pulley bearings will wear fast.
Step 5 – Reassemble and Test
On a riding mower, slide the deck back under the frame and reinsert the lift pins. Reconnect the belt engagement linkage rod. Reconnect the spark plug wire.
On a walk-behind, tip the mower back onto its wheels and reconnect the spark plug wire.
Before you start the engine, turn the blade engagement lever by hand if you can reach it, or engage the drive to check for binding.
Start the engine. Let it idle for 30 seconds. Then engage the blades or drive slowly.
Listen for squealing, slapping, or any sound that wasn’t there before. If it runs quiet and smooth, the job is done. I’ve replaced a lot of belts over the years, and that moment when the mower runs clean again still feels good every time.
Steps at a Glance
| Step | What You Do | Time Estimate |
|---|---|---|
| 1 | Disconnect the spark plug wire | 1 minute |
| 2 | Access the deck or drive system | 15-30 minutes |
| 3 | Remove the old belt and inspect pulleys | 10-15 minutes |
| 4 | Route and install the new belt | 15-20 minutes |
| 5 | Reassemble and test | 10-15 minutes |
| Total | 50-80 minutes |
Replacing the Belt on Different Mower Types
The same five steps apply to every mower. What changes is how you get to the belt and how complicated the routing is.
Walk-Behind Push Mowers
Push mowers have one belt: the blade belt. It runs from the engine crankshaft pulley down to the blade spindle under the deck.
Tip the mower on its side (air filter up). The belt is right there. If you need to get the belt off the blade spindle, use a block of wood wedged between the blade and the deck to hold the blade still while you break the center bolt loose. Use the correct torque spec when you put it back: most walk-behind blade bolts need 35-50 ft-lbs (Briggs & Stratton Service Manual, 2021).
These are the fastest belt jobs. First-timers can usually finish in under 45 minutes.
Self-Propelled Mowers
Self-propelled mowers have a small drive belt separate from the blade belt. It runs from the engine output shaft to the rear wheel transmission.
The drive belt is usually behind a plastic cover on the upper rear of the mower, near where the handle meets the deck. Snap off the cover and the belt is visible.
One thing to watch on these: the tension spring for the drive belt is small and sits under light load. When you release it, it can snap outward and land across the garage. Hold it with needle-nose pliers as you release the tension. I lost a spring under a workbench once and spent 15 minutes looking for it.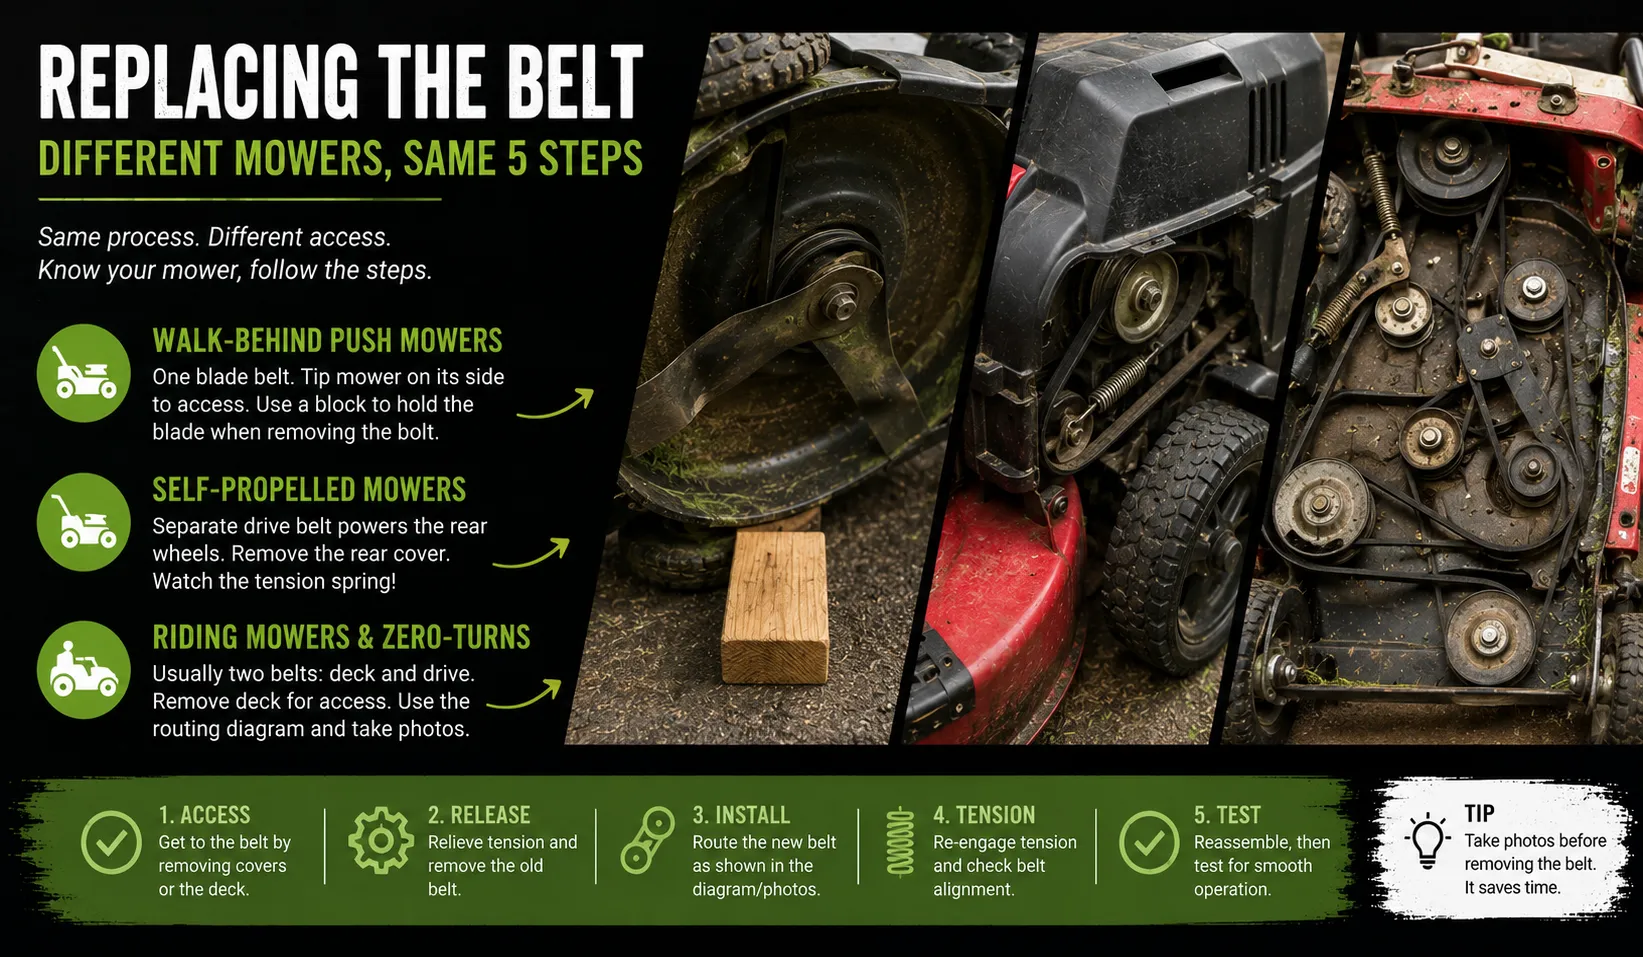
Riding Mowers and Zero-Turns
Riding mowers typically have two belts. The deck belt spins the blades. The drive belt moves the mower forward and back.
The deck belt breaks most often and is the easier of the two to replace. Remove the deck, replace the belt, reinstall. The steps in this guide cover that fully.
The drive belt is a bigger job. On most Craftsman and Troy-Bilt models, it runs from the engine pulley down through a series of idlers to the transmission pulley under the frame. You’ll need to remove the deck first to get access. Then trace the routing diagram under the frame. The belt path can go around four to six pulleys depending on the model. This is where taking photos before removal is absolutely necessary.
Zero-turns use the same process for the deck belt but with a wider, heavier deck and thicker belts. Budget 30 minutes longer than a standard riding mower on your first attempt.
Difficulty by Mower Type
| Mower Type | Belt Access | Difficulty | First-Timer Time |
|---|---|---|---|
| Push Mower | Tip mower on side | Easy | 30-45 min |
| Self-Propelled | Remove rear cover | Easy to Medium | 45-60 min |
| Riding Mower (deck belt) | Remove deck | Medium | 60-90 min |
| Riding Mower (drive belt) | Remove deck + trace frame | Medium to Hard | 90-120 min |
| Zero-Turn (deck belt) | Remove wide deck | Medium | 75-105 min |
Real Problems I’ve Run Into (And How I Fixed Them)
These are the situations that don’t appear in any owner’s manual. They show up on a Saturday when you just want to finish mowing.
Belt Keeps Slipping Off
This happened on a Husqvarna YTH22V46 shortly after I put in a new deck belt. The belt kept jumping off the left blade mandrel pulley.
The problem was a bent belt keeper. One of the small metal tabs that holds the belt against the pulley had been bent outward, probably when the old belt failed. The belt had no guide to hold it in the groove. I bent the keeper back with needle-nose pliers and the belt stayed on.
Other causes of belt slipping: the belt is too long for the mower (wrong part number), the idler pulley is bent or its bearing is bad, or a blade mandrel pulley is loose on its spindle. Check all three before you assume the belt itself is defective.
New Belt Snapped After One Use
This happened with a generic belt on a Craftsman T225 about two seasons ago. The belt snapped after two passes. I could smell it burning before it went.
The cause was a seized idler pulley bearing. The pulley wasn’t rotating – it was just sitting there while the belt slid across it. The friction burned through the belt in minutes.
I replaced the idler pulley ($12 at Lowe’s) and installed a second new OEM belt. No problems after that. This is exactly why I spin every pulley by hand before putting a new belt on.
Can’t Find the Right Routing Path
On a John Deere D105 that came into my garage, the deck belt routes around six pulleys. I pulled the old belt off before I took any photos. Classic mistake.
The diagram in the manual showed the routing, but I couldn’t tell from the flat diagram which side of the idler arm the belt was supposed to go on. I stared at it for 20 minutes.
The fix: I searched YouTube for “John Deere D105 deck belt replacement” and found a four-minute video of someone doing exactly what I was doing. I had the belt on correctly in five minutes after watching it. If you’re stuck on routing, that’s always the fastest solution.
Common Mistakes People Make When Replacing a Belt
These come up over and over. Knowing them ahead of time saves you a second trip to the store.
Buying the Wrong Belt Size
A belt that’s a quarter-inch too long will slip under load. A belt that’s too short won’t install without overstretching, and it will break quickly.
Don’t measure the old belt and try to match it by length alone. Belts stretch during use, so a worn belt always measures longer than the correct size. Use the number stamped on the side of the old belt, or look up the part by your mower’s model number. Those are the only reliable ways to get the right fit.
If you’re at the store and the old belt is already gone, bring your mower’s model number and let the parts counter match it for you.
Skipping the Pulley Inspection
A new belt on a bad pulley is a new belt that will fail fast. I’ve said it twice already in this guide because it’s the mistake I see most often.
Spin every pulley before you install the new belt. It takes about two minutes total. If any pulley feels rough, wobbles side to side, or doesn’t spin freely, replace it. Pulley prices run $8 to $30 depending on the mower. That’s a much cheaper problem to fix now than it is after you’ve already burned through a second belt.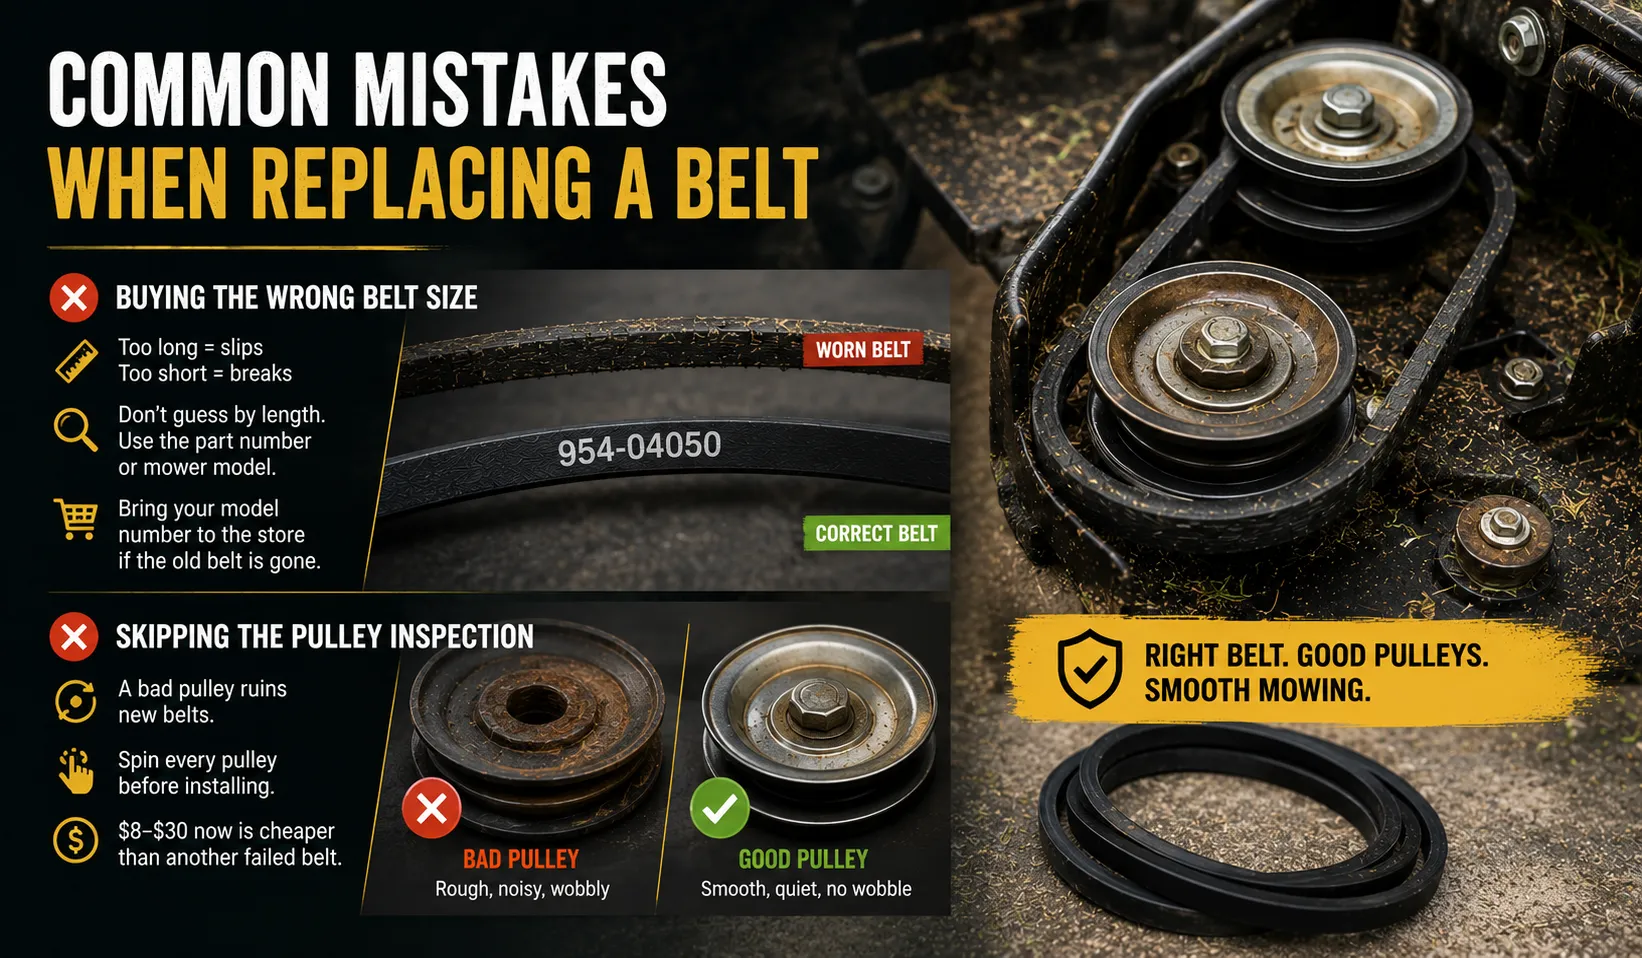
My Final Thoughts
A belt replacement on a walk-behind or self-propelled mower is one of the easier DIY mower jobs. Most homeowners can do it the first time with no mechanical experience. A deck belt on a riding mower takes more time, but it’s genuinely doable for anyone willing to take it slow and follow the routing diagram.
Where I’d say think twice about DIYing: if you remove the old belt and find damaged pulleys, a bent spindle housing, or signs of heat damage around the deck, that’s a deeper problem. At that point, a repair shop with a lift and the right diagnostic tools will save you time and probably money.
For a straightforward belt replacement where everything else looks fine, do it yourself. You’ll save $80-$160 on labor, and you’ll know exactly what was done. The second time you do it on the same mower, you’ll finish in half the time. I can do a riding mower deck belt I’ve worked on before in under an hour now. The learning curve is real, but it’s short.
DIY vs. Shop: The Real Cost Comparison
| Factor | DIY | Repair Shop |
|---|---|---|
| Belt cost | $15-$40 | $15-$40 |
| Labor cost | $0 | $60-$120 |
| Total cost | $15-$40 | $80-$160 |
| Time from start to mowing | 1-2 hours | 1-3 days (drop-off + wait) |
| Tools required | Basic socket set | None |
| Risk if pulleys are also bad | May miss it without experience | Should be caught at shop |
| Best situation | Belt-only failure, pulleys in good shape | Multiple issues or unfamiliar mower |
Frequently Asked Questions About How to Replace a Lawn Mower Belt
How do I know if my lawn mower belt needs replacing?
The clearest signs are: the mower won’t drive forward, the blades won’t engage, you hear squealing or slapping from under the deck, or you smell burnt rubber during mowing. If you can see the belt and it’s cracked across its width, shiny on the inside surface, or frayed at the edges, replace it before it snaps completely.
How long does a lawn mower belt last?
Most mower belts last 2-4 mowing seasons with regular residential use (Husqvarna Operator’s Manual, 2022). Mowers used on larger properties or in heavy, wet grass wear belts faster. Keeping the deck clean and replacing worn pulleys promptly extends belt life significantly.
What is the difference between a drive belt and a deck belt?
The deck belt spins the cutting blades. It runs between the engine pulley and the blade mandrel pulleys under the mowing deck. The drive belt moves the mower forward and backward – it connects the engine to the transmission. Riding mowers typically have both. Walk-behind push mowers only have a blade belt.
What does a PTO clutch do, and does it affect belt replacement?
The PTO (Power Take-Off) clutch is what engages and disengages the deck belt on most riding mowers and zero-turns. When you pull the blade engagement lever, the PTO clutch applies tension to the deck belt, spinning the blades. If the PTO clutch is failing, the belt may slip even if the belt itself is new. A belt replacement alone won’t fix a bad PTO clutch.
How do I find the right replacement belt for my mower?
Check the number stamped or printed on the side of the old belt. It’s usually on the top or inner edge. If the belt is already gone, find your mower’s model number on the sticker under the seat or on the engine housing. Type that model number into Amazon, Home Depot, or Lowe’s to get the correct OEM or compatible belt.
How much does it cost to replace a lawn mower belt?
The belt itself costs $15-$40 depending on the mower type and brand. If you do the job yourself, that’s your total cost. A repair shop typically charges $80-$160 for the same job once you add labor. If the pulleys need replacing too, add $8-$30 per pulley.
What is belt routing, and why does it matter?
Belt routing is the specific path the belt follows as it wraps around each pulley on the deck or drive system. If the belt is routed incorrectly, even by going on the wrong side of a single pulley, it will slip off or run at the wrong tension. Always photograph the routing before removing the old belt, and compare your new belt path against the routing sticker on the deck or the diagram in your owner’s manual.