Quick Overview
- Replacing a lawn mower spark plug takes 20-30 minutes and costs under $10 for the part
- You need a spark plug socket (5/8″ or 13/16″), a ratchet wrench, and a feeler gauge or gap tool
- Disconnect the spark plug wire before touching anything – this step is not optional
- The correct electrode gap for most small engines is 0.030″ (0.76mm) – always verify against your manual
- If your mower cranks but won’t fire, runs rough, or smells like raw fuel, the plug is the first thing to check
It happened to me on the first warm Saturday of spring. Fifty-two degrees in the Minnesota garage, the kind of morning where you can finally smell cut grass again. I pulled the cord on my old Briggs & Stratton push mower three times. Nothing. Four times. A cough. I yanked the plug out and held it up to the light – it was black as charcoal, with a faint smell of carbon and old fuel.
Twenty minutes later, the mower fired on the first pull. All it needed was a new spark plug.
This guide is for homeowners with zero mechanic experience who just want their mower running again. I’ll walk you through how to replace a lawn mower spark plug from start to finish – including the mistakes I’ve made and the things that can go sideways if you rush it.
Why the Spark Plug Matters More Than People Think
Most people ignore the spark plug until the mower stops starting. That’s understandable. But a worn or fouled plug affects more than just starting – it hurts fuel efficiency, strains the ignition system, and can cause carbon buildup in the combustion chamber over time.
What a Spark Plug Actually Does (Plain English)
A spark plug fires a small electrical spark into the air-fuel mixture inside the engine cylinder. That spark ignites the fuel, which pushes the piston down and turns the blade. If the spark is weak, late, or missing, combustion fails.
The plug sits between the ignition coil (which generates voltage) and the combustion chamber. It has two electrodes – a center electrode and a ground electrode – separated by a small gap. That gap is where the spark jumps. The size of that gap directly affects how well the engine fires.
A plug that’s fouled with carbon, oil, or old fuel can’t produce a clean spark. A plug with the wrong gap produces a spark at the wrong moment, or not at all.
Signs Your Spark Plug Needs Replacing
Replace the spark plug if you notice any of these:
- The mower cranks but won’t start after 4-5 pulls
- The engine starts, then dies within 30 seconds
- You notice an engine misfire – a rhythmic stumble or hiccup at idle
- You smell unburnt fuel after cranking (fuel is entering the cylinder but not igniting)
- The plug hasn’t been changed in two or more mowing seasons
- You’re storing the mower for winter – replace it before spring startup
Most small engine manufacturers recommend changing the spark plug every 25 hours of use or once per season, whichever comes first (Briggs & Stratton, 2024).
What You’ll Need Before You Start
Getting the right parts and tools before you begin saves you a second trip to the hardware store. Here’s what you actually need.
Tools and Supplies
- Spark plug socket – either 5/8″ or 13/16″ (see your manual; most push mowers use 5/8″)
- Ratchet wrench with a 6-inch extension
- Feeler gauge or spark plug gap tool
- Wire brush or clean rag
- Torque wrench (optional, but worth it if you’ve ever stripped a thread)
- Dielectric grease (a small dab on the plug wire boot protects it from corrosion)
The spark plug socket is different from a regular socket – it has a rubber insert inside that grips the ceramic insulator and prevents cracking. Don’t use a regular socket. I cracked a plug once doing exactly that, and spent 40 minutes picking ceramic out of the socket.
How to Find the Right Spark Plug for Your Mower
The easiest method: look at the old plug. The part number is stamped on the ceramic body – something like RJ19LM, NGK BR2LM, or Champion RC12YC.
If the number is worn off, check:
- Your owner’s manual (the plug spec is almost always listed in the maintenance section)
- The sticker on the engine housing – many Briggs & Stratton and Kawasaki engines print the plug spec directly on the engine block
- The manufacturer’s website – enter your model number and it will return the correct plug
NGK and Champion are the two most common small engine plug brands in the US. Either works fine. NGK plugs tend to have slightly tighter manufacturing tolerances, but for a lawn mower running 60-80 hours per year, the difference is minimal. Go with whichever your local hardware store stocks for your engine.
Common Mower Brands and Their Plug Types
| Mower Brand | Engine | Plug Model (NGK) | Plug Model (Champion) | Socket Size |
|---|---|---|---|---|
| Honda (HRX, HRN) | GCV160/GCV200 | BPR6ES | RN9YC | 5/8″ |
| Toro (Recycler) | Briggs 163cc | RJ19LM | RJ19LM | 5/8″ |
| Husqvarna (push) | Briggs 163cc | RJ19LM | RJ19LM | 5/8″ |
| Craftsman (push) | Briggs 150cc | RJ19LM | RJ19LM | 5/8″ |
| Troy-Bilt (riding) | Briggs 420cc | RJ17LM | J17LM | 13/16″ |
| John Deere (riding) | Kawasaki FR series | BPR4ES | RC12YC | 5/8″ |
Cross-reference with your owner’s manual before purchasing. Riding mowers with twin-cylinder engines require two plugs.
How to Replace a Lawn Mower Spark Plug – Step by Step
This is the full process from cold mower to first pull-start. Read through all six steps before you begin, then go back and do them in order.
Step 1 – Safety First: Disconnect the Spark Plug Wire
Pull the rubber boot off the top of the spark plug and set the wire aside, away from the plug. This cuts power to the ignition system and prevents the engine from accidentally firing while your hands are near the blade.
On a push mower, also tip the mower on its side with the air filter facing up – not down. Tipping it filter-side down causes oil to flow into the air filter and carburetor, which creates a separate problem you don’t want.
If you’re working on a riding mower, disconnect the negative terminal of the battery as well.
Step 2 – Remove the Old Spark Plug
Fit the spark plug socket over the plug, attach your ratchet, and turn counterclockwise to loosen. If the plug hasn’t been changed in years, it may feel stuck. Don’t force it cold.
Spray a small amount of penetrating oil (WD-40 or PB Blaster) around the base of the plug and wait five minutes. Then try again. Forcing a seized plug in a cold aluminum head is how threads get stripped. I stripped a thread on a Craftsman 190cc engine in Arizona doing exactly that – the engine was hot from a failed start attempt, the aluminum had expanded, and I got impatient. Cost me an extra hour and a thread repair kit.
Once it breaks loose, unscrew it by hand the rest of the way.
Step 3 – Read the Old Plug (What It’s Telling You)
Before you toss the old plug, look at the firing end. The color and deposits tell you what’s happening inside your engine.
| Plug Condition | What It Means |
|---|---|
| Light tan or gray deposit | Normal wear – engine is running correctly |
| Black, sooty, dry carbon | Running rich (too much fuel) or air filter is clogged |
| Black, wet, oily | Oil is getting into the combustion chamber – check piston rings |
| White or chalky | Running lean (too little fuel) or overheating |
| Melted or blistered electrode | Serious overheating – check cooling fins and oil level |
| Worn or rounded electrode | Normal end-of-life wear – just replace it |
A dry black plug on a push mower usually means a dirty air filter. Clean or replace the filter when you change the plug. Don’t put a new plug into an engine with a clogged air filter – you’ll foul the new plug in one season.
Step 4 – Check and Set the Electrode Gap
Take your new plug and check the electrode gap before installation. Plugs are often pre-gapped by the manufacturer, but “pre-gapped” doesn’t always mean correctly gapped for your specific engine.
Use a feeler gauge or gap tool. Slide the 0.030″ blade between the center electrode and the ground electrode. It should slide through with slight resistance – like pulling a credit card through a card slot. Too tight means the gap is under-spec; too loose means over-spec.
To adjust: bend the ground electrode (the curved arm on the side) carefully. Bend it toward the center electrode to close the gap, away to open it. Use a gap tool with an adjustment notch – do not use a screwdriver. I once used a flathead to adjust a gap and snapped the ground electrode clean off a brand-new NGK plug.
Standard gap specs:
- Briggs & Stratton small engines: 0.030″ (0.76mm)
- Honda GCV series: 0.028″-0.031″ (0.70-0.80mm)
- Kawasaki FR/FX series: 0.028″-0.031″
- Tecumseh engines: 0.030″
When in doubt, 0.030″ is correct for the vast majority of US residential mower engines.
Step 5 – Install the New Spark Plug
Thread the new plug in by hand first. This is important. Starting it by hand prevents cross-threading, which can destroy the threads in the aluminum head.
Screw it in by hand until it seats against the gasket, then use the ratchet to tighten. If you have a torque wrench:
| Engine Type | Torque Spec |
|---|---|
| Aluminum head (most push mowers) | 11-15 ft-lbs |
| Cast iron head (older/heavier engines) | 15-22 ft-lbs |
| Honda GCV series | 13 ft-lbs |
| Briggs & Stratton (14mm plug) | 15 ft-lbs |
If you don’t have a torque wrench: finger-tight plus 1/2 to 3/4 of a turn with the ratchet is the standard rule for a new plug with a crush gasket. Used plugs (reinstalling after inspection) get only 1/8 to 1/4 turn after finger-tight because the gasket is already compressed.
Snug is enough. Tight is not better – it just strips threads.
Step 6 – Reconnect and Test
Push the plug wire boot firmly onto the new plug until you feel it click or seat fully. A loose boot causes intermittent misfires and can look identical to a bad plug.
For push mowers: set the mower upright, prime the engine 3 times if it has a primer bulb, and pull. A properly gapped new plug in a healthy engine should fire within 2-3 pulls on a warm day.
For cold Minnesota spring startups: prime 3-5 times, choke fully, and pull. Once it catches, move the choke to half after 10-15 seconds, then fully off once the engine warms up. If it floods during warm-up, remove the plug, pull the cord 5-6 times with no plug installed to clear the cylinder, reinstall, and try again with less prime.
How Conditions Affect Spark Plug Wear
Where you live and how you store your mower changes how fast plugs wear and what kind of fouling you’ll see. I’ve changed plugs in three very different environments, and the failure modes are genuinely different.
Hot and Humid Climates (Southeast, Gulf Coast)
In a Georgia garage in August, the main enemies are moisture and carbon buildup. High humidity promotes rust on the electrode, and frequent short mowing sessions (never letting the engine fully warm up) leads to wet carbon fouling.
If you’re in the Southeast and mowing 3-4 times per week during the summer growing season, check your plug at mid-season, not just annually. A plug that looks fine in March may be black by July after 20+ hours on a humid, stop-start cycle.
Use a plug rated for the correct heat range for your engine. A plug that’s too “cold” (higher heat range number) won’t burn off moisture and deposits in humid conditions – it just accumulates them.
Dry and Dusty Environments (Southwest, Plains States)
In a New Mexico shed, the issue shifts to dust and lean mixture. Fine dust gets past air filters faster than in humid climates. A partially clogged air filter starves the engine of air, which makes the fuel mixture run rich, which fouls the plug with wet black carbon.
Check and clean the air filter every 25 hours in dusty conditions – twice as often as the standard recommendation. When you change the plug in a dusty environment, blow compressed air into the plug well before removing the plug. Otherwise, grit falls directly into the open cylinder.
Also watch for a white or chalky plug in dry heat. High-altitude and very dry air can cause a lean condition that overheats the plug tip. If your plug looks bleached white after one season, talk to a small engine shop about a heat range adjustment.
Cold-Start Damage and Winter Storage (Midwest, Northeast)
Cold-start damage is the most common plug problem I see in the upper Midwest. Starting a cold engine causes incomplete combustion, which deposits unburnt fuel and carbon on the plug. Do this repeatedly over a spring season (pulling, flooding, pulling again) and the plug fouls fast.
Two rules for cold climates:
- Replace the spark plug in fall before storage, not in spring. A fresh plug starts easier in April. An old plug that survived a cold winter is already borderline.
- If you store the mower without draining the fuel, the old fuel leaves varnish deposits that coat the plug electrode. Drain the fuel or use a fuel stabilizer (STA-BIL, 2024).
Wear Patterns by Climate – Quick Reference
| Climate | Most Common Failure Mode | Check Frequency |
|---|---|---|
| Hot, humid (Southeast) | Wet carbon fouling from short runs | Every 20 hours or mid-season |
| Dry, dusty (Southwest) | Lean misfire from clogged air filter | Every 25 hours + check air filter |
| Cold start cycles (Midwest/NE) | Carbon from incomplete combustion | Replace each fall before storage |
| Moderate (Pacific Northwest) | Standard wear – annual replacement adequate | Once per season |
Common Mistakes People Make
Two mistakes account for most of the plug-related problems I’ve seen on residential mowers. Both are easy to avoid once you know what to watch for.
Using the Wrong Plug or Skipping the Gap Check
Installing a plug with the wrong heat range – even if it physically fits – causes misfires, hard starting, or overheating. Heat range is not a minor variable.
A plug that’s too hot will pre-ignite the fuel before the spark fires. You’ll hear a knocking sound and the engine will run rough. A plug that’s too cold won’t burn off carbon deposits, and you’ll end up with fouling within a season.
Skipping the gap check is the other mistake. Pre-gapped plugs are gapped for a “typical” engine, not necessarily yours. A plug gapped at 0.025″ instead of 0.030″ produces a weaker spark. The engine may start fine but run rough under load – especially when the blade engages on a riding mower. Always gap the plug yourself before installation.
Over-Tightening or Under-Tightening
Over-tightening is more common and more damaging. The threads in a lawn mower cylinder head are cut into aluminum, which is soft. Strip those threads and you’re looking at a helicoil repair or a new short block.
Over-tightening also distorts the crush gasket past its design spec, which can actually cause exhaust leaks rather than preventing them.
Under-tightening is the opposite problem. A plug that’s too loose vibrates loose during operation, which causes a misfire – sometimes intermittent, which makes it hard to diagnose. If your mower suddenly starts running rough after a bumpy mow, check that the plug is still seated.
The fix for both: use a torque wrench. It’s a $20 tool and it removes all guesswork.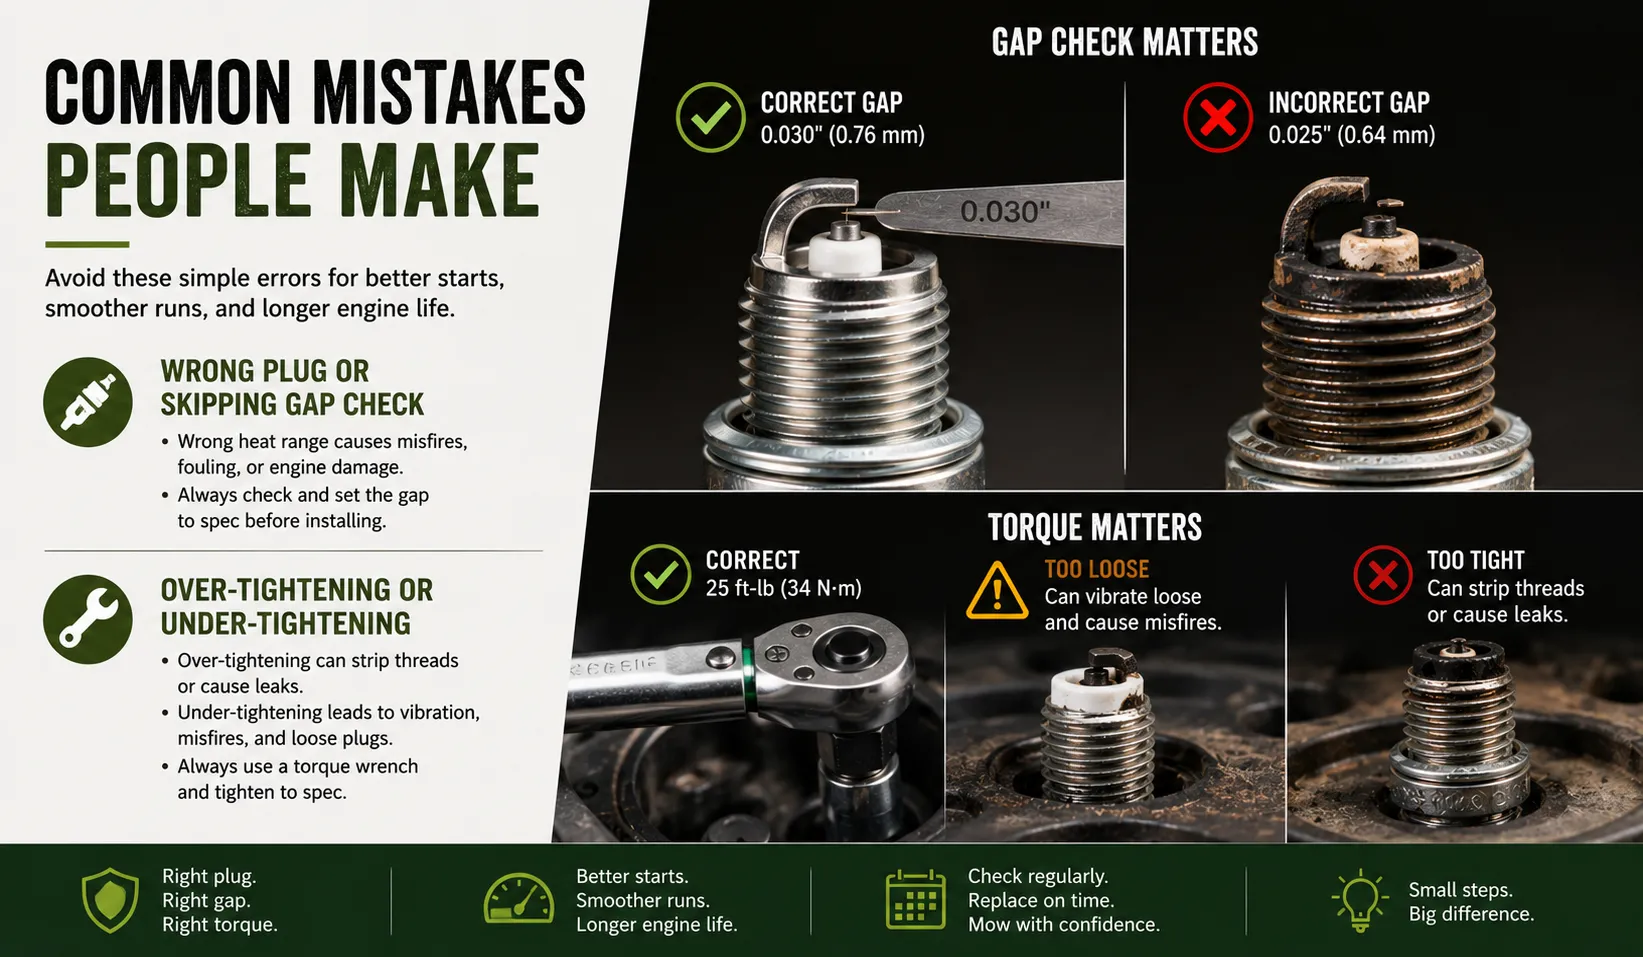
My Final Recommendation
After replacing plugs on mowers from Georgia humidity to Minnesota spring cold, the honest answer is: this is one of the most worthwhile 20-minute jobs in small engine maintenance. The part costs $4-8. The labor is zero. And it solves or prevents a surprisingly large number of starting and running problems.
Buy a two-pack of plugs when you buy one. Put the spare in the shed. If the mower ever won’t start and you’ve already checked the fuel and air filter, you can swap the plug on the spot in under five minutes – no hardware store trip, no lost afternoon.
The one situation where I’d say skip the DIY route: if you pull the old plug and find it covered in oil, or if the engine produces white smoke after the new plug goes in, those symptoms point to internal engine problems (worn piston rings, a blown head gasket) that a new plug won’t fix. At that point, take it to a small engine shop and get an honest diagnosis before spending more money on parts.
DIY vs. Shop: Honest Pros and Cons
| DIY Spark Plug Replacement | Small Engine Shop | |
|---|---|---|
| Cost | $4-8 for the part | $40-80 labor + part |
| Time | 20-30 minutes | Drop-off + 1-3 day wait |
| Tools required | Spark plug socket, ratchet, gap tool | None |
| Right for you if… | You have basic tools and 30 minutes | Plug is seized, threads are stripped, or you suspect deeper engine problems |
| Risk | Stripped threads if over-forced | None to you, but diagnosis may reveal bigger issues |
| Skill level needed | Beginner – no prior mechanical experience required | N/A |
Frequently Asked Questions About Lawn Mower Spark Plugs
How often should I replace my lawn mower spark plug?
Replace it once per season or every 25 hours of use, whichever comes first. For most homeowners mowing once a week during a 20-week season, that’s roughly one plug per year. Briggs & Stratton recommends annual replacement as standard maintenance for residential engines (Briggs & Stratton, 2024).
What size socket do I need to remove a lawn mower spark plug?
Most push mowers with small Briggs & Stratton or Honda engines use a 5/8″ (14mm) spark plug socket. Most riding mowers and larger engines use 13/16″ (21mm). Check your owner’s manual or look at the plug when you remove the wire boot – the socket size is often printed on the plug body.
Can I use any spark plug brand in my lawn mower?
NGK and Champion are the two most common brands for small engines in the US, and either works in most residential mowers. The important thing is matching the correct part number, not the brand. A correct Champion plug is better than an incorrect NGK plug. Cross-reference using your owner’s manual or the part number stamped on your current plug.
What happens if the spark plug gap is wrong?
A gap that’s too small produces a weak spark that can cause hard starting and rough running. A gap that’s too large requires more voltage to jump, which can prevent firing entirely or cause intermittent misfires under load. Always check and set the gap before installation, even on new “pre-gapped” plugs.
Why does my mower start then die after I replace the spark plug?
A new plug by itself won’t fix problems caused by other issues. If the mower starts then stalls, check the air filter (dirty filters cause rich running), the fuel (old or stale fuel causes flooding), and the carburetor (a gummed-up carb restricts fuel flow). A new plug fixes spark – it doesn’t fix fuel delivery or air flow problems. Also confirm the plug wire boot is fully seated on the new plug.
How do I know if my spark plug is fouled vs. just worn?
A worn plug has a rounded, eroded center electrode and a gray-tan deposit from normal combustion. A fouled plug has black carbon (dry fouling from rich mixture) or a wet, oily coating (oil fouling from internal engine wear). Worn plugs fire weakly; fouled plugs may not fire at all. Both need replacement, but oily fouling also signals you need to investigate why oil is reaching the combustion chamber.
Is it safe to clean and reuse a spark plug instead of replacing it?
You can clean a lightly carboned plug with a wire brush and reinstall it for testing purposes. For regular maintenance, though, a new plug is worth the $4-8. The electrode gap widens as the plug wears, and cleaning doesn’t restore the electrode geometry. Reusing an old plug is fine as a temporary measure; it’s not a substitute for annual replacement.