I still remember the first time I tried to remove my lawn mower blade. It was a warm Saturday morning in late April. The grass was thick and green after weeks of spring rain. I fired up my old Craftsman push mower and rolled it across the yard. Instead of a clean cut, I got ragged, torn tips. The lawn looked chewed, not mowed.
I knew the blade was dull. I just had no clue how to remove it. I spent 20 minutes wrestling with the wrong socket size before I gave up and called my neighbor Dave. He walked over in flip-flops, fixed it in ten minutes, and left without saying a word. That was my wake-up call.
So I learned. And now, after pulling blades on everything from a rusty riding mower to a brand-new EGO battery mower, I can tell you the whole process is simple once you know what you are doing. That is exactly what I want to share with you today.
In this guide, I will walk you through how to remove a lawn mower blade safely and correctly. Step by step. No fluff. No jargon. Just the real stuff that works.
Why Removing Your Lawn Mower Blade Matters
Most people never think about the blade until the lawn starts looking bad. I was the same way.
What a Dull Blade Actually Does to Your Grass
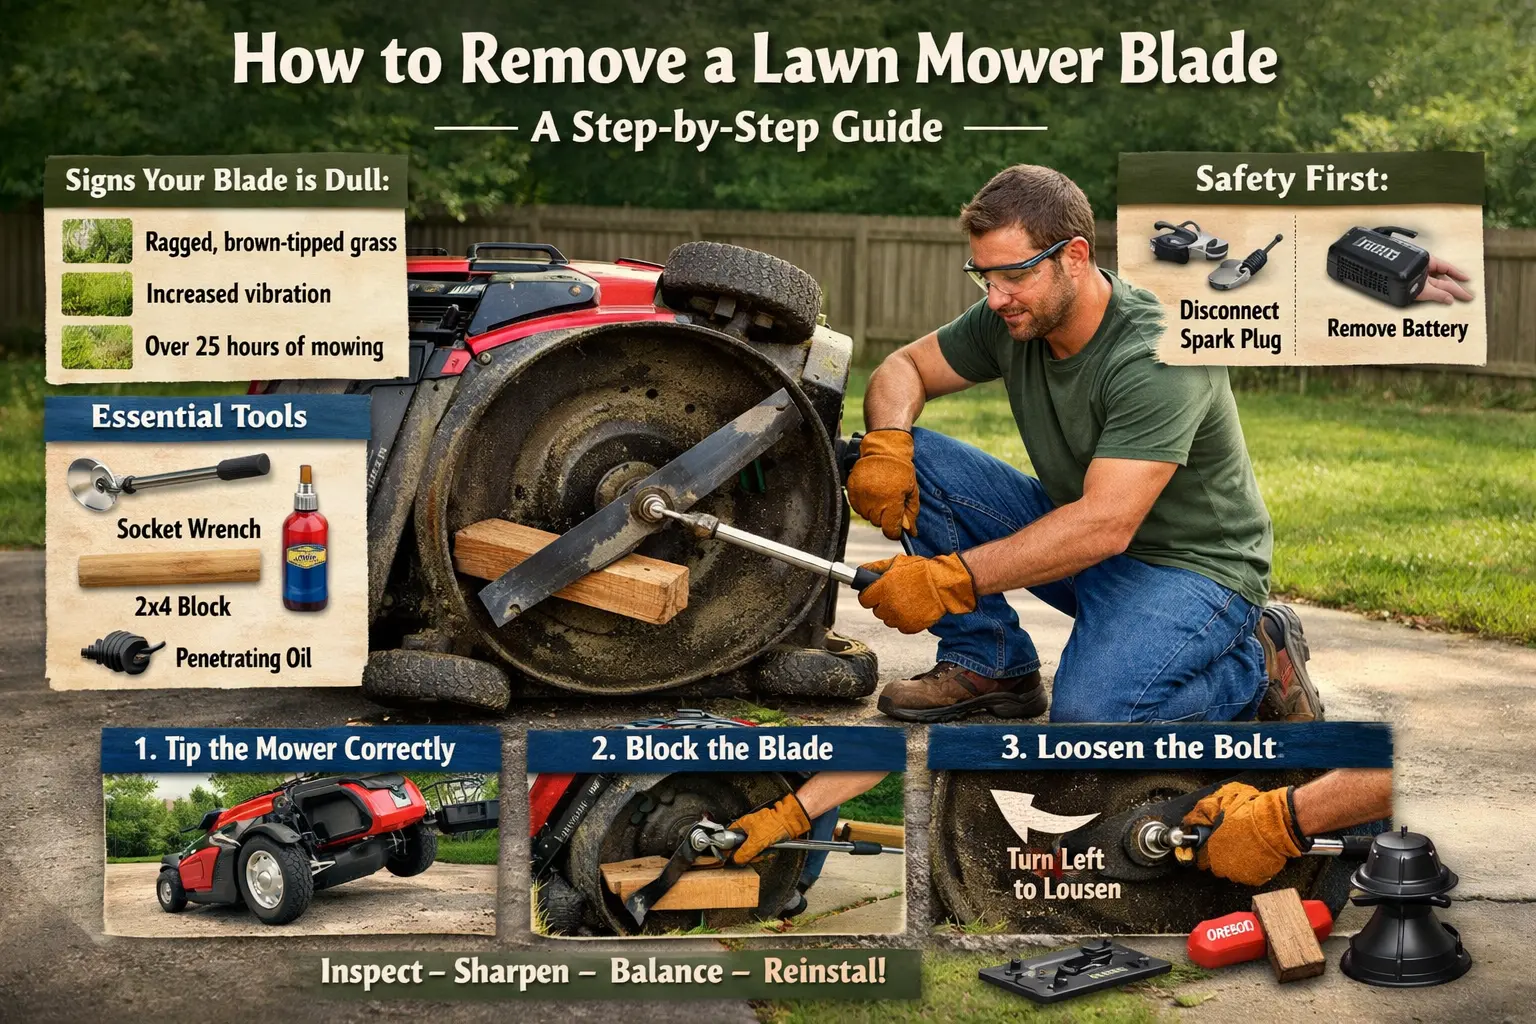
A sharp blade cuts grass clean. A dull blade tears it. You might not notice right away. But give it two days. The torn tips turn yellow or brown. That pale, ragged look across your lawn? That is blade damage.
Beyond looks, torn grass is more likely to get stressed. It loses moisture faster. It invites disease. If you have ever stared at your yard thinking, why does this look so rough, the blade is probably the answer.
Here is what I watch for before I pull the blade:
- Grass tips look shredded or frayed after mowing
- The lawn has a brownish tint two to three days after cutting
- I feel vibration through the handle that was not there before
- The mower hit a rock, root, or a buried sprinkler head
- It has been more than 25 hours of mowing time since the last sharpening
Sharpening vs. Replacing the Blade
Not every dull blade needs to be thrown out. I sharpen mine two or three times before I replace it. But there are times when sharpening just is not enough.
If the blade has cracks, deep gouges, or bends in the body itself, it is done. A bent blade will never balance properly. An unbalanced blade vibrates. That vibration damages your spindle over time. I learned that the hard way on an old Troy-Bilt after ignoring a bent blade for half a season.
When I replace, I usually go with an Oregon aftermarket blade. They are well made and easy to find at Tractor Supply or online. OEM blades from brands like Husqvarna or Honda are great too, just a bit pricier.
How Often Should You Pull the Blade?
I follow a simple rule. Every 20 to 25 hours of run time, I pull and inspect the blade. For most suburban lawns, that is once or twice a season.
The schedule changes based on where you live and what you are cutting. If you mow Bermuda grass down in Florida or the Gulf Coast, you might be mowing most of the year. That means more wear and more frequent checks. If you are up in Minnesota or Ohio, you get maybe five or six months of mowing season. One solid spring sharpening usually carries you through.
Safety First: What to Do Before You Touch the Blade
This is the part people skip. Please do not skip it. A mower blade is incredibly sharp and sits close to a mechanical system that can move without warning.
Disconnect the Spark Plug on Gas Mowers
This step is non-negotiable. Pull the spark plug wire before you do anything else. I mean before you even tip the mower.
Here is why it matters. If the blade rotates even slightly, the engine piston can compress and cause the engine to kick. That is called an accidental start. It is rare but it happens. And when it does, the consequences are serious.
The spark plug wire is that rubber boot cap sitting on top of the spark plug. Pull it straight off. Tuck it to the side so it cannot accidentally reconnect while you are working. Simple.
Battery and Electric Mower Safety
Battery mowers have become hugely popular over the last few years. Brands like EGO, Greenworks, and Ryobi are everywhere now. The process is just as simple here.
Take out the battery pack completely. Do not just turn the mower off. Remove the battery. On most EGO and Ryobi packs, you press a release tab and slide the pack out. Put it on the ground away from your workspace.
For corded electric mowers, unplug the cord from the wall. All the way out. Then wrap the cord away from the area where you are working.
Gear Up: What You Actually Need to Wear
I keep it simple. I grab my leather work gloves. That is the one item that actually matters. Mower blades are sharp even when dull. The edge will still cut skin easily.
Eye protection is a good idea if the blade area is rusty or grimy. A few small debris bits can fly when you are scrubbing and loosening things up. I usually grab my old shop glasses from the garage shelf.
Old clothes. Grease is involved. Always.
Tools You Need to Remove a Lawn Mower Blade
You do not need a mechanic’s toolbox. I have done this job with basic gear from the garage. Here is what you need.
The Must-Have Tools
The most important item is a socket wrench with the right socket. Most walk-behind mower blade bolts use a 5/8 inch socket. Some use 3/4 inch. If you have a metric model like an EGO, you may need a 19mm. Bring a few options the first time.
Here is my go-to list:
- Socket wrench and socket set — Craftsman and Kobalt are solid and affordable at Lowe’s
- A piece of 2×4 lumber — this blocks the blade so you can turn the bolt without the blade spinning
- Penetrating oil — I use PB Blaster. It is widely available at AutoZone and Home Depot
- A wire brush — to clean debris from the blade mount area
- Work gloves — non-negotiable
Nice to Have But Not Required
A breaker bar is a game changer for seized bolts. It gives you way more leverage than a standard ratchet. I added one to my garage kit after a stubborn Toro bolt nearly made me cry.
If you plan to sharpen the blade after removal, an Oregon blade sharpening kit or a simple angle grinder works well. You can find them at Tractor Supply, Ace Hardware, or Amazon.
A blade balancer is about five dollars and worth every penny. It helps you confirm the blade is evenly weighted before you reinstall.
The Reverse Thread Question
This trips people up constantly. I see it in forums all the time. Most walk-behind mower blade bolts are standard thread. Counterclockwise to loosen. That is it.
A small number of older engines, specifically some Briggs and Stratton models with a counterclockwise crankshaft, have reverse thread bolts. Clockwise to loosen on those. Check your owner’s manual if you are unsure. If the bolt will not budge with normal counterclockwise force and you have good penetrating oil on it, check whether it might be reverse thread before you apply more force.
Riding mowers with twin blade decks sometimes have one standard and one reverse thread bolt. Usually it is the left side deck blade that reverses. Again, manual first.
How to Remove a Lawn Mower Blade: Step by Step
Okay, this is the part you came here for. Let me walk you through exactly what I do.
Step 1: Pick the Right Spot and Prep the Mower
I always work on my concrete driveway. It is flat, firm, and well lit. If you are in Phoenix or somewhere dry, any time of day works. If you are somewhere humid like the Gulf Coast or the Southeast, try to work in the morning before the air gets sticky and slippery.
For gas mowers, check your fuel level. If the tank is close to full, you have a couple of options. You can siphon some out with a hand pump. Or you can tip the mower carefully with the carburetor side up to prevent fuel from flooding the air filter. The carburetor is on the same side as the air filter. That side goes up, always.
Let the engine cool for at least 20 to 30 minutes after mowing. Touching hot engine parts is just not fun. And the metal expands when hot, which can make the bolt harder to turn.
Step 2: Tip the Mower on Its Side
Tipping direction matters a lot here. Always tip the mower with the air filter and carburetor facing up. If those face down, oil can leak into the air filter and you will have a whole separate problem to solve.
On most walk-behind mowers, that means tilting to the right side, looking from behind the handle. But check your specific model. Some Honda and Toro mowers have the carburetor on a different side.
Once tipped, I place a folded piece of cardboard under the deck edge to protect it from scratching on the concrete. Small thing. Makes a difference.
For self-propelled mowers with big rear wheels, the handles can rest against a step stool or the side of the garage to keep everything stable. If the mower keeps trying to fall back upright, have someone hold it while you work.
Step 3: Block the Blade
Now you can see the blade. It is right there under the deck. Before you put a wrench on the bolt, you need to stop the blade from spinning when you apply force.
Grab your piece of 2×4 lumber. Wedge it between the blade and the inside wall of the mower deck. It sits right there and takes the rotational load while you turn the bolt. Simple, cheap, effective. I have done this probably 50 times. Never had an issue.
If you want something more purpose-built, Oregon makes a blade removal tool for about 12 dollars. It is a small curved piece that locks onto the blade. Works great. Available at Tractor Supply and on Amazon. But the 2×4 works just as well.
Do not use your hand to hold the blade. Ever. Not even for a second. This is the rule that never changes.
Step 4: Loosen the Blade Bolt
With the blade blocked, attach your socket wrench and turn the bolt counterclockwise. On a standard thread mower, that is left. Apply steady pressure. Do not yank or jerk. Steady force wins here.
If the bolt is rusty, this is where the PB Blaster earns its keep. Spray it on the bolt, let it soak for ten to fifteen minutes, then try again. I have had bolts that would not budge at all without a good soak. Patience is worth it.
Still stuck? Add a cheater bar. Slide a short piece of metal pipe over the handle of your ratchet. Instant leverage increase. Most seized bolts give up after that.
If it still will not move, it is impact wrench time. A DeWalt DCF887 or a Milwaukee 2767-20 will crack almost any bolt. Both are common at Home Depot and hardware stores. Some people rent them if they do not want to buy. Smart move for a one-off job.
Step 5: Note the Blade Orientation
Before you pull that blade off, take a photo with your phone. Seriously. Takes five seconds. Save yourself 20 minutes of confusion when you reinstall.
The blade has a correct side and a wrong side. The cutting edges face up, toward the engine. The lift wings or curved ends also face up. If you install it upside down, the mower will run perfectly but will not cut a single blade of grass. I have seen people do this. It is a frustrating and embarrassing thing to diagnose.
Also note how any washers or adapter plates are stacked. Some mowers have a star-shaped adapter between the blade and the spindle. That goes back exactly the way it came off.
Step 6: Remove the Bolt and Pull the Blade
Once the bolt is loose, finish removing it by hand. Keep track of the bolt and any washers. I put them in a small cup or a zip-lock bag right away so nothing rolls away.
Pull the blade off the spindle shaft. It should slide off cleanly. If it feels stuck, wiggle it gently side to side. Sometimes corrosion or debris creates a slight bond.
Set the blade on a flat surface. Now take a moment to look at it before you do anything else.
Step 7: Inspect the Blade and the Spindle Area
Hold the blade and look at it carefully. Check for cracks, deep gouges, or a warped body. Run your finger along the edge carefully. You can feel where the dullness is.
Now look at the spindle shaft. That is the short metal post the blade was sitting on. Check for scoring, rust, or any wobble. A healthy spindle is smooth and firm. If you grab the shaft and it wiggles, that is a bearing issue. Worth knowing now rather than mid-season.
Clean the spindle area with a wire brush. Get the rust and debris off. This makes reinstallation smoother and keeps the mounting surface clean for a good, tight fit.
Removing Blades on Different Types of Mowers
The same core process applies across mower types. But each type has its own quirks. Here is what I have learned from working on different machines.
Walk-Behind Gas Mowers
This covers the most popular mowers out there. Toro, Honda, Craftsman, Troy-Bilt, Snapper. Most homeowners in suburbs across the country own one of these.
Single blade. One center bolt. Standard process as described above. Brand notes worth knowing:
- Toro Recycler series: 5/8 inch bolt, standard thread, factory torque is tight at around 90 ft-lbs. PB Blaster first, always.
- Honda HRX217: This one has a twin blade system. Two smaller blades, each with its own bolt. Both are standard thread.
- Craftsman M105 and M215: Briggs and Stratton engines, standard thread. Decent clearance inside the deck for the 2×4 method.
- Troy-Bilt TB110 and TB330: Straightforward layout, no surprises. Good starter mowers to practice on.
Battery-Powered Walk-Behind Mowers
I made the switch to battery on my main home mower a couple of years ago. The EGO LM2135SP is what I use now. Quieter, cleaner, and shockingly powerful. No gas smells in the garage.
The blade removal process is identical to gas once you take the battery out. Pull the pack first. Then tip, block, and remove just like normal.
One thing to note: the EGO uses a 19mm bolt. Metric. If your socket set only goes to standard, you will be reaching for the wrong size. I bought a cheap metric socket set from Amazon after learning this the annoying way.
Greenworks and Ryobi models follow a similar process. Slightly lighter blades due to smaller decks. The removal steps are the same.
Riding Mowers and Zero-Turn Mowers
Riding mowers are a different level of job. I am not going to pretend otherwise. But it is still very doable at home if you take your time.
You need a mower lift or floor jack to get safe access under the deck. Tilting a riding mower like a push mower is not the plan. These machines weigh several hundred pounds.
Always engage the parking brake. Remove the ignition key. If it is an electric start model, disconnect the battery terminal too.
Most riding mower decks have two or three blades. Each blade has its own bolt. You repeat the block-and-remove process for each one. John Deere 100 series models typically use a 15/16 inch bolt on the blades. Husqvarna YTA series models are similar.
The deck hardware is more complex. Anti-scalp rollers, deck hangers, belt covers. Take photos as you go. It helps a lot when you reassemble.
Corded Electric Mowers
Sun Joe and Greenworks make the most common corded electric models you will see. They are popular for smaller city lots and apartment-style yards.
Unplug from the wall. Fully. Then the process is nearly identical to a gas push mower. The blade is usually a bit lighter, which makes handling easier. Standard socket and 2×4 method works fine.
Common Mistakes When Removing a Lawn Mower Blade
I have made most of these myself at some point. Let me save you the trouble.
Tipping the Mower the Wrong Way
This was my first mistake. I tipped my old Craftsman with the carburetor facing down. Oil flooded the air filter. The mower started rough and smoked for ten minutes after I got it back upright. Not a good afternoon.
Always tilt with the air filter side up. Carb up. Air filter up. Repeat it like a mantra.
Skipping the Spark Plug Disconnect
I know it feels unnecessary on a machine that is not running. But the spark plug disconnect is there for a reason. If the blade moves and the piston compresses, the engine can fire without warning. That is not a risk worth taking for the 15 seconds it takes to pull the wire.
Installing the Blade Upside Down
Completely avoidable. Entirely my fault the first time it happened to me. The mower ran perfectly. It just did not cut anything. I mowed my entire front yard before noticing the grass had barely changed height.
Take the phone photo before you remove the blade. It is the simplest fix for this mistake.
Getting the Bolt Torque Wrong on Reinstall
Two ways this goes wrong. Too loose, and the blade wobbles. The vibration eventually damages the spindle bearings. I have seen this ruin an otherwise healthy mower deck over one season.
Too tight, and next time you go to remove it, the bolt is seized. Which means penetrating oil and a breaker bar and a lot of patience.
Use a torque wrench. Hit the manufacturer spec. It takes two minutes and saves a lot of headaches.
Using the Wrong Socket Size
I stripped a bolt head once trying to force a slightly-too-large socket. I thought it was close enough. It was not. Removing a stripped bolt requires an extractor set and a whole separate level of frustration.
Test the socket fit before you apply force. It should sit snugly with no play. If it wobbles, grab a different size.
How to Sharpen Your Blade After Removing It
Removing the blade is half the work. Sharpening it is where the real reward comes from. A freshly sharpened blade transforms how your lawn looks after a cut.
The DIY Sharpening Method
I use an angle grinder with a metal grinding wheel. You can also use a flat mill file if you prefer a more hands-on approach. Both work well.
The key is matching the existing bevel angle. That angle is around 30 degrees on most residential blades. Do not try to change the angle. Just follow the existing edge and sharpen along it.
Work in one direction. Heel to tip. Single strokes. Remove metal evenly from both ends of the blade. This is important for balance.
You are done when the edge feels like a butter knife, not a razor. A mower blade does not need to be razor sharp. It needs to be sharp enough to cut cleanly at high speed. There is a difference.
How to Check Blade Balance
An unbalanced blade vibrates. Vibration kills spindle bearings. So after sharpening, always check the balance before reinstalling.
Get a blade balancer. It is a small cone-shaped plastic tool. About five dollars on Amazon or at Tractor Supply. Hang the blade on it by the center hole. If it stays level, you are good. If one side dips, that side is heavier. File or grind a little more off the heavy end and check again.
You can also hang the blade on a large nail driven into a wall stud. Same principle. Horizontal means balanced. Tipped means one side is heavier.
When to Replace Instead of Sharpen
Some blades are beyond saving. If the blade has a visible crack anywhere, replace it. Full stop. A cracked blade can break apart at speed. That is dangerous.
If the blade body is bent, even slightly, replace it. You cannot safely flatten a bent blade back to true. The internal stress in the metal is compromised.
If the cutting edge has been sharpened down so thin it is translucent when held to light, replace it. There is nothing left to sharpen.
Replacement blades are easy to find. Bring the old blade with you to match it, or note your mower model number. Oregon, Maxpower, and OEM brand blades are all widely available at Home Depot, Tractor Supply, and Amazon.
How to Reinstall the Lawn Mower Blade Correctly
Getting the blade back on correctly matters just as much as getting it off. Here is my exact reinstall process.
Step-by-Step Reinstallation
First, clean the spindle shaft and mounting surface with your wire brush. Remove any caked grass, rust, or debris. A clean surface makes for a tight, even seat.
Slide the blade back onto the spindle. Refer to your phone photo. Cutting edges face up toward the engine. Wings face up. Star adapter in the original orientation. This is the step where the photo pays off.
Thread the bolt by hand first. All the way in by hand before touching the wrench. This prevents cross-threading, which is a miserable problem to fix.
Block the blade with your 2×4 again. Tighten the bolt with your wrench. Then use a torque wrench to hit the correct spec. Here is a quick reference for common US brands:
- Toro walk-behind gas models: approximately 90 ft-lbs
- Honda HRX and HRN series: 36 to 47 ft-lbs
- Craftsman with Briggs and Stratton engines: 35 to 50 ft-lbs
- Husqvarna walk-behind models: 35 to 50 ft-lbs
- EGO battery mowers: approximately 37 ft-lbs, always confirm in your manual
- Riding mower models generally: 60 to 90 ft-lbs, confirm with model-specific documentation
Lower the mower back upright. Reconnect the spark plug wire or reinsert the battery. Start the mower and listen. A smooth, vibration-free idle means you got it right.
Seasonal Blade Care: Storage and Spring Startup
The blade care routine changes depending on where you live and when you mow. Here is how I handle both ends of the mowing season.
Fall and Winter Preparation
If you live somewhere with a real winter, the end of the mowing season is the time to give the blade some attention. I do this every October before I put the mower away.
Pull the blade off. Clean it thoroughly. Dry it completely. Then coat it with a thin layer of WD-40 or 3-IN-ONE oil to prevent rust during storage. Wrap it in an old cloth rag and store it separately if you want to be thorough.
I stick a small piece of tape on the blade and write a note. Something like, needs sharpen before spring, or, good to reinstall. That way, when April rolls around and I am digging the mower out of the corner of the garage, I already know what I am dealing with.
Spring Startup Check
That first warm weekend in spring, when the lawn is green and growing and you are itching to get out there, take 20 extra minutes to pull the blade before the first cut.
Check for rust or pitting that developed over winter, even if you oiled it. Sharpen if needed. Balance check. Reinstall. Then do a short test run on a small patch of grass before committing to the full lawn.
This little habit has saved me from starting the season with a rough, torn-up lawn more than once. First cut of the year on a sharp blade feels completely different. The lawn looks magazine-quality after just one pass.
Year-Round Mowing Regions
If you are in Florida, southern Texas, Arizona, or coastal California, you might mow ten or eleven months a year. The blade schedule is different for you.
I would check the blade every four to six weeks during active mowing months. Sandy soil, which is common in Florida and the desert Southwest, wears blades faster than soft loam soil. The particles act like fine-grit sandpaper at blade speed.
Keep a spare blade on the garage shelf. When you pull the old one for inspection and decide it needs replacing, you can swap immediately instead of waiting for a delivery or a store trip. It is a small convenience that makes maintenance feel much less like a chore.
DIY vs. Calling a Pro: When to Hand It Off
I am a fan of doing it myself. But I am also honest about when a job is beyond what I want to deal with at home.
Do It Yourself When:
This job belongs on your own driveway when:
- You have a socket wrench, work gloves, and a piece of scrap lumber
- The blade bolt is not stripped or seized solid
- You just need to sharpen, balance, and reinstall a standard blade
- You own a walk-behind mower of any type
- You have done basic DIY home or car maintenance before
Call a Small Engine Shop When:
There are real situations where paying someone is the smarter call:
- The bolt is completely seized and an impact wrench at a shop will crack it in 30 seconds, versus your 45-minute wrestling match
- The spindle feels loose or wobbles. That is a bearing replacement job and needs a press
- The deck has cracks or warped metal around the blade mount area
- Your mower is under warranty and DIY blade work might void coverage
Most local small engine shops charge between 15 and 30 dollars for a blade pull, sharpen, and reinstall. Independent shops, Ace Hardware repair centers, and dealers for brands like John Deere and Husqvarna usually offer this. It is genuinely worth knowing about for those years when you just do not have the time or patience.
Frequently Asked Questions About Lawn Mower Blade Removal
These are the questions I get most often, and the ones I spent the most time confused about myself before I figured things out.
Which way do you turn the bolt to remove a lawn mower blade?
Turn it counterclockwise. That loosens a standard right-hand thread bolt, which is what most walk-behind mowers use. The old saying works here: lefty loosey, righty tighty.
The exception is certain older engines with a counterclockwise spinning crankshaft. Some Briggs and Stratton models fall into this category. Those have a reverse thread bolt, meaning you turn clockwise to loosen. If counterclockwise is not working and the bolt is not just stuck from rust, check your owner’s manual for thread direction.
Can I remove the blade without a special blade removal tool?
Yes, absolutely. The 2×4 lumber method works perfectly well. Wedge a piece of scrap wood between the blade and the inside of the deck. It stops the blade from rotating while you turn the bolt with your socket wrench.
The Oregon blade removal tool makes it a little more convenient. It costs about 12 dollars. But it is not required. I used the 2×4 method for years before I ever bought the tool.
Is it safe to sharpen the blade without removing it?
Technically possible. Practically, I do not recommend it. You need to tip the mower, disconnect the spark plug, and somehow get an angle grinder or file into a tight, awkward space. The results are usually uneven.
More importantly, you cannot balance the blade without removing it. And an unbalanced blade is a bigger problem than a dull one. Pull it out. Do the job right.
Why is my blade bolt so hard to turn?
A few reasons. Rust is the most common one, especially on mowers that sit in humid garages or are stored without maintenance through a wet winter. Spray penetrating oil on the bolt, wait 15 minutes, and try again.
Factory overtightening is another common cause. Some brands torque their blades tight right from the assembly line. A breaker bar handles this. If neither works, an impact wrench will crack it.
And sometimes the bolt is just physically stripped or corroded beyond standard removal. That is when I take it to the shop.
How long does this whole process take?
For a walk-behind mower, figure 15 to 25 minutes once you have done it a couple of times. Your first time might run 30 to 45 minutes. That is completely normal.
Riding mowers with multi-blade decks take longer. Budget 45 minutes to an hour if you are working on one of those for the first time. Getting the deck lowered safely and accessing multiple blade bolts just adds steps.
Can I use an impact wrench to reinstall the blade bolt?
You can, but be careful. Impact wrenches make it very easy to overtighten. I use one to break the bolt loose on removal. For reinstallation, I switch to a standard torque wrench so I can hit the correct spec. Over-torquing the bolt now means a seized bolt nightmare next time. Use the torque wrench for the final tighten.
One Last Thing Before You Head to the Garage
Knowing how to remove a lawn mower blade is one of those skills that seems small until you actually need it. Then it feels enormous.
The first time you do it and get it right, you feel genuinely good about it. Your lawn looks better. Your mower runs smoother. And you know you did it yourself, correctly, without waiting on someone else or paying a shop for a simple job.
I have done this job in the Florida humidity, in an Ohio garage in late October, and on a dusty Arizona driveway in July. The process is the same every time. Disconnect the power source. Tip it the right way. Block the blade. Loosen the bolt. Take a photo. Pull the blade. Inspect, sharpen, balance. Reinstall to spec. Listen for that clean idle.
That is it. Every single time. Once you have done it twice, it becomes second nature. You will not even think about calling Dave.