
It was a Saturday in late April. My Georgia backyard looked like a jungle. The grass had gone from “needs cutting” to “genuinely embarrassing” in about two weeks.
I pulled out my old Craftsman push mower. Give the cord a yank. Heard it: that rough, sluggish cough. Like the engine was clearing its throat.
That’s not a starting problem. That’s dirty oil.
I hadn’t changed it since August. It had been sitting all winter — cold, damp, and collecting everything bad a crankcase can collect. The engine was telling me loud and clear it was done being patient.
Here’s what I’ve learned after years of working with small engines. Learning how to drain oil from a lawn mower is one of the most important things you can do for your equipment. It costs almost nothing. It takes under 20 minutes. And skipping it is one of the fastest ways to kill an engine that would have run for 15 years.
I’ve worked with Briggs & Stratton engines, Honda GCV models, Kohler single-cylinders, and Kawasaki V-twins. I’ve changed oil in humid Florida summers and bone-dry Arizona heat. I’ve done it wrong more than once. I’ve helped neighbors rescue mowers they thought were dead — just from a fresh oil change.
This guide is everything I know. Short sentences. Plain language. Real experience. Let’s get into it.
Why Draining Old Oil Actually Matters More Than You Think
Old oil doesn’t just get dirty. It turns into sludge. That sludge slowly destroys your engine from the inside while you’re blissfully unaware.
What Happens to Oil After 50 Hours of Use
Think about what your lawn mower engine goes through. Extreme heat every single time you run it. Combustion gases leaking past piston rings. Microscopic metal particles from moving parts. Moisture sneaking in through the breather system.
Fresh oil starts golden and clear. It’s full of additives that protect metal surfaces. It flows easily and keeps everything running smooth.
After 50 hours? Different story. The oil breaks down from repeated heat cycles. Additives get used up. Contaminants build up — grass clippings, moisture, combustion byproducts.
Pull the dipstick on an overdue engine. The oil looks dark brown. Almost black. It smells burnt. That’s degradation. The oil can barely do its job anymore.
Viscosity drops when oil oxidizes. It gets too thin to hold a protective film between metal parts. Metal starts touching metal. That’s when real damage begins.
The Real Cost of Skipping Oil Changes
I had a neighbor in North Carolina with a Troy-Bilt riding mower. Beautiful machine. Bought it new. Never once changed the oil.
Two seasons later, the engine seized. Locked up mid-cut. The repair estimate came in at $340. The mower had cost him $1,100.
A quart of SAE 30 oil costs about $5. An oil change on a push mower takes maybe 15 minutes.
That math is not complicated.
The humidity in Florida and along the Gulf Coast makes this even more urgent. Moisture gets into the crankcase faster in humid climates. The oil degrades quicker. If you’re mowing in Houston or Tampa, skipping the seasonal change is genuinely risky.
Dry climates like Colorado or Nevada aren’t off the hook either. Heat breaks down oil just as effectively as moisture. It just looks different when you drain it.
How Often Should You Drain Oil From a Lawn Mower?
Most manufacturers say every 50 hours of use. Or once per season — whichever comes first.
Here’s the one most people miss: new engines need their first oil change at just 5 hours. That’s the break-in change. Metal parts are still seating during those first hours. The oil collects tiny metal particles. Leaving them in is a mistake that shortens engine life right from the start.
| Mower Type | First Change | Regular Interval |
| Push mower (walk-behind) | 5 hours | Every 50 hours |
| Riding mower | 5 hours | Every 50–100 hours |
| Zero-turn mower | 5 hours | Per manufacturer spec |
If you mow every week on a large half-acre yard, you can hit 50 hours in a single season. Small suburban lot, mowing twice a month? Once per season is enough.
When in doubt, change it. Oil is cheap. Engines are not.
What You Need Before You Start (Tools and Oil)
You don’t need a garage full of equipment. But you do need the right stuff — because putting the wrong oil in the wrong engine is almost as bad as skipping the change entirely.
Tools You’ll Actually Use
- An oil drain pan — at least 1–2 quart capacity. A cheap $5 one from AutoZone works fine.
- A socket wrench set — most drain plugs need a 3/8″ drive. Some need a 1/2″. Bring both.
- Nitrile gloves — don’t let warm oil sit on your skin. Trust me on this one.
- Rags or paper towels — you will make a small mess. That’s just part of it.
- A wide-mouth funnel — for refilling without spilling oil down the outside of the engine.
- A small sealed container — for transporting used oil to a recycling drop-off.
One tool I added two years ago changed everything: an oil extractor pump. It goes down through the dipstick tube and sucks the oil out without you crawling under the mower. Briggs & Stratton makes a good one for about $15 at Home Depot. For riding mowers especially, it’s a game-changer. My driveway has never looked cleaner on oil change day.
Choosing the Right Replacement Oil
This is where a lot of people get tripped up. Not all oil is the same. The grade matters. The temperature matters.
- SAE 30 — best for warm weather above 40°F. Great for the US South. Most older Briggs & Stratton engines call for this.
- 10W-30 — solid all-around choice. Works in variable temps. Good for the Midwest and Northeast where seasons shift hard.
- 10W-40 — wider temperature range. Less common in lawn mowers but works in some models.
- Synthetic 5W-30 — made for cold climates. If you’re in Minnesota or Wisconsin starting your mower in early spring near freezing temps, this is your oil.
Always check your owner’s manual first. Honda, Toro, and John Deere each have their own recommendations. What works in a Craftsman M110 isn’t necessarily what a John Deere E110 wants. You can also check the official Briggs & Stratton oil guide for their complete recommendations by engine model.
One important note: avoid car motor oil labeled “energy conserving” or marked with the EC symbol. These contain friction modifiers designed for car engines. In a small engine, they can cause damage over time. Regular conventional 10W-30 without the EC designation is usually fine.
How Much Oil Does a Lawn Mower Take?
Push mowers hold surprisingly little. Most take 12 to 20 ounces — roughly 0.6 quarts.
Riding mowers hold more. Expect 1.5 to 2 quarts depending on engine size.
Never just pour until it “seems full.” Always use the dipstick to check. Overfilling causes oil to foam inside the crankcase, which destroys its lubricating properties. An overfilled engine blows white smoke from the exhaust. Not a fun surprise mid-mow.
Safety First — Before You Touch Anything
This section is short. But please don’t skip it. A warm engine is not dangerous. A running engine is.
Let the Engine Cool Down (But Not Too Cold)
Here’s a balance that confuses people. You don’t want to drain totally cold oil — it’s thick and slow. It won’t drain completely. You’ll leave contaminated oil behind.
But you also don’t want to drain it right after a long mowing session. The oil is dangerously hot and can splash and burn.
The sweet spot: run the engine for one or two minutes. Shut it off. Wait five to ten minutes. Oil is warm enough to flow freely but cool enough to handle safely.
On a July afternoon in Texas, even that short warmup means gloves are non-negotiable.
Disconnect the Spark Plug Wire
This single step prevents accidental engine start while your hands are near the blade.
The wire is usually black with a rubber boot that caps onto a metal post near the front of the engine. Pull it off firmly — it unsnaps with a pop. Let it hang visibly away from the plug.
I’ve seen YouTube tutorials where the presenter never disconnects the plug wire. It drives me crazy every time. It’s a five-second step. Take it.
Work on a Flat, Stable Surface
Uneven ground causes oil to drain unevenly and spill in the wrong direction.
Use a concrete driveway or a level garage floor. Lay down old cardboard underneath the mower before you start. It makes cleanup ten times easier and keeps oil off surfaces where you don’t want it.
Don’t do this on grass. Engine oil soaking into your lawn can kill grass and contaminate soil. Not worth it.
How to Drain Oil From a Push Lawn Mower (Step-by-Step)
Walk-behind mowers are the most common type in the US. They’re also the easiest to change oil on once you know what to look for.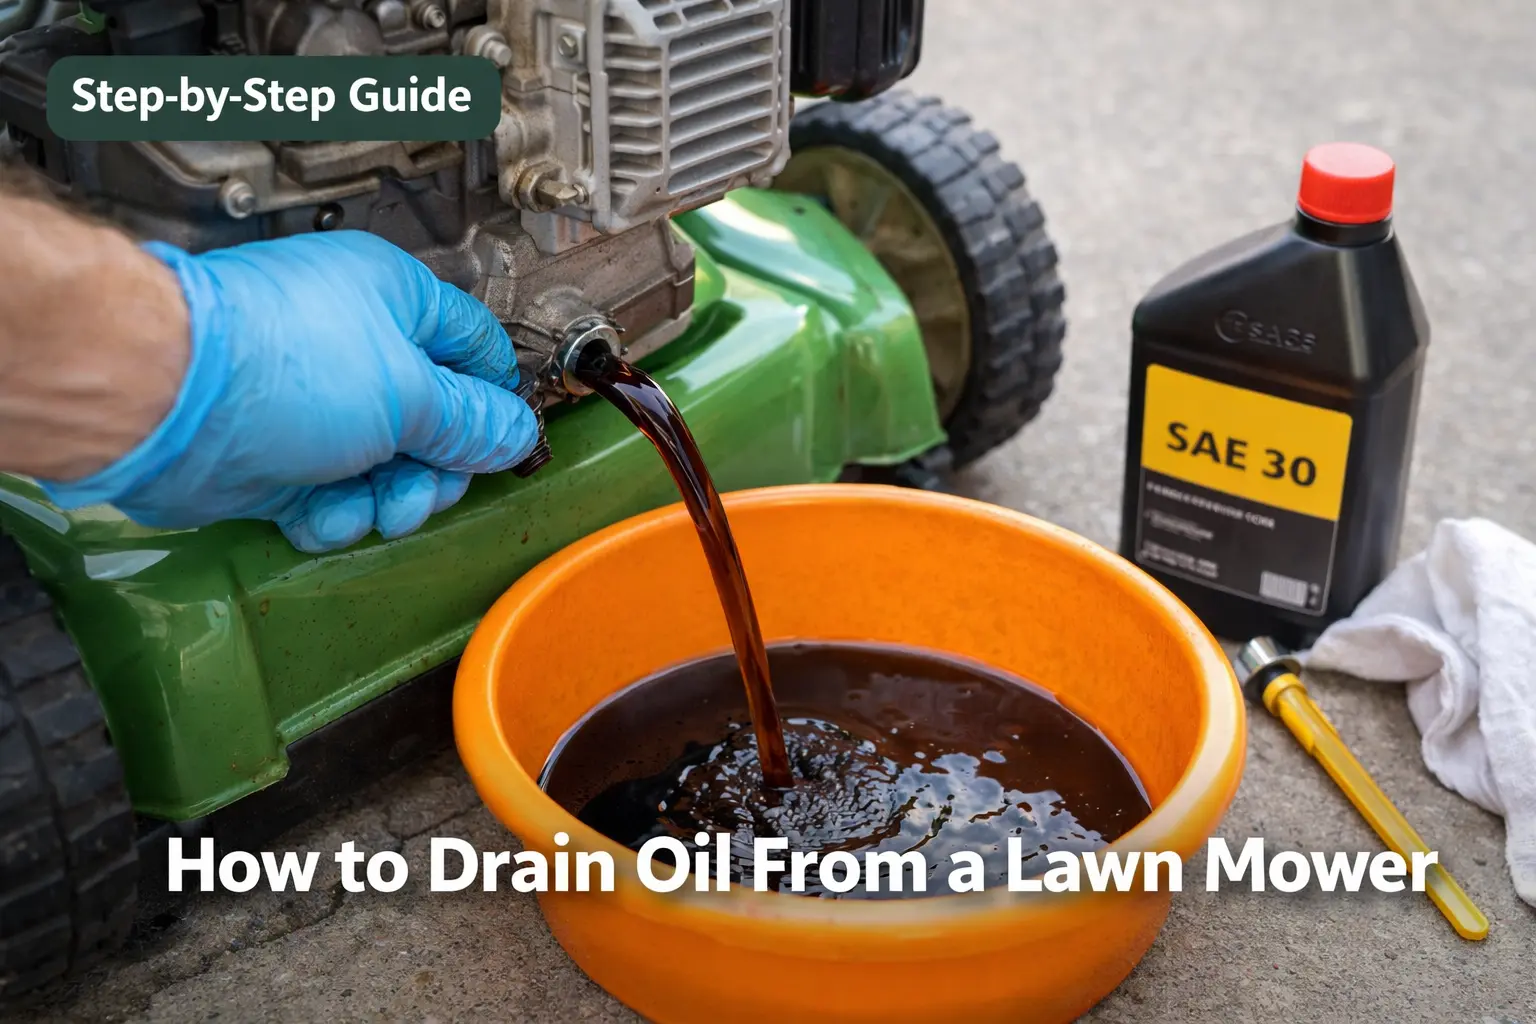
Step 1 — To Drain Oil From a Lawn Mower, First Find the Drain Plug or Tube
This step varies the most by brand and model. Most push mowers use one of three systems:
- Drain plug — a bolt-style plug at the base of the engine. Most common on Briggs & Stratton and Honda GCV models.
- Drain tube — a small flexible rubber tube near the engine base. Unscrew the cap and let it drain. Common on Toro Recycler and some Craftsman models.
- Dipstick-only drain (tilt method) — no plug or tube. You tilt the mower and drain through the dipstick opening. Covered in its own section below.
Not sure which type you have? Check the model number stamped on your engine block and look it up in the owner’s manual. Takes about 30 seconds.
Step 2 — Position Your Drain Pan
Slide the drain pan directly under the drain plug or tube. Give yourself enough room so you won’t scramble once oil starts flowing.
If you need to tilt the mower to reach the plug, always tilt toward the drain side and keep the air filter pointing up. Tilting the wrong way pushes oil toward the carburetor.
Step 3 — Remove the Drain Plug
Use the correct socket — commonly 3/8″ to 1/2″. Turn counterclockwise to loosen.
Once loose, finish unscrewing by hand. Keep fingers ready to catch the plug before it drops into the drain pan. Oil will flow immediately.
It’ll be dark brown to almost black if it’s overdue. That color is telling you something. It’s normal — but it means the change was definitely needed.
Step 4 — Let It Drain Completely
Give it three to five minutes minimum. Don’t rush.
Tilt the mower slightly toward the drain side to get every last drop out. Old oil mixing with fresh oil shortens your effective change interval and defeats the whole purpose.
While it drains, wipe the plug clean. Inspect the crush washer. If it looks compressed or cracked, replace it. They cost about 50 cents and prevent slow oil leaks later.
Step 5 — Reinstall the Drain Plug
Hand-tighten first. Then snug it with a wrench.
Do not over-torque it. Small engine threads — especially on aluminum blocks — strip easily. Most drain plugs torque to 90–180 inch-pounds. Firm, not forceful.
If it drips after reassembly, the answer is a new crush washer. Not more force on the wrench.
Step 6 — Refill With Fresh Oil
Set your funnel in the dipstick fill tube. Pour slowly. Pause every few ounces.
Wipe the dipstick clean first. Insert it fully. Pull it out slowly. The oil level should land between MIN and MAX. That’s your target. Not above it.
Step 7 — Run the Engine and Check for Leaks
Reconnect the spark plug wire. Start the engine. Let it run for 30 seconds.
Shut off. Wait 30 seconds. Recheck the dipstick. Look at the drain plug area for any drips.
Start to finish, once you’ve done this a couple times, it takes about 15 minutes.
How to Drain Oil From a Riding Lawn Mower
Riding mowers have bigger engines and more oil capacity. The mess potential is higher. But the process is straightforward once you know your engine type.
Know Your Engine Type First
Most US residential riders run one of these engines:
- Briggs & Stratton single-cylinder — common in Craftsman and Troy-Bilt riders
- Kohler Command — found in John Deere and many Husqvarna models
- Kawasaki V-twin — typically in higher-end zero-turns
Each has a different drain plug location. On some models it’s on the side of the engine block. On others it’s underneath. Some Kohler and Kawasaki models have a drain valve instead of a plug — even easier to use.
Check your owner’s manual before you start. Ten minutes of reading saves 30 minutes of crawling around with a flashlight.
Using an Oil Extractor Pump (The Easier Method)
Two years ago I switched to an oil extractor pump for my riding mower. I’ve never looked back.
Warm the engine for about two minutes. Insert the extractor tube down through the dipstick opening. Pump the handle. The oil gets drawn up and out in five to eight minutes.
No crawling under the deck. No drain pan positioning. No driveway spillage.
Does it get every drop? About 95 percent — completely acceptable for regular maintenance. The small amount remaining gets diluted into fresh oil on the next fill.
Brands like Briggs & Stratton, LiquiVac, and FloTool all make reliable extractors running $15 to $40. Worth every penny.
The Traditional Drain Plug Method for Riders
Locate the drain plug. On most riders it’s on the left side of the engine or underneath. Some models have a small belly pan underneath — usually four to six bolts — that you’ll need to remove first.
Have a large drain pan ready. Riding mowers hold 1.5 to 2 quarts of oil. Same basic steps from there: remove plug, drain completely, reinstall, refill.
How to Dispose of Old Lawn Mower Oil Legally
You cannot pour used oil down the drain or on the ground. It’s illegal in all 50 states.
Here’s what to do instead:
- AutoZone, O’Reilly, and Advance Auto Parts accept used motor oil for free at most locations
- Earth911. com — type in “used motor oil” and your zip code to find the nearest drop-off
- Local hazardous waste collection events — many counties host these a few times per year
Seal the old oil in a clean plastic container. A gallon milk jug with the lid screwed on works perfectly. Label it “used oil.” Takes two extra minutes and it’s the right thing to do.
The Tilt Method — Draining Mower Oil Without a Drain Plug
Some mowers — especially older and budget models — don’t have a drain plug at all. The tilt method is your answer. But there’s a right way and a very wrong way.
When the Tilt Method Makes Sense
Budget push mowers under $200 often skip the drain plug entirely to cut manufacturing costs. Common with older Murray, Poulan, and off-brand models from the early 2000s.
The tilt method drains oil just fine for basic seasonal maintenance. It’s also useful when a socket wrench can’t reach a tight drain plug location.
The Right Way to Drain Oil From a Lawn Mower Without Flooding the Carburetor
This is where people go wrong. And it can be costly.
Always tilt the mower with the air filter side pointing UP. Not down. Up.
The carburetor and air filter are on the same side of the engine. If you tilt that side down, oil flows directly toward them. Oil in the carburetor means white smoke, rough running, and a flooded engine at the next start.
If you’re not sure which side holds the air filter — look before you start. It’s the large plastic housing on the side of the engine. Put a piece of tape on that side as a reminder if needed.
Tilt at roughly 45 to 90 degrees toward the drain side. Let oil flow out through the dipstick tube opening into your drain pan.
Cleaning Up After the Tilt Method
The tilt method leaves slightly more residual oil behind than the plug method. That’s a known limitation of the technique.
After refilling and reconnecting the plug wire, run the engine for about 60 seconds. This circulates fresh oil and helps flush out residue. Check the dipstick again — tilting sometimes creates air pockets that read low. Add oil if needed to hit the full mark.
Common Mistakes People Make (And How to Avoid Them)
After doing this for years and helping more than a few neighbors rescue their mowers, I’ve seen the same mistakes come up repeatedly. Let me save you the learning curve.
Mistake #1 — Using the Wrong Oil Type
SAE 30 in a cold Minnesota winter is like pouring molasses into your engine. It’s too thick to circulate on cold starts. The engine wears heavily before the oil warms up enough to flow properly.
In that situation you want synthetic 5W-30. It flows immediately in low temperatures.
Opposite problem: some people in hot climates use 10W-40 in an engine that calls for SAE 30. The oil burns off faster at high temperatures and you end up running low without knowing it.
Always cross-reference oil type with your owner’s manual. The manufacturer tested their engine with a specific grade. Trust that.
Mistake #2 — Overfilling the Oil
More oil is not better. This surprises people every time.
When you overfill, the crankshaft splashes through the excess oil and whips it into foam. Foamy oil has terrible lubricating properties — it causes heat, increased wear, and white exhaust smoke.
Use the dipstick. Every time. Stop at the full line.
Mistake #3 — Not Changing Oil After Winter Storage
Oil sitting in a stored engine absorbs moisture over winter. Condensation builds up inside the crankcase during months of sitting idle.
By March in Ohio or Illinois, that oil is contaminated even if the mower hasn’t run since October. Starting the season on old oil defeats the whole point.
My rule: first spring startup comes after an oil change. Not before.
Mistake #4 — Forgetting to Reconnect the Spark Plug Wire
I’m laughing as I type this because I’ve done it. You spend 20 minutes troubleshooting why the mower won’t start. Check the fuel. Check the carburetor. Check the filter.
Then you see the dangling wire.
It was funny the second time. Not the first.
Mistake #5 — Over-Torquing the Drain Plug
Aluminum engine blocks strip easily. If you crank that drain plug as hard as possible every time, you’ll eventually strip the threads and create an expensive problem.
Hand-tight plus a firm quarter-turn is usually enough. If oil is leaking after that, replace the crush washer — don’t just crank harder.
How to Read a Dipstick Correctly
The dipstick is your engine’s health report. But you have to read it right to get accurate information.
The 2-Step Dipstick Check After You Drain Oil From a Lawn Mower
Most people just yank the dipstick out and look at it. That gives an inaccurate reading.
Do it right:
- Pull the dipstick out. Wipe it completely clean with a rag.
- Insert it fully — push all the way down until it seats.
- Pull it out slowly and steadily.
- Read where the oil line stops.
It should land between MIN and MAX. Or between L and H on models that use those labels. While you’re at it, check the color and texture.
What Different Oil Colors Mean
| Color | What It Means |
| Golden or amber | Fresh or recently changed |
| Light brown | Normal use — still okay |
| Dark brown to black | Needs changing |
| Milky gray or white | Water contamination — serious problem |
| Gritty texture | Metal particles — see a professional |
When Color Alone Isn’t Enough
Some synthetic oils darken faster than conventional oils. That doesn’t mean they’re worn out. Synthetics sometimes look darker earlier because they’re doing their job more aggressively — suspending contaminants in suspension.
Don’t rely on color alone if you’re running synthetic oil. Trust your hour meter or seasonal schedule over visual appearance.
When in doubt? Change it. Oil is cheap. Engines are not.
Seasonal Oil Change Guide for US Climates
Where you live in the US matters a lot for lawn mower oil — not just which type you use, but how often to change it.
The South and Southeast (Florida, Georgia, Texas, Louisiana)
Mowing season runs March through November here. South Florida? Practically year-round.
The humidity is intense. Moisture enters the crankcase faster than in drier climates. Oil degrades more quickly. I’d recommend changing oil every 40 to 50 hours down here — slightly more frequently than the standard 50-hour interval. SAE 30 or 10W-30 both perform well in the warmer months.
The Midwest (Ohio, Illinois, Iowa, Minnesota)
Cold spring startups are hard on small engines. Oil is thick, the engine is stiff, and the temperature swing between sitting overnight and running is significant.
Synthetic 5W-30 performs better in these conditions. It flows immediately at cold temperatures and protects the engine during those first critical seconds when oil pressure is building.
Change oil at spring startup and again at fall shutdown. Minnesota winters mean oil sits for five to six months — always change it at both ends of the season.
The Southwest (Arizona, Nevada, New Mexico)
Dry heat breaks down oil fast. It’s not moisture — it’s the temperature. Running a mower in Phoenix in July means extreme ambient heat stacked on top of combustion heat.
Change oil every 40 to 45 hours. Keep an eye on the level too — heat evaporates oil slightly faster in dry climates. SAE 30 works for summer. Use 10W-30 for spring and fall when temperatures swing more dramatically.
The Pacific Northwest (Oregon, Washington)
The mowing season starts early — sometimes February or March. The climate is consistently wet.
Moisture contamination is a real concern here. Check your dipstick color frequently during the wet season. If you see anything milky or gray, that’s water in the oil. Drain it and investigate before running the engine again.
Brand-Specific Tips — Because Not All Mowers Are Built the Same
The drain process is similar across most mowers. But specific brands have quirks worth knowing before you start.
Briggs & Stratton Engines (Craftsman, Troy-Bilt, Murray)
Briggs & Stratton is the most common small engine brand in the US. Craftsman, Troy-Bilt, and Murray mowers almost all use a B&S engine.
The drain plug is usually on the left side of the crankcase — easy to access. B&S recommends SAE 30 for temps above 40°F. They sell their own 4-cycle engine oil, which is a fine product. But regular 10W-30 from any reputable brand works just as well at lower cost.
Honda GCV Engines (Honda HRX, HRN Series)
Honda is particular about oil quality. They recommend API SJ or later rated motor oil — check the back of the oil bottle for that rating.
The drain plug sits at the base of the engine and is very accessible. One unique feature on many Honda mowers: the oil fill cap and dipstick are a single combined unit. Remove the cap to add oil and it also serves as your dipstick. Takes a second to get used to but works well once you know it.
John Deere Riding Mowers (E100, S100, X300 Series)
John Deere specifies 10W-30 for most residential models. Drain plug location varies by series. Some X300 models have a drain valve instead of a plug — makes drainage genuinely easy without tools.
John Deere sells branded Turf-Gard oil. It’s a decent product but not required. Any API-rated 10W-30 does the job. If your rider has an oil filter — and many John Deere riders do — change it every oil change. Running fresh oil through an old filter circulates contamination right back through the engine.
Husqvarna and Toro Walk-Behind and Riders
Husqvarna uses Briggs & Stratton, Kohler, or Kawasaki engines depending on the model. Follow the engine manufacturer’s spec — not just the Husqvarna brand recommendation.
Toro Recycler models are among the easiest push mowers to change oil on. They use a drain tube system — just unscrew the cap on the end of the tube, let it drain. No socket wrench needed at all.
Both brands accept SAE 30 or 10W-30 depending on your climate and season.
What to Do If the Oil Looks Milky or Has Metal Flakes
Sometimes what you find when you drain is worse than just dirty oil. These are warning signs that something more serious is going on inside the engine.
Milky Oil — What It Means
White, gray, or creamy oil means water has entered the crankcase.
This is serious. Water does not lubricate. Running an engine on water-contaminated oil causes rapid, severe internal wear.
Common causes: a blown head gasket, a cracked engine block, or extended storage where condensation built up without the engine ever running long enough to burn it off.
Do not restart the engine until you’ve identified the source. For small engines, head gasket repair costs can sometimes exceed the mower’s value. Get a professional opinion before putting more money into it.
Metal Particles in the Oil
Rub a small amount of drained oil between your fingers. Gritty texture means metal particles.
Some tiny particles are normal during the break-in period of a new engine. In an engine that’s been running for years, it signals internal wear — bearings, piston rings, or cylinder walls degrading faster than normal.
Drain. Refill with fresh oil. Run briefly. Drain again. Check for particles.
If they come back, a small engine mechanic needs to take a look before you keep running it.
When to Call a Small Engine Mechanic
Some issues are beyond a DIY oil change. Call a professional if you’re seeing:
- Persistent white smoke after the oil change
- Engine knocking after fresh oil is in
- Significant power loss despite a full service
- Oil level dropping between uses with no visible external leak
Small engine shops typically charge $50 to $90 per hour. For a mower worth under $300, a $200 repair bill deserves a real cost-benefit conversation. Sometimes replacement is the smarter move.
Frequently Asked Questions: How to Drain Oil From a Lawn Mower
These are the questions I get asked most — from beginners who’ve never touched a dipstick to experienced folks who just want to double-check something specific.
Can I Use Car Oil in My Lawn Mower?
Sometimes yes — but check for the “energy conserving” label or EC symbol on the bottle. Oils marked EC contain friction modifiers designed for car engines that can damage small engines over time.
Regular conventional 10W-30 without the EC designation? Usually fine. Dedicated small engine oils are ideal, but they’re not dramatically different from a clean conventional oil without friction modifiers.
What Happens If I Never Change the Oil?
Engine wear accelerates fast after 100+ hours on old oil. Sludge builds up and restricts oil passages inside the engine. Overheating becomes common during summer mowing sessions when ambient temperatures are already pushing the engine hard.
The worst outcome is engine seizure — metal on metal, no lubrication, permanent damage.
A John Deere E110 owner in Alabama ran three full seasons without an oil change. Engine seized mid-cut. Repair bill: $340 on a $1,100 mower that could have been maintained for about $20 total across those three seasons.
How Do I Know If My Mower Has a 2-Stroke or 4-Stroke Engine?
Simple rule: if your mower has a dipstick on the engine, it’s a 4-stroke. Separate oil reservoir. You add oil through a fill cap independently of the fuel.
A 2-stroke engine mixes oil and fuel in the gas tank. No separate oil reservoir. You’d know — the fuel cap instructions would tell you to mix oil directly with the gasoline.
Nearly all modern US push mowers and riding mowers are 4-stroke. Everything in this guide applies to them.
Do I Have to Change the Oil Filter Too?
Most push mowers don’t have an oil filter at all.
Riding mowers and zero-turns typically do — a small spin-on filter similar to what you’d see on a car. If your rider has one, change it every oil change. It costs $4 to $10 depending on the model.
Running fresh oil through an old, contaminated filter circulates the problem right back through your new clean oil. Defeats the whole point.
Can You Drain Oil From a Lawn Mower That Won’t Start?
Yes. Use an oil extractor pump through the dipstick tube. It works on cold oil — just more slowly. You’ll get most of the oil out without needing to run the engine first.
If the mower can start at all — even for 60 seconds — do it first. Warm oil drains far more completely than cold, thick oil.
Is Synthetic Oil Worth It for a Lawn Mower?
For heavy-use mowers — weekly cutting on large yards, commercial use, or extreme climates — yes. Better protection at temperature extremes and better cold-start performance.
For a typical homeowner with a small lot mowing twice a month? Conventional 10W-30 is perfectly fine and costs about half as much.
Synthetics won’t hurt anything. Briggs & Stratton and Honda both approve synthetic use in their engines. It just costs more than necessary for light-duty residential use.
Quick Reference Checklist — Oil Change in Under 20 Minutes
Once you’ve done this a few times, the whole process moves fast. Here’s the checklist to follow until it becomes second nature.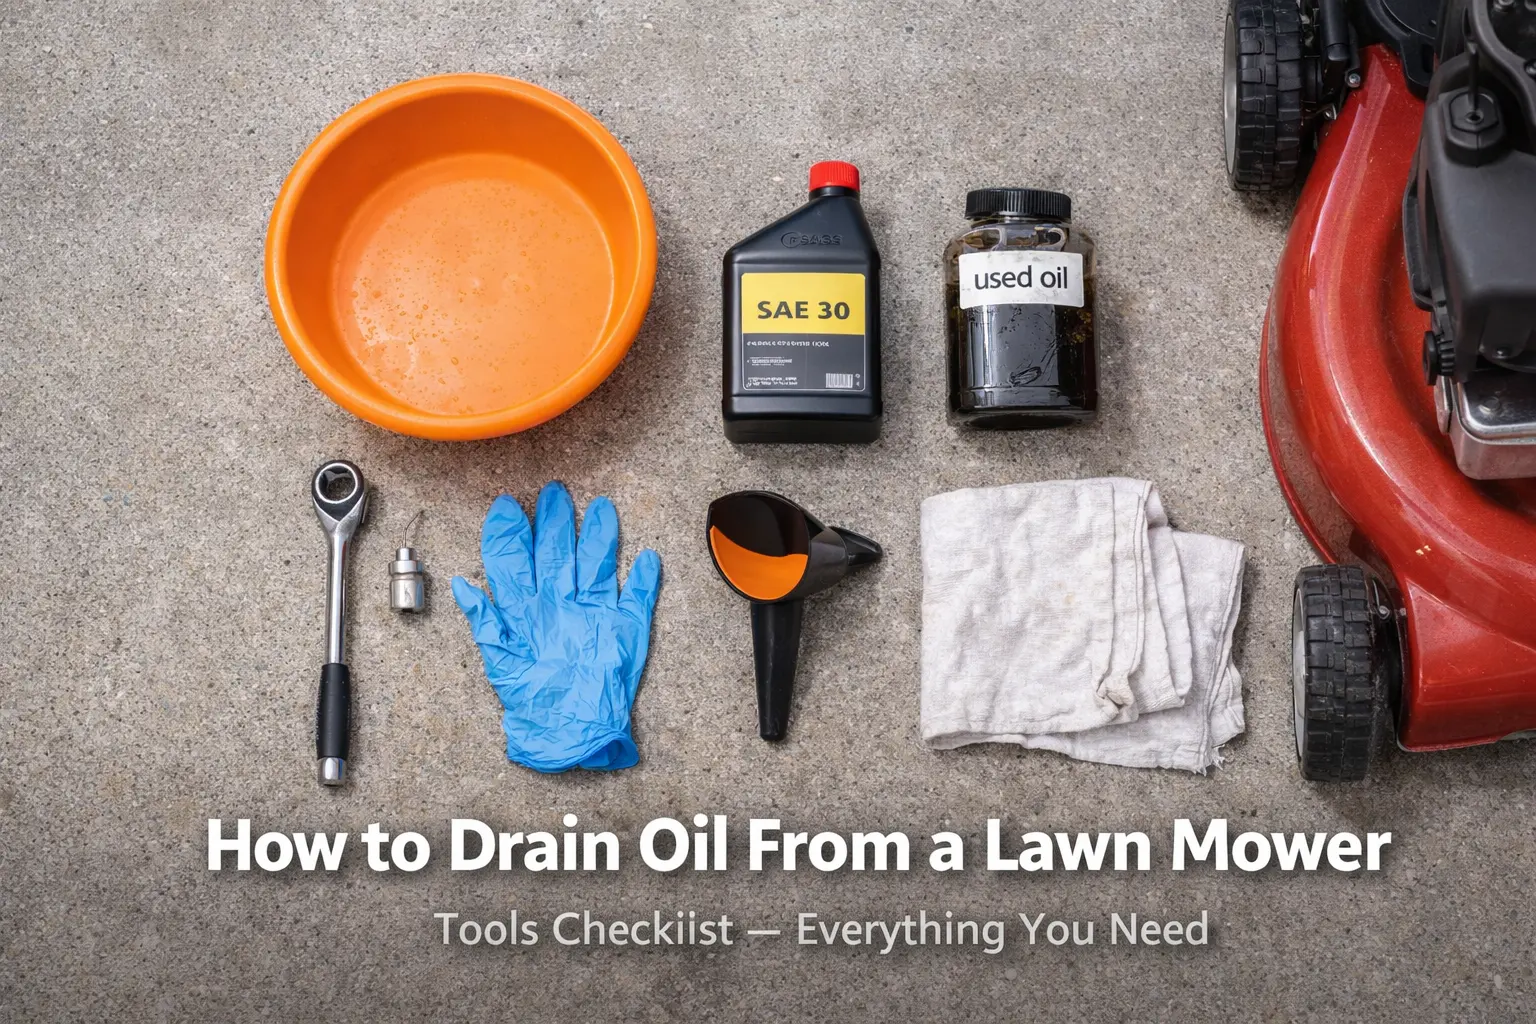
Pre-Change Checklist
- Engine warmed for 1–2 minutes, cooled for 5–10 minutes
- Spark plug wire disconnected and draped away from plug
- Correct oil type confirmed (check owner’s manual)
- Drain pan positioned under plug or tube
- Nitrile gloves on
- Flat, stable surface confirmed — cardboard laid underneath mower
Drain and Refill Checklist
- Drain plug removed or tilt method executed (air filter side UP)
- Oil drained for at least 3–5 minutes
- Drain plug cleaned and crush washer inspected
- Plug reinstalled and snug — not over-torqued
- Fresh oil added slowly using a funnel
- Dipstick reading confirmed between MIN and MAX marks
Post-Change Checklist
- Spark plug wire reconnected
- Engine started and run for 30 seconds
- Drain plug area checked for any drips or leaks
- Dipstick rechecked after short run
- Old oil sealed in container for recycling
- Date and hours logged for next change reminder
There’s nothing complicated about how to drain oil from a lawn mower once you’ve walked through it once. It’s a simple job. Basic tools. Almost no cost.
But it’s the difference between a mower that runs clean for 20 years and one that locks up in three.
I’ve seen both outcomes. One Saturday in spring, one rough-running Craftsman, and a hard lesson about skipping maintenance — that’s what it took for me to never skip an oil change again.
Change the oil. Do it at the start of every season. Do it again at 50 hours if you mow heavily. Your engine will reward you with clean starts, strong power, and a run life that makes the original purchase price look like a great deal.
That’s all there is to it.