I remember a hot Saturday last July. It was about 90 degrees. The humidity was high. I was in my backyard in Georgia. The grass was tall. It looked messy. I pulled the cord on my mower. Nothing happened. I pulled again. Still nothing. Sweat ran down my face. I smelled gas. It was old and stale. I knew right away. The carburetor was dirty. This happens to everyone.
If you live in the humid South, gas goes bad fast. If you live in the dry West, dust gets in. The result is the same. The engine won’t run. You don’t need a shop. You can fix this. I will show you how to clean lawnmower carburetor parts easily. We will use simple tools. We will save money. Let’s get that mower running again.
Signs Your Carburetor is Dirty or Clogged
A dirty carb acts up in specific ways. I have seen them all. Knowing these signs saves you from guessing.
The Engine Won’t Start at All
This is the most common issue. You pull the cord. The engine turns over. But it never catches. It just sounds hollow. This is usually fuel starvation. The jet is blocked. Gas cannot get to the engine.
I like to do a quick test. I spray a little starter fluid in the air filter. Then I pull the cord. If it starts for a second and dies, I know it has spark. The problem is fuel. It is a classic sign. The main jet is clogged shut. No gas can pass through. It is frustrating, but at least we know the cause.
The Mower “Hunts” or Surges
This sound really gets on my nerves. The engine starts. But it does not hum smoothly. It goes “vroom… die… vroom… die.” We call this “hunting.” The governor arm waves back and forth. It is trying to keep the engine alive.
This means the mix is lean. A tiny bit of gas gets through. But it is not enough. The engine gasps for fuel. Then it gets a sip and revs up. Then it gasps again. It usually means a partial clog. Or maybe an air leak. A bad gasket can let too much air in. This messes up the mix.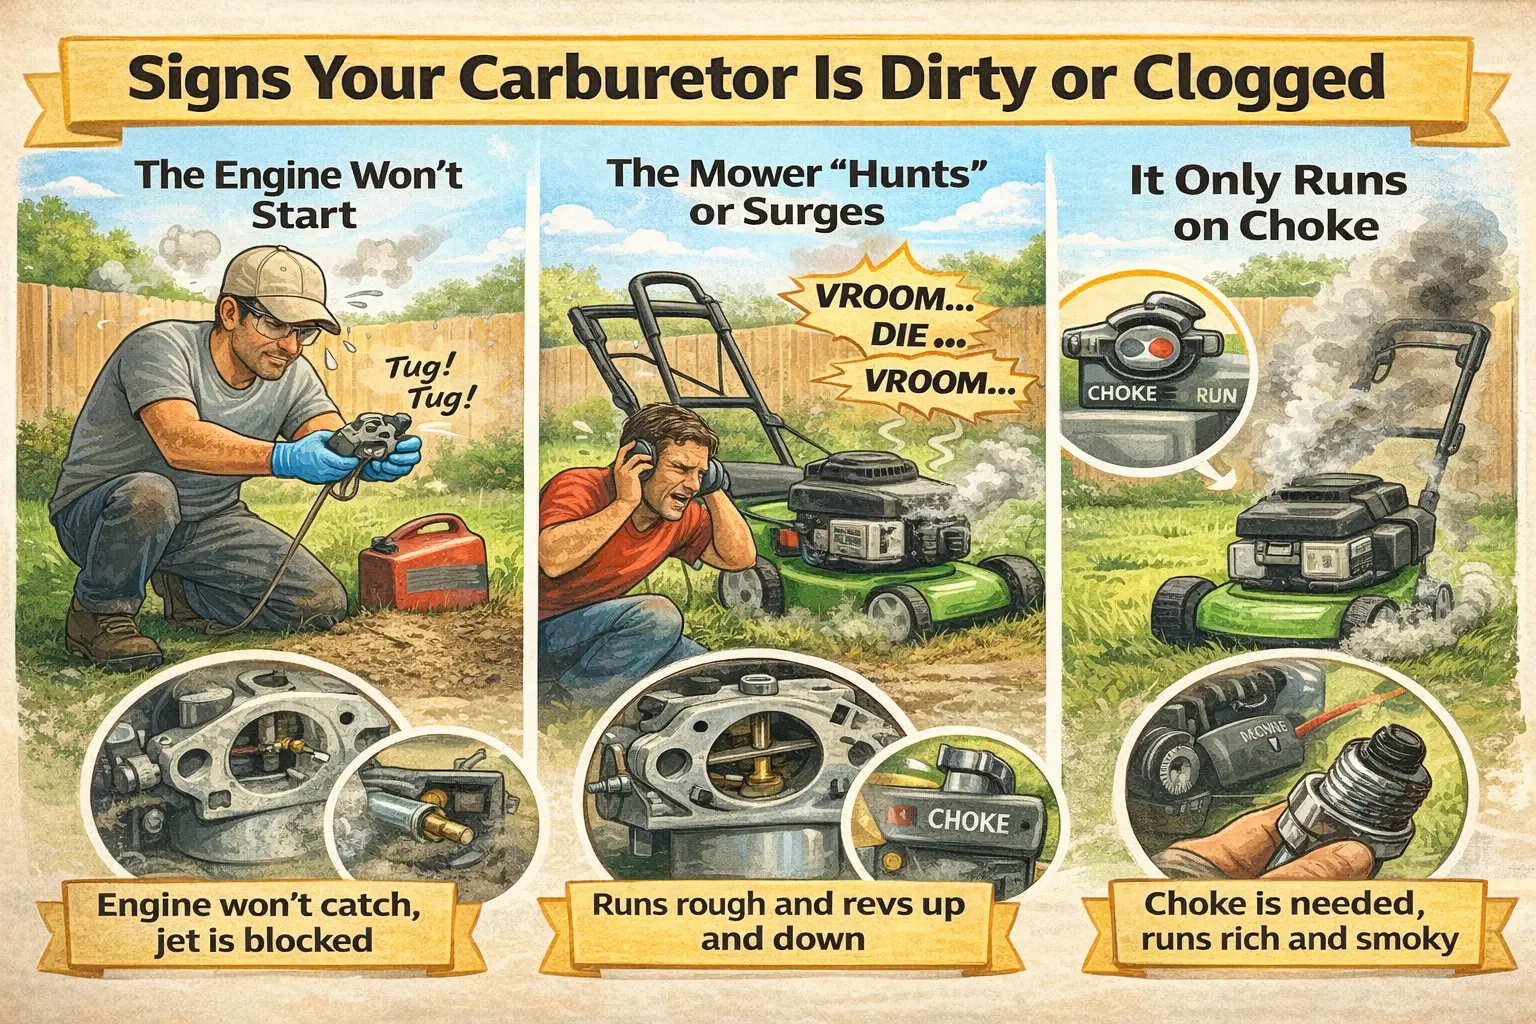
It Only Runs on Choke
Does your mower die when you turn the knob to “Run”? This is a pain. I have had to mow a whole lawn on “Choke” before. It uses a lot of gas. It makes black smoke. But it was the only way to finish the job.
This happens when the tiny idle passages are blocked. The choke cuts off air. This forces more gas into the engine. It compensates for the clog. But it is bad for the motor. It fouls the spark plug. It builds up carbon. You need to clean those tiny holes. Spraying cleaner down the throat rarely fixes this. You have to take it apart.
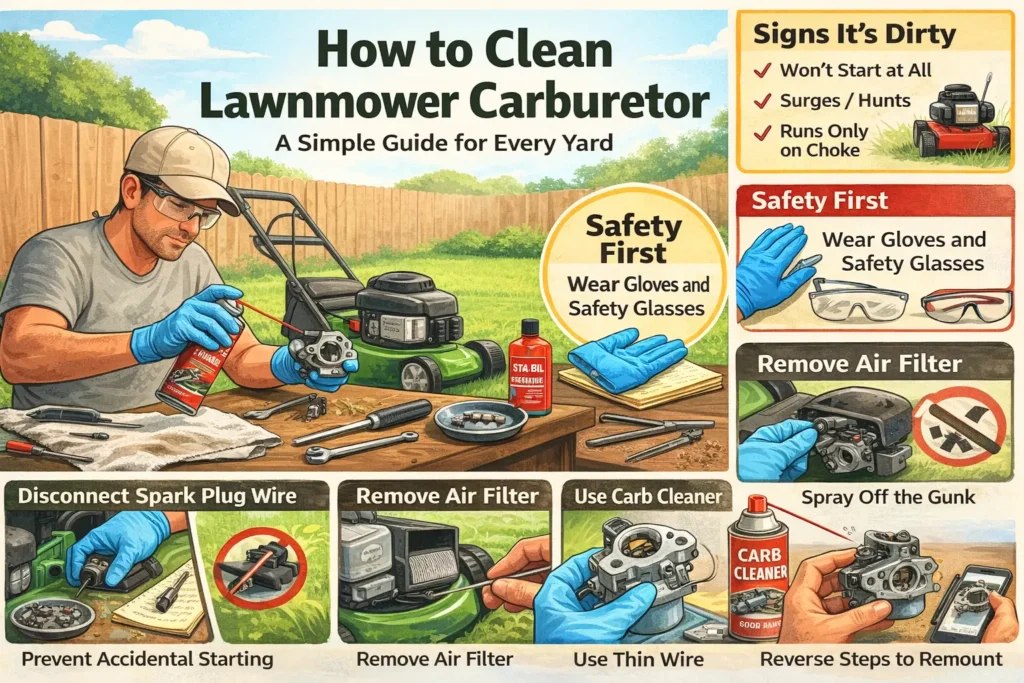
Safety First: Don’t Hurt Yourself
Gasoline is dangerous. Parts are sharp. I have cut my hands many times. Let’s take a few quick precautions.
Disconnect the Spark Plug Wire
This is step one. Never skip it. I mean it. If you spin the blade, the engine could start. It happens fast. You do not want your hand near it. Find the thick black wire on the front. Pull the rubber boot off the plug.
Tuck the wire away. Make sure it cannot snap back. I usually tuck it behind a hose. Or I tape it to the side. I want to be 100% sure. A spinning mower blade is no joke. It gives me peace of mind. Now I can work safely.
Work in a Ventilated Area
Gas fumes are heavy. They sink to the floor. They stay there. Do not do this in a closed shed. I learned this the hard way. I got a headache in ten minutes. Now I open the big garage door. Or I work in the driveway.
Keep away from sparks. Look for your water heater. If it is in the garage, stay away. The pilot light is a flame. Fumes can find it. That is a bad mix. Just get some fresh air. It is nicer to work outside anyway.
Protect Your Hands and Eyes
Gas dries out your skin. It smells terrible for days. My wife hates the smell. So I wear nitrile gloves. They are cheap. They keep the grease off. Carb cleaner is strong stuff. It can burn your skin.
Wear safety glasses too. Carb cleaner comes in a spray can. It has a red straw. Sometimes that straw pops off. The spray can splash back. It stings your eyes bad. I keep a pair of glasses on my workbench. Put them on. It takes two seconds. It is worth it.
Gathering the Right Tools for the Job
You don’t need a fancy mechanic’s chest. I use basic tools. You probably have them in the garage right now.
Essential Hand Tools
Grab your socket set. You usually need a 1/4 inch drive. A 10mm and an 8mm socket cover most mowers. Briggs & Stratton engines love these sizes. Honda engines do too. Sometimes you need a 7mm. Just bring the whole set.
You need screwdrivers. Get a flathead. Get a Phillips head. You will need them for the plastic covers. I also use needle-nose pliers. These pliers help with small clips. They work well on fuel line clamps. They also protect your fingers from getting pinched.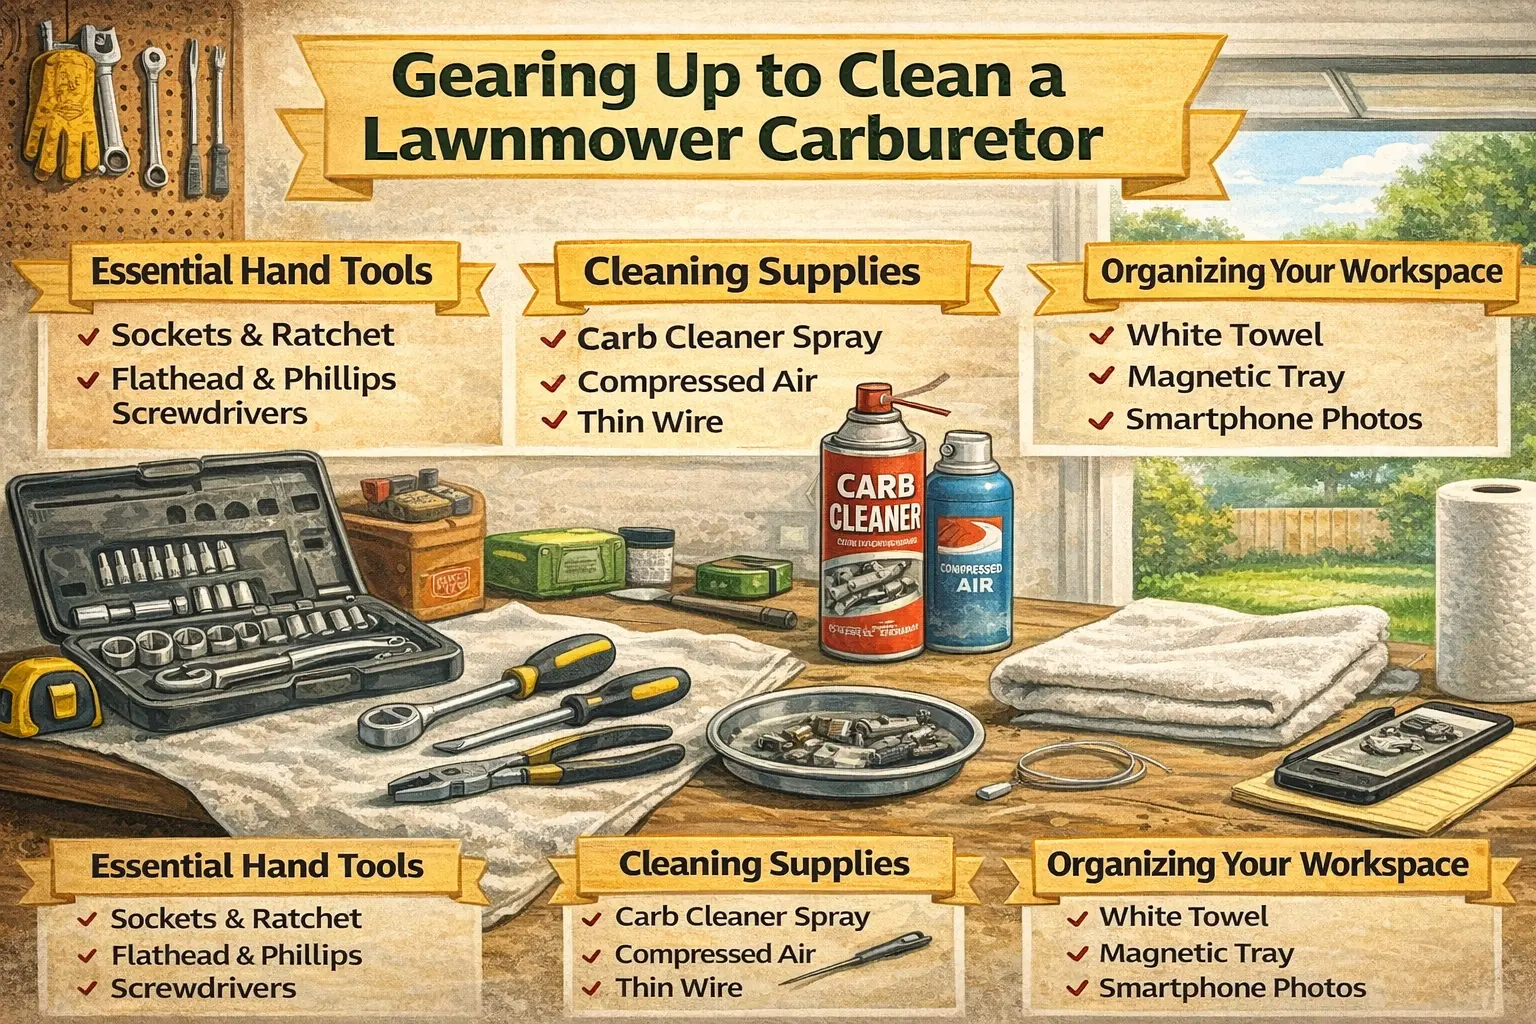
Cleaning Supplies
This is the secret sauce. You need “Carb and Choke Cleaner.” It comes in a spray can. Any auto parts store has it. It dissolves the gunk. It melts the varnish. Do not use brake cleaner. It can eat plastic parts. Stick to carb cleaner.
I also use compressed air. A can of air for keyboards works. If you have an air compressor, that is better. It blows out the dirt. I also use a thin wire. A bread tie wire works well. Strip the paper off. The wire is thin enough to poke through jets. It is a great free tool.
Organizing Your Workspace
I am messy by nature. But not with carbs. There are too many tiny parts. I lay down a clean rag. I use a white towel. If a screw drops, I can see it. It won’t bounce away.
I also rely on my phone. Taking pictures helps a lot. Before disassembly, I snap a photo. I make sure to photograph the springs. I do the same with the rods. Trust me on this. You will forget where they go. The pictures save the day. A magnetic tray is nice too. It holds the bolts. They won’t roll into the grass.
Step 1: Gaining Access to the Carburetor
Before we clean it, we have to find it. It is buried under plastic. We have to dig through the covers.
Removing the Air Filter Cover
Look for the plastic box on the side. That is the air filter housing. Usually, there is a knob or a screw. Sometimes it is just tabs. Pop the cover off. Take a look at the filter.
Is it full of dirt? Is it oily? If it is paper and dirty, toss it. Buy a new one. They are cheap. If it is a foam sponge, you can wash it. Use soap and water. Squeeze it out. Let it dry. A clean engine needs air.
Removing the Air Filter Housing
Now we need to take the plastic box off. Look for bolts. There are usually two or three. They hold the box to the engine. They might be inside the box. Use your socket set. Turn them left.
Be careful as you pull the box. There is often a rubber tube. This is the breather tube. It connects to the engine block. Pull it off gently. Watch out for the gasket. It is a piece of paper behind the box. Try not to tear it. If it tears, you need a new one.
Step 2: Disconnecting Fuel and Linkages
This is the tricky part. Patience pays off here. The metal rods are delicate.
Clamping the Fuel Line
Locate the black rubber hose. It brings gas from the tank. We need to take it off. But the tank has gas in it. If we just pull, gas spills everywhere. We need to stop the flow.
I use a clamp. You can buy hose pinch pliers. Or use vice grips. Put tape on the jaws so you don’t cut the hose. Clamp it shut gently. Now look for the red or silver clip. Squeeze it with pliers. Slide it back. Twist the hose gently. Break the seal. Then pull it off. Have a rag ready. A little gas will spill.
Detaching Throttle and Governor Springs
Stop. Take a picture. Zoom in on the holes. There are tiny holes in the plastic arm. The metal rod goes into one. The spring goes into another. If you put them in the wrong hole, the engine runs bad.
Be gentle. Do not bend the metal rods. These control the engine speed. If you bend them, the mower will rev too high. Or it won’t rev at all. Rotate the carb to free the rod. There is usually a “Z-bend” at the end. You have to twist the carb to slide the “Z” out. It is like a puzzle.
Sliding the Carburetor Off
Now the carb is free. It slides off the long bolts. These are called studs. Pull it straight out. Watch the gasket on the back side. It might stick to the engine. Or it might stick to the carb.
Be careful. The bowl is still full of gas. Keep it upright. Walk it over to your clean bench. You have successfully removed it. That was the hardest part. Now we can get to work.
Step 3: Disassembling the Carburetor
Now we open up the heart of the problem. We will see what is hiding inside the bowl.
Removing the Float Bowl
Flip the carb upside down. You will see a bolt on the bottom. This holds the bowl on. On many mowers, this bolt is special. It acts as the main jet too. Put your socket on it. It is usually a 1/2 inch or 13mm.
Unscrew it. Gas will pour out. Catch it in a jar. Look at the gas. Is there water? Water looks like bubbles at the bottom. Is there dirt? Black specks mean the fuel line is degrading. If the bowl is stuck, tap it. Use the handle of your screwdriver. Tap the side gently. It should pop loose.
Checking the Float and Needle
You will see a white plastic part. It looks like a donut. This is the float. This part moves up and down. Its job is to control the fuel level. A small silver pin holds it in place. Push the pin out. It slides easily.
Watch out for the needle. This needle is a small, pointed piece. It hangs from the float. The tip is made of rubber. Check that tip. Is it smooth? If it has a groove or a cut, it leaks. Replaces it. Shake the float. Listen closely. Do you hear liquid inside? If yes, it has a leak. It will sink. You need a new float.
Locating the Jets
Look at the center hole. This is where the main jet lives. If the bottom bolt had holes in it, that was the jet. If not, the jet is up inside the brass tube. It is a brass screw with a tiny hole.
Look for a pilot jet. It is often on the side. It might be under a black plastic screw. This controls the idle. Many Honda mowers have this. Look for the emulsion tube. This part is a long brass tube. It sits directly above the main jet. Small holes run along its sides. In most cases, it pushes out easily.
Step 4: Deep Cleaning the Parts
Spraying the outside isn’t enough. We need to clear the microscopic internal passages.
Soaking vs. Spraying
If the carb is just a little dirty, spray it. Use the red straw. Blast cleaner into every hole. Blast it until it comes out the other side. Wear your glasses. It splashes back.
If it is really bad, soak it. I mean really bad. Like it sat for three years. The gas turns to green goo. It smells like varnish. You need a dip bucket. Buy a can of parts dip. Put the metal parts in. Let them soak overnight. Do not put rubber or plastic in there. It will melt them. Just the metal body.
Clearing the Tiny Holes
This is the most important step. The main jet has a tiny hole. It is the size of a pin. Gum blocks it easily. Take your bread tie wire. Poke it through the hole. Floss it back and forth. Be gentle. Do not make the hole bigger. Just clear the gunk.
Do the “light test.” Hold the jet up to the sun. Look through it. Do you see a perfect circle of light? If it looks fuzzy, it is still dirty. Clean it again. Check the emulsion tube. It has tiny holes on the sides. Poke them all. They must be clear.
Cleaning the Carb Body
Look at the main body. Look at the throat. There is a round plate. That is the butterfly valve. Is there black soot there? Wipe it out. Use a rag and cleaner.
Spray cleaner into the fuel inlet. That is where the hose connects. Flush it out backwards. Flush out the idle circuit. Blast air through everything. Use your compressed air. Blow it dry. Make sure no loose dirt remains. One speck of sand can clog it again.
Step 5: Reassembly and Reinstallation
Putting it all back together is just reversing the steps. But we need to do a few checks.
Installing the Float and Needle
This takes steady hands. Put the needle on the float. Balance it. Carefully lower it into the hole. The needle must slide into the seat. Do not force it. It should drop in.
Slide the silver pin back. It locks the float in place. Now do the bounce test. Push the float up gently. Let it go. It should bounce down freely. If it sticks, gas will overflow. It must move like a swing.
The Bowl Gasket
Look at the rubber ring. It sits on the carb body. This seals the bowl. Check whether it is flat. See if it feels hard. Look closely for cracks. If so, buy a new one. A leak here is bad. It drips gas on a hot engine.
If it looks good, put the bowl back on. Line it up. Screw the bottom bolt in. Tighten it snug. But do not tighten it too much. The carb is aluminum. It is soft metal. If you crank it too hard, it cracks. Just get it tight enough so it won’t leak.
Reconnecting Linkages
Walk back to the mower. Slide the carb onto the studs. Now look at your phone. Look at the picture. Which hole did the spring go in? Put it back in that exact hole.
Twist the carb to get the Z-bend in. It should slip in. Do not bend the rod. Slide the carb all the way back. Reconnect the fuel line. Slide the clamp up. Reinstall the air filter box. Tighten the bolts. Put the filter back. Put the cover on. You are done.
Common Mistakes to Avoid
I have made these mistakes. So you don’t have to. Watch out for these traps.
Using Old Gaskets
I used to be cheap. I reused every gasket. That was a mistake. Paper gaskets tear. Rubber gaskets flatten out. When you reuse them, air gets in. This creates an air leak.
The engine sucks in air through the gap. Because of this, the engine runs lean. That condition causes it to heat up. Surging often follows. Idle quality also suffers. If a gasket looks bad, replace it. A kit costs five bucks. It is worth it. Do the hiss test. If it runs bad, spray cleaner near the mount. If the engine changes sound, you have a leak.
Ignoring the Fuel Tank
You just cleaned the carb. It is spotless. You put it back on. You start the mower. It runs for five minutes. Then it dies. Why? Because the tank is dirty.
Sediment lives in the tank. Rust lives there too. As soon as you open the gas valve, it flows down. It clogs the clean jet immediately. Check the tank. Shine a light in there. If you see debris, flush it. Take the tank off. Pour a little gas in. Shake it. Dump it out. Repeat until it is clean.
Bending the Governor Arm
The governor controls the speed. It uses a spring and an arm. I once bent the arm by accident. I started the mower. It revved up like a race car. It sounded like it would explode. I had to shut it off fast.
Try not to touch the governor arm nut. Leave it alone. Be gentle with the links. If you bend them, you have to bend them back. It is a guessing game. It takes a long time to get right. Just be careful when you take things apart.
Regional Tips for US Lawns
Where you live changes how you should care for your equipment. I have friends all over the US. We compare notes.
The Humid South (Florida, Georgia)
I live here. The air is wet. Humidity is high. This puts water in your gas tank. It happens overnight. Condensation forms on the walls of the tank. The water sinks to the bottom.
Rust is a big problem here. Metal bowls rust out fast. I see it all the time. Keep your tank full. This leaves less room for air. Less air means less water. Or keep it totally empty. But don’t leave it half full. That is asking for trouble.
The Midwest Rust Belt (Ohio, Michigan)
My cousin lives in Ohio. He has a different problem. Winter is long. The mower sits for five months. It freezes. Gas breaks down in the cold. It separates.
To prevent problems, he uses fuel stabilizer. In October, he adds it to the tank. After that, he runs the engine for ten minutes. This gets the treated gas into the carb. If he forgets, spring is a nightmare. He also washes his mower. Salt from the garage floor gets on it. Salt eats metal. He rinses it before storage.
The Dry Southwest (Arizona, Nevada)
I visited Arizona once. It is dry and dusty. The dust is fine. The dust is almost like powder. Because it is so fine, it spreads everywhere. Cheap filters cannot stop it. As a result, the tiny air bleeds in the carb get clogged.
You need good filters there. If you have a foam filter, oil it. The oil traps the sand. If you don’t oil it, sand gets in the engine. It scores the cylinder. Also, heat is an issue. Gas evaporates fast. It leaves sticky varnish behind quickly. Do not leave gas in the mower in July. It will dry out in weeks.
When to Just Buy a New Carburetor
I love fixing things. But sometimes, you have to fold. Sometimes scrubbing isn’t worth the time.
The Cost Factor
Carburetors used to be expensive. They cost $80. Now, you can find them online. You can get a generic one for $15. Maybe $20. It comes with new gaskets. It comes with a new filter.
Think about your time. Cleaning takes an hour. Maybe two. If the carb is a disaster, just buy a new one. Swap it out. It takes ten minutes. You are back to mowing. There is no shame in that. It is smart.
Severe Corrosion
Look inside the bowl. Is the aluminum pitted? Is there white powder everywhere? That is aluminum oxide. It means the metal is rotting. You can scrub it. But it will come back.
Check the needle seat. This is where the needle seals. If the metal seat is pitted, it will leak. You cannot fix that. The gas will always drip. The oil will smell like gas. At that point, the carb is trash. Throw it away. Get a fresh one.
Maintenance to Prevent Future Clogs
I hate cleaning carbs. I want to mow and be done. So I do a little prep. A little care now saves a headache next Saturday.
Use Fuel Stabilizer
This is the easiest trick. Buy a bottle of stabilizer. Sta-Bil is a popular brand in the US. Keep it next to your gas can. Every time you fill the can at the pump, add a splash.
Do it right then. Don’t wait. This treats the gas immediately. It keeps it fresh for months. It fights the ethanol. Modern gas has ethanol. Corn alcohol. It attracts water. Stabilizer stops that. It is cheap insurance.
Buy Ethanol-Free Gas
This is even better. Look for “ethanol-free” pumps. We call it “Rec 90.” Many gas stations have it now. It costs a little more. Maybe fifty cents more a gallon. But your mower sips gas. You don’t use much.
Ethanol eats rubber. It dries out hoses. Pure gas does not. It burns cleaner. It stores longer. My mower loves it. My weed eater loves it. It is worth the extra coins. Check a website like pure-gas.org to find a station near you.
End of Season Routine
This is the big one. It is November. The grass has stopped growing. Do not just park the mower. The gas will sit there all winter. It will turn to gum.
Run it dry. That is my method. Start the mower. Let it run. Go inside. Have a coffee. Let it run until it stalls. Then try to start it again. Get every drop out. Now the carb is empty. Nothing can rot inside. Open the bowl drain bolt if you want to be sure. A quick spray of fogging oil in the spark plug hole is nice too. It keeps the piston safe.
Now you know the secrets. You can fix it. You don’t need a mechanic. Grab your tools. Put on your gloves. Get that mower running. The grass is waiting. You got this.
FAQs for How to Clean Lawnmower Carburetor
Can I clean a carburetor without removing it?
Yes, you can try this method first. Spray cleaner directly into the throat. It clears light clogs fast. But for a deep fix, take it apart to learn how to clean lawnmower carburetor parts fully.
What are the signs of a dirty carburetor?
The engine might not start at all. It often hunts or surges while running. sometimes it only runs on choke. These signs mean you must learn how to clean lawnmower carburetor jets right now.
What is the best cleaner to use?
Use a specific carb and choke cleaner spray. It cuts through sticky varnish fast. Do not use brake cleaner. It hurts rubber seals. This is key when you ask how to clean lawnmower carburetor.
How long does it take to clean it?
It usually takes about one hour to do. Beginners might need a bit more time. Take photos as you go to help. It is a quick task if you know how to clean lawnmower carburetor parts safely.
Will vinegar work to clean the parts?
Vinegar can work if you soak brass parts. But a spray cleaner is much faster. It uses pressure to blast out dirt. This is the best way when learning how to clean lawnmower carburetor gunk.
Final Thoughts on Cleaning Your Own Carburetor
If you enjoy saving money and working with your hands, this task is for you. It feels great to fix it yourself. If you hate gas smells or are in a rush, just buy a new one. From my experience, learning how to clean lawnmower carburetor parts is a skill you will use forever.
Read More: Lawnmower After Winter