It is a hot Saturday. The sun is high. I am in the driveway. The grass in my yard is getting tall. I grab a wrench. I need to change that dull blade. I pull on the bolt. I push on it. Nothing moves.
I start to wonder. Are lawnmower blades reverse thread? Or is this bolt just stuck?
I have been there. I have skinned my knuckles on mowers all over. I have fixed them in humid Florida. I have fixed them in dry Arizona lots. It is frustrating. We grow up learning “righty-tighty, lefty-loosey.” But mowers are different. They have to be. If you get this wrong, you strip the bolt. Then a ten-minute job becomes a nightmare.
Let’s fix this. I will show you how to check your mower. We will get that blade off safely. I will share what I know. We will save your hands. We will save your afternoon.
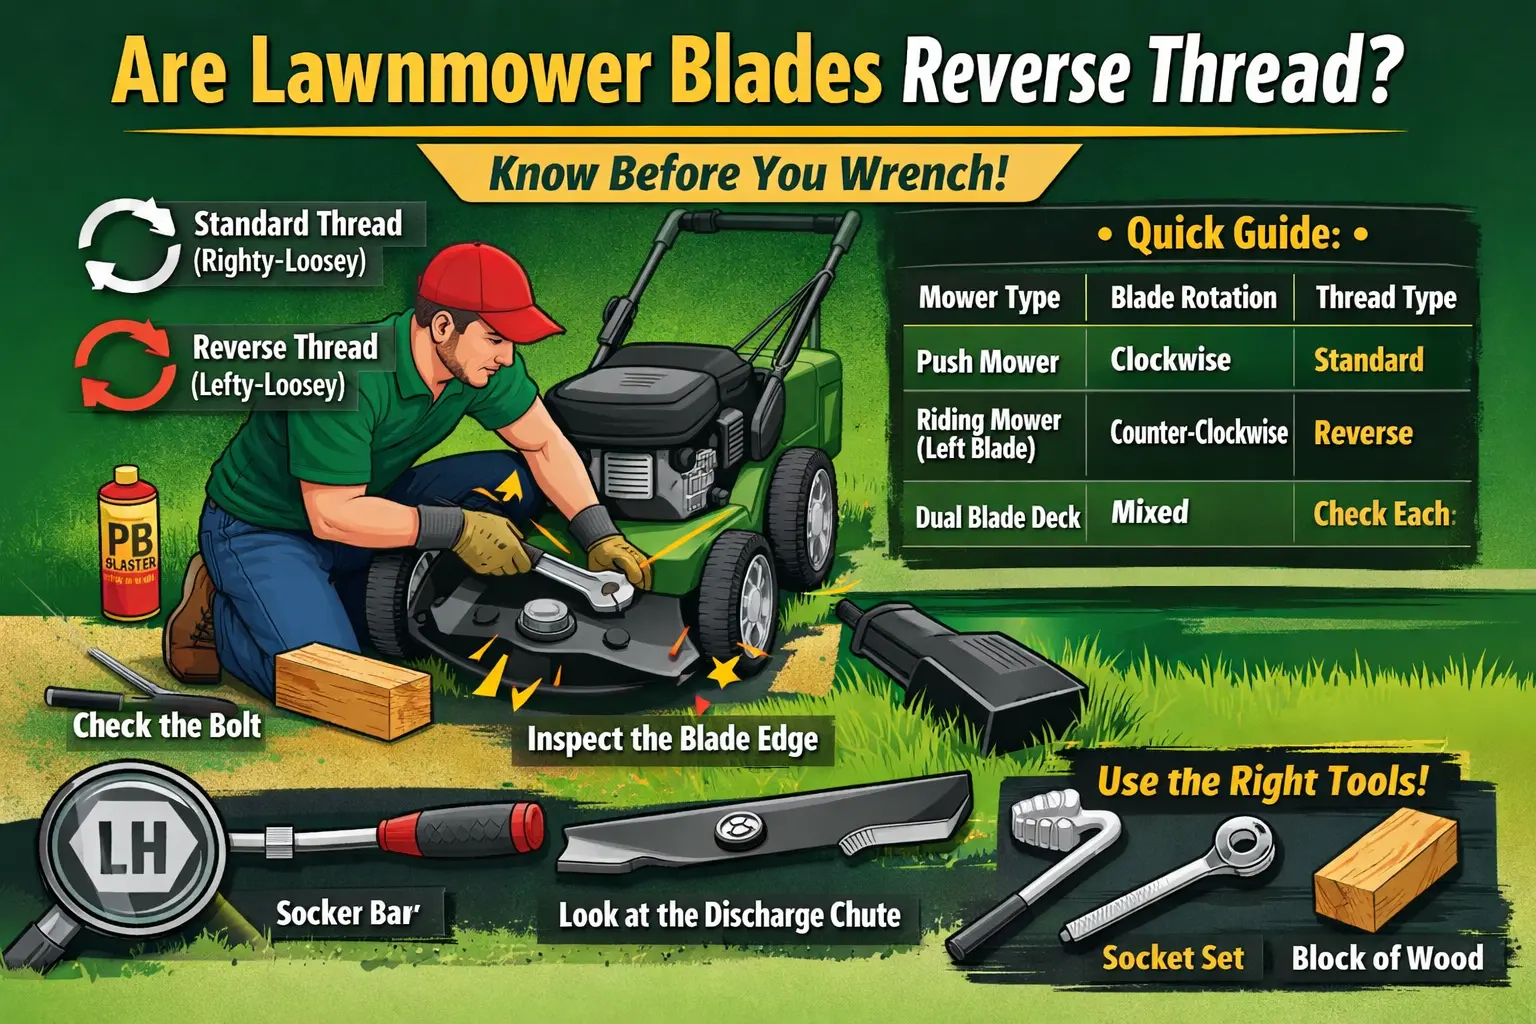
The Quick Answer: Do Blades Spin Left or Right?
Most walk-behind mowers are standard thread, but there are big exceptions you need to know about right now.
The short answer is not always simple. For most push mowers in the US, the bolt is standard. You turn it left to loosen it. That is counter-clockwise. But this is not a rule for every mower. Some are different.
I once helped a neighbor in Ohio. He had a riding mower. He used a huge breaker bar. He pulled hard to the left. He snapped the bolt head right off. It was a reverse thread. He was actually tightening it. He felt bad. I felt bad for him.
We need to be sure. You cannot just guess. A broken bolt is a pain to fix. You have to drill it out. It takes hours. Checking first takes seconds.
The “Righty-Tighty” Rule vs. Reality
We learn this rule as kids. Turn right to tighten. Turn left to loosen. It works for jar lids. It works for light bulbs. It works for car tires.
But a mower is a machine with a big spinning part. The blade carries a lot of energy. The rules change here. The bolt has a job to do. It has to stay on.
If the bolt follows the standard rule, it might fail. The spinning force could unscrew it. That is bad. Manufacturers know this. They design the threads to fight the spin.
Why Rotation Direction Matters
Think about the blade. It spins very fast. It spins at 3,000 RPM. That is thousands of times a minute. That is a lot of force.
The bolt holds the blade to the engine shaft. If the blade spins one way, the bolt should tighten that way. It is a safety feature.
If the thread is wrong, the blade comes loose. It could fly off. I have seen a blade come loose. It is scary. It can ruin the mower deck. It can hurt you. We do not want that.
Single Blade vs. Dual Blade Setups
Most push mowers have one blade. These usually have standard threads. The blade spins clockwise. The bolt tightens clockwise. So, you loosen it to the left.
Riding mowers are different. They often have two or three blades. The blades might spin in different ways. This helps them cut better. It helps move the grass to the chute.
I worked on a John Deere once. It had two blades. One was standard. The other was reverse. You have to check each one. Do not assume they are the same.
The Science of Torque: Why Reverse Threads Exist
It is not just to annoy you; it is simple physics that keeps the blade attached while it spins at 3,000 RPM.
You might ask why. Why make it confusing? Why not make them all the same? It comes down to physics. It is about how forces work.
When the engine starts, the shaft spins. The blade has weight. It wants to stay still. This creates torque. We call this “inertial torque.”
Precession and Self-Tightening
Imagine the shaft spinning right. The blade resists. It pushes back to the left. If the bolt has standard threads, this push tightens it.
It is like a self-locking trick. The more it spins, the tighter it gets. This keeps you safe. It keeps the blade on the mower.
If they used the wrong thread, it would loosen. Every time you started the mower, the bolt would back out. The blade would wobble. Then it would fall.
The Risk of “Standard” Threads on the Wrong Mower
I saw this happen at a shop in Texas. A guy put a standard bolt on a reverse spindle. He tightened it well. He thought it was fine.
He started the mower. It ran for a minute. Then we heard a loud clang. The blade hit the deck. The bolt had spun itself out.
The vibration loosens it too. Mowers shake a lot. The engine shakes. The grass adds drag. All this motion works on the bolt. The thread direction fights this.
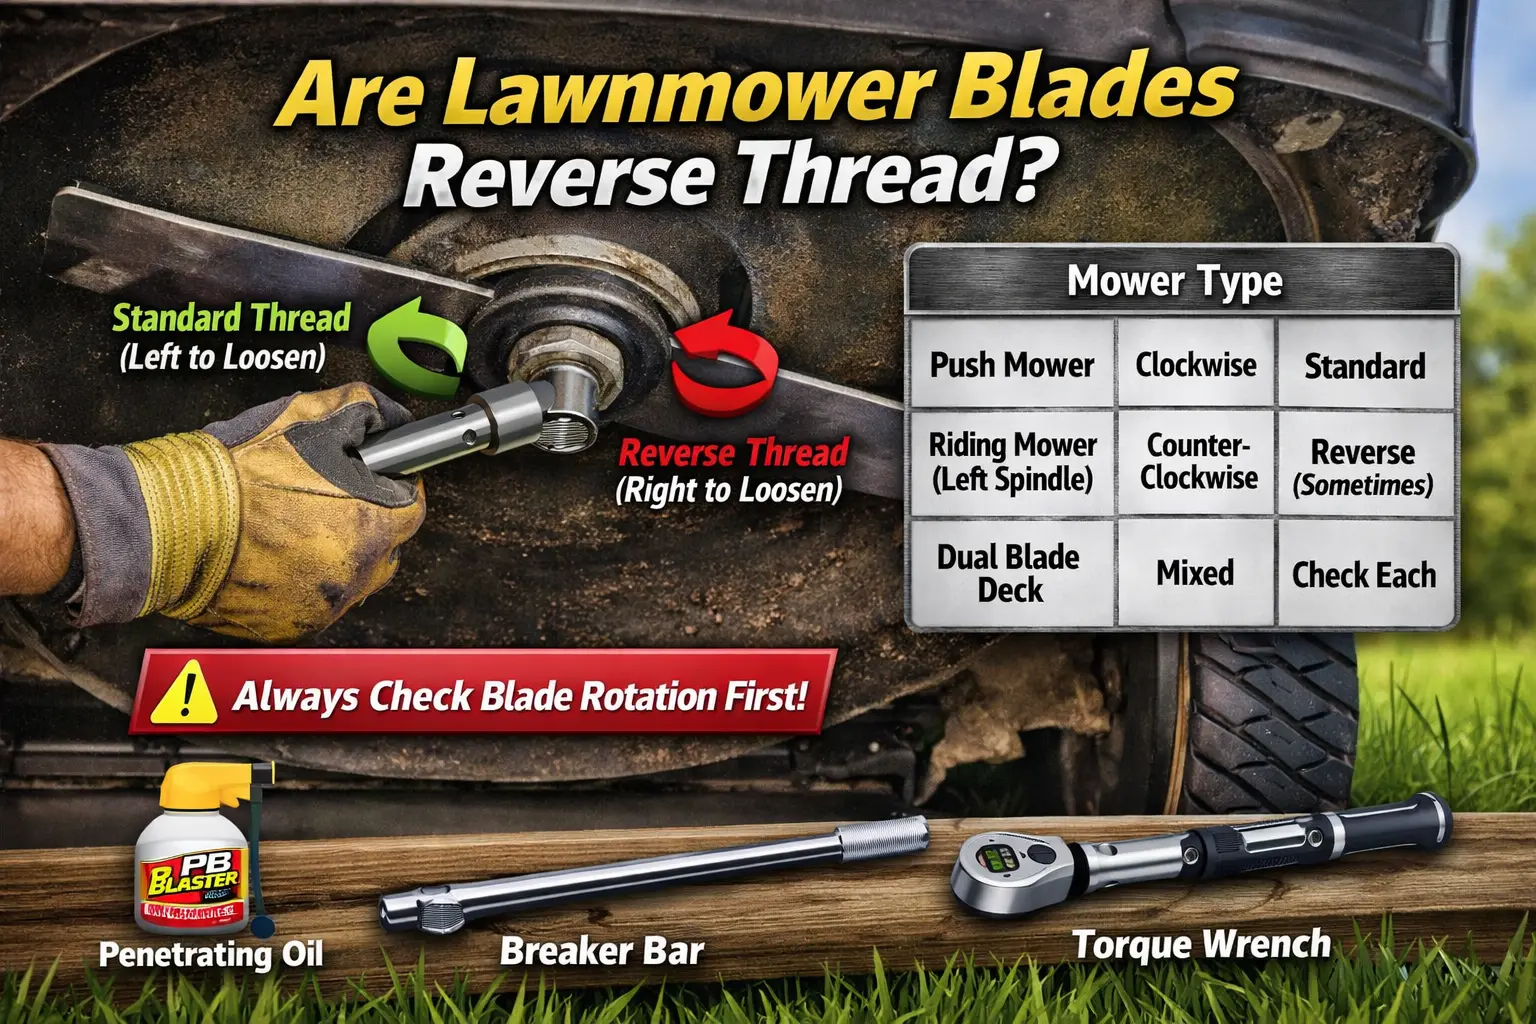
Visual Clues: How to Tell Without a Manual
You do not need the paperwork to figure this out; just look closely at the bolt and the blade itself.
You lost the manual. That is okay. I lose mine too. You do not need it. The mower tells you what to do. You just need to look.
There are signs on the metal. There are clues in the shape. I look for these first. I do this before I grab a tool. It saves me time.
Reading the Bolt Head Markings
Look at the bolt head. Wipe off the grass. Wipe off the grease. Use a rag. Is there a letter stamped there?
Sometimes you see “LH”. This means “Left-Hand.” That is a reverse thread. You turn it right to loosen. It is rare on push mowers. But it happens.
If you see metric numbers like “8.8”, that is just the grade. It talks about strength. It does not tell you the direction. Do not get confused.
The “Discharge Chute” Trick
This is my favorite trick. Look where the grass comes out. Is the chute on the right side? Most US mowers are like this.
If the chute is on the right, the blade spins clockwise. It throws grass out the right side. This means the bolt is likely standard.
If it is a rear discharge, it is harder to tell. But the side chute is a good clue. It is a quick check. It works most of the time.
Inspecting the Blade Sharp Edge
Look at the blade itself. It has a sharp edge. It has a dull edge. The sharp edge cuts the grass. It must lead the way.
If the sharp edge is on the right, the blade spins right. That is clockwise. If it spins clockwise, the bolt is standard. You loosen to the left.
If the sharp edge is on the left, it spins left. That is counter-clockwise. Then the bolt is reverse thread. You loosen to the right.
Essential Tools for the Job (US Market Standards)
Don’t round off that bolt with cheap pliers; grab the right gear to save your hands and your patience.
I love good tools. They make work easy. They make work safe. You do not need a whole shop. You just need a few good things.
Please do not use pliers. Do not use an adjustable wrench. They slip. They strip the bolt head. Then you have a real problem.
The Right Wrench or Socket Set
You need a socket wrench. You need the right size socket. Most US mowers use SAE sizes. Some use Metric.
I keep both sets handy. A 5/8 inch is common. A 14mm is common too. Test the fit. It should be tight. No wiggle room.
Use a 6-point socket. It has six sides. It grips the flat parts of the bolt. A 12-point socket grips the corners. It can slip. It can round off the head.
The “Block of Wood” Method
This is a classic pro tip. You need a piece of wood. A 2×4 scrap is perfect. I keep a small piece in my toolbox.
You wedge the wood. Put it between the blade and the deck. When you turn the wrench, the blade hits the wood. It stops.
This protects your hand. It protects the blade. It is better than holding it. Blades are sharp. Hands are soft. Use the wood.
Breaker Bars vs. Impact Guns
Sometimes the bolt is very tight. A regular wrench is too short. You cannot get enough leverage. You need a breaker bar.
A breaker bar is long. It gives you power. It makes it easy to turn. Just go slow. Make sure you turn the right way.
Impact guns are fun. They are loud. They are fast. But be careful. They can snap a bolt in a second. I use them to remove bolts. I never use them to tighten.
Step-by-Step Guide: Removing the Blade Safely
I have done this a thousand times, and skipping the safety steps is the only time I ever got hurt.
I have scars to prove it. I rushed once. I did not unplug the spark plug. The engine kicked. The blade moved. It hit my hand.
It hurt a lot. I was lucky. It could have been worse. Now I follow a routine. I do it every time. No exceptions.
Step 1: Disconnect the Spark Plug
This is the most important step. Do it first. Find the rubber boot on the front of the engine. It is black usually.
Pull the boot off. It pops off. You will hear a click. Tuck the wire away. Make sure it cannot touch the plug.
This kills the power. The engine cannot start. Even if you spin the blade, it is safe. It gives you peace of mind.
Step 2: Tilt the Mower Correctly
You need to reach the blade. You have to tilt the mower. But be careful. There is oil inside. There is gas inside.
Look for the carburetor. Look for the air filter. Keep them up. If you tilt them down, oil runs in. It ruins the filter. It smokes when you start it.
I usually tip it back on the handle. I put a heavy weight on the handle. This lifts the front up. It is safe and easy.
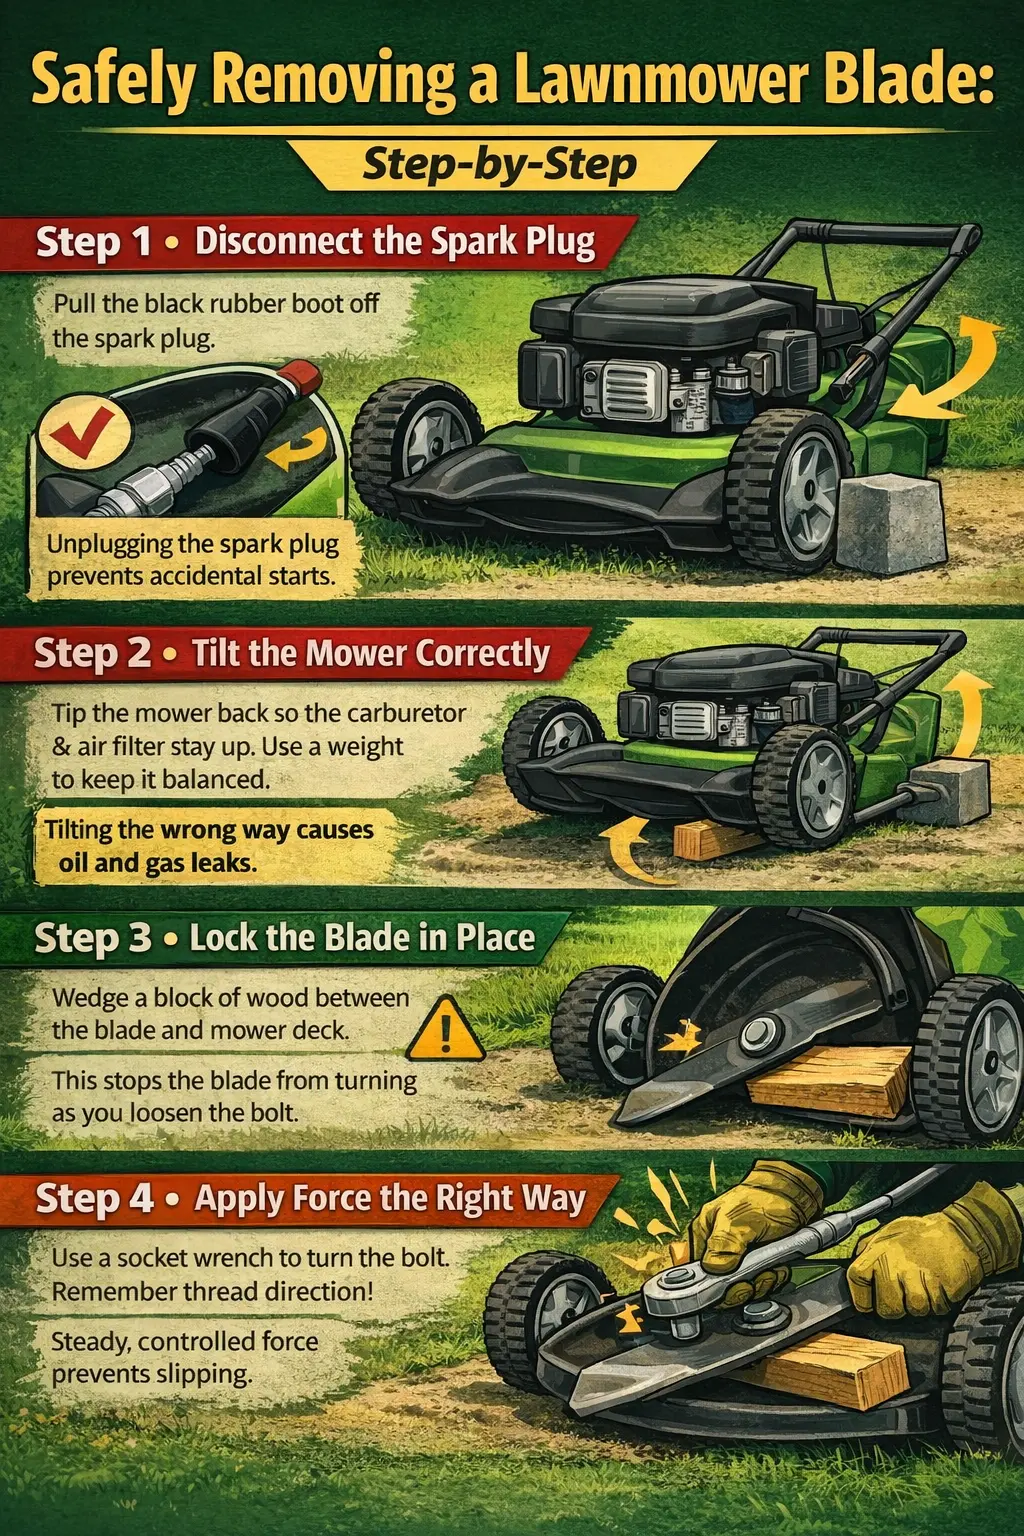
Step 3: Locking the Blade in Place
Now you are under the deck. It is dirty. It is grassy. Wear gloves. Thick leather gloves are best.
Take your wood block. Wedge it in. If you loosen to the left, block the right side of the blade. It will spin and hit the wood.
If you have a riding mower, use a clamp. Clamp the blade to the deck. It holds it tight. It acts like a third hand.
Step 4: Applying Force the Right Way
Now grab your wrench. Put it on the bolt. Make sure it is straight. Hold the mower deck with one hand.
Pull the wrench. Remember your check. Are lawnmower blades reverse thread on this one? If standard, pull left.
Pull steady. Do not jerk it. Jerking can slip. If it is stuck, stop. Re-check your direction. Take a breath. Try again.
Brand-Specific Guide: Who Uses What?
Different brands have different quirks, so let’s look at the big names found in American garages.
I have used them all. I have mowed with Toros. I have fixed Hondas. I have ridden John Deeres. They are all good machines. But they are different.
Knowing your brand helps. It gives you a head start. Here is what I have seen in the field.
Toro and Lawn-Boy Mowers
Toro makes great mowers. I see them everywhere. Most walk-behind Toros are standard thread. You turn left to loosen.
They use a blade adapter. It is a metal piece. It fits on the shaft. It often gets stuck. The bolt comes out, but the blade stays.
You might need to tap it. Use a rubber mallet. Tap the blade gently. It will pop off the adapter. Just be patient.
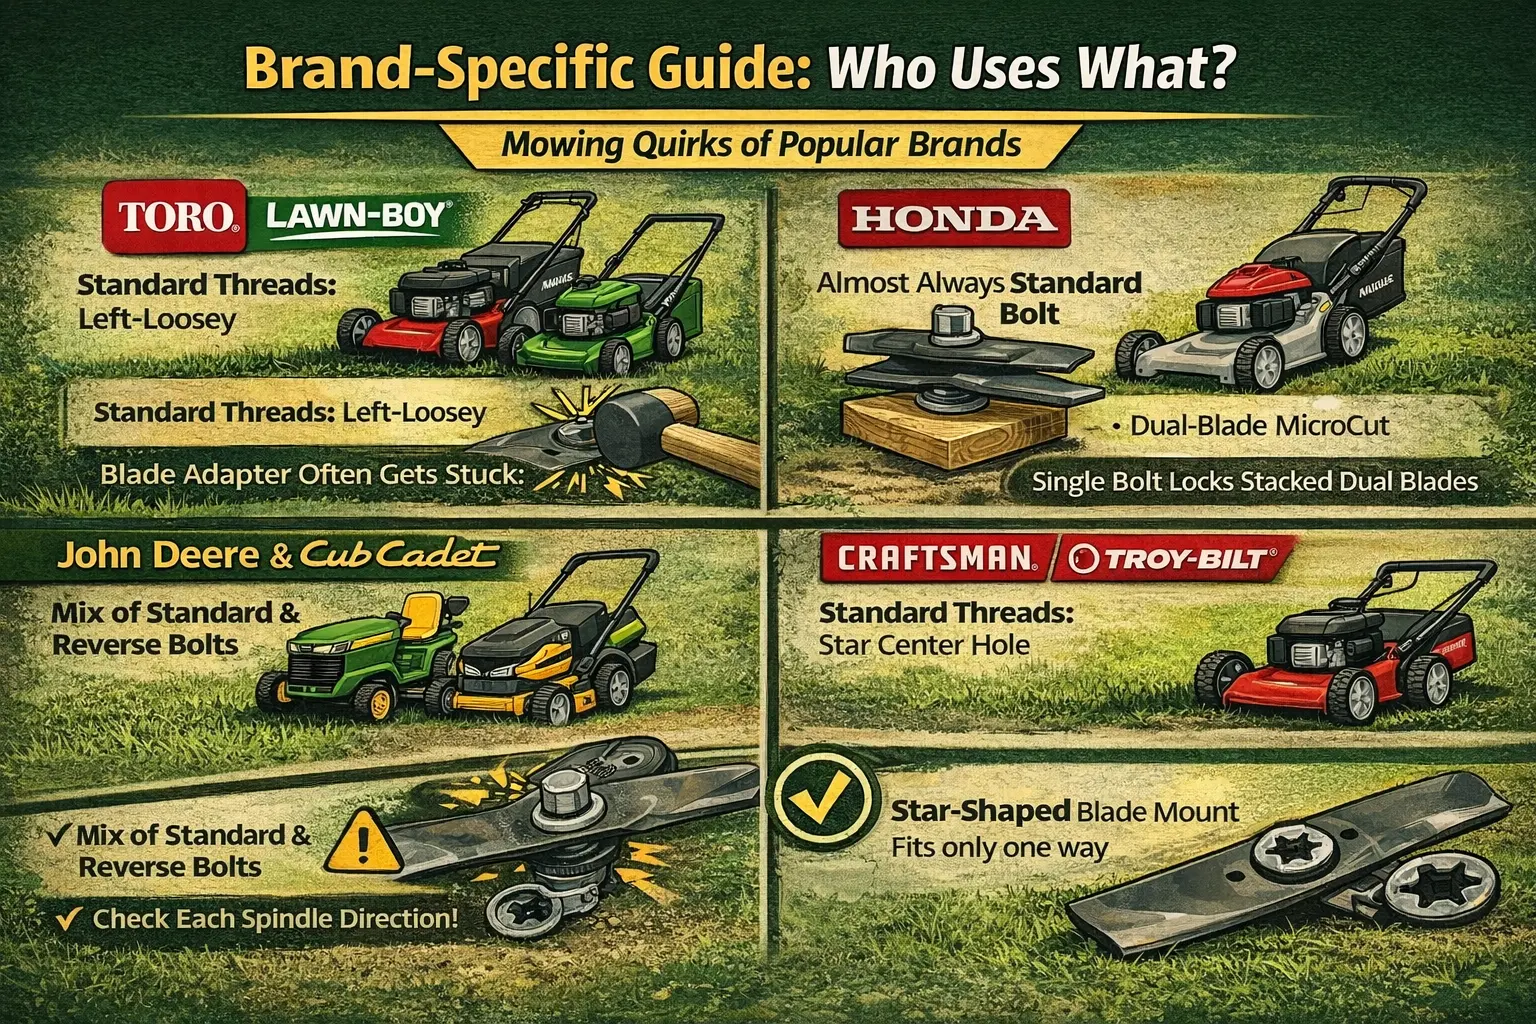
Honda (HRX and HRN Series)
Hondas are fancy. They cut grass like scissors. Many have two blades. They call it MicroCut.
Both blades usually share one bolt. It is almost always a standard thread. But Honda bolts are tight. They torque them hard at the factory.
You need a long wrench. You need that wood block. The dual blades can slip. Make sure the block catches both if you can.
John Deere and Cub Cadet
These are the big boys. Riding mowers are heavy. They have big decks. They cover a lot of ground.
On a three-blade deck, check the manual. Sometimes the left blade spins the other way. It might have a reverse thread bolt.
Check the spindle. That is the part the blade attaches to. If you replace a spindle, check the threads. Do not mix them up.
Craftsman and Troy-Bilt
These are very common. You can buy them at big stores. They are often made by a company called MTD.
They use standard threads mostly. The blades have a star hole in the center. It is a 6-point star. Or a bow-tie shape.
The star must line up. If it does not, the blade wobbles. It vibrates. It ruins the star pattern. Check the fit carefully.
Dealing with Stuck, Rusted, or Frozen Bolts
If you live in the Rust Belt or leave your mower out in the rain, that bolt is going to fight you.
I lived in the Midwest for a while. The winters are wet. The salt gets everywhere. Bolts rust tight. It is a bond like glue.
You try to turn it. It feels like it is welded. It is not fun. But you can win. You just need tricks.
Penetrating Oil is Your Friend
Do not force a rusty bolt. You will snap it. Get some oil. WD-40 Specialist is good. PB Blaster is great.
Spray the bolt head. Spray behind the washer. Let it sit. Go drink a coffee. Wait 15 minutes. Let it soak in.
Tap the bolt head with a hammer. Not hard. Just a tap. This vibration helps the oil move. It breaks the rust seal.
Using Heat (Carefully!)
If oil fails, use heat. Heat expands metal. It breaks the rust bond. I use a small propane torch.
Be very careful. There is gas nearby. There is oil nearby. Do not burn the mower. Do not melt plastic parts.
Focus on the bolt head. Heat it for 30 seconds. Then try the wrench. The nut expands. It lets go of the threads.
What If the Bolt Head Snaps?
It happens to the best of us. The head breaks off. The rest of the bolt is stuck inside. Do not panic.
You can drill it out. You need a metal drill bit. You need a screw extractor kit. It takes time. It takes a steady hand.
Sometimes it is easier to replace the part. You can buy a new spindle. It costs some money. But it is easier than drilling.
Inspecting and prepping the New Blade
Putting a dull or wrong blade back on is a waste of time; let’s make sure it cuts like a razor.
You got the old one off. Great job. Now look at the new one. Is it the right one? Is it sharp?
Do not just slap it on. Take a minute. Prep the blade. Prep the mower. Do it right. Your grass will thank you.
Mulching vs. Bagging Blades
Blades are not all the same. Some are for bagging. They have high wings. They act like a fan. They blow grass up the chute.
Some are for mulching. They are called Gator blades sometimes. They have teeth. They chop grass into dust. It feeds the lawn.
Make sure you have the right type. If you mulch with a bagging blade, it clumps. If you bag with a mulching blade, the bag stays empty.
Checking for Balance
This is key. A blade must be balanced. If one side is heavy, it wobbles. It shakes the whole mower.
It ruins the engine bearings. It makes your hands numb. Test it. Hang the blade on a nail on the wall.
Does it tip? If it tips, that side is heavy. Grind a little metal off the heavy end. Test it again. It should hang straight.
Cleaning the Mounting Surface
Look at the shaft. Look at the adapter. Is there old grass stuck there? Is there rust?
Scrape it off. Use a wire brush. The surface must be flat. If it is bumpy, the blade sits crooked.
A crooked blade vibrates. It cuts unevenly. Your lawn looks bad. A clean mount means a smooth cut.
Installation: Getting It Tight Enough
You don’t want it falling off, but you also don’t want to crack the block.
We are almost done. You have a sharp blade. You have a clean deck. Now we put it back together.
This is the home stretch. But stay focused. Do not rush the end. Tighten it right.
Thread Locker: Yes or No?
People ask me this. Should I use Loctite? That is the thread glue.
Blue Loctite is okay. It holds it tight. But you can still get it off next time. It prevents vibration loosening.
Never use Red Loctite. Red is permanent. You will need a torch to get it off. Most manuals say dry threads are fine. I usually go dry.
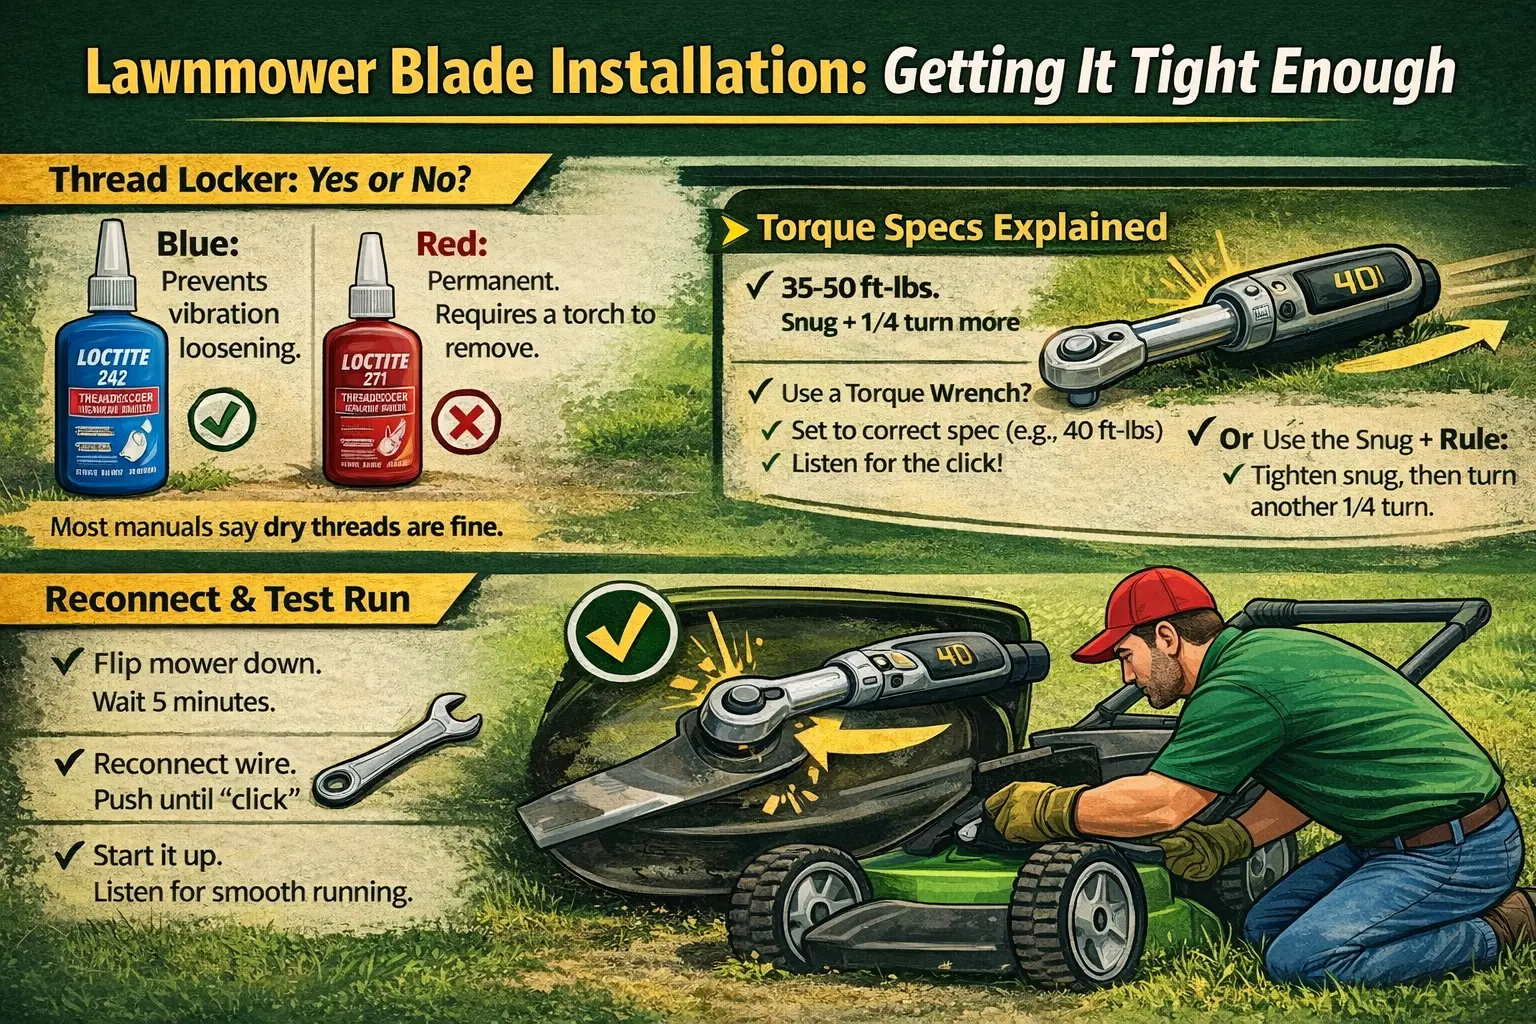
Torque Specs Explained
How tight is tight? Manufacturers have a number. It is usually 35 to 50 foot-pounds.
If you have a torque wrench, use it. Set it to the number. Click it. You know it is right.
If you do not, use the “snug plus” rule. Tighten it until it is snug. Then turn it one quarter turn more. That is usually enough.
Reconnecting and Test Run
Flip the mower back down. Let it sit. The oil needs to drain back. Give it five minutes.
Reconnect the spark plug wire. Push it on. Listen for the click. Now you are live.
Start the engine. Listen. Does it sound smooth? Do you feel weird shaking? If it hums, you did good. Go cut that grass.
Frequently Asked Questions (FAQ)
Short, punchy answers to the questions my neighbors ask me when they see me working in the garage.
I get asked a lot of things. People walk by my garage. They see me working. They have questions. Here are the top ones.
Can I use an impact driver to remove the blade?
Yes, you can. It works great for taking bolts off. The bursts of power break rust loose. It is easy on your wrist.
But be careful putting bolts on. Impacts are strong. You can over-tighten. You can strip threads. Start the bolt by hand first.
Why does my mower vibrate after changing the blade?
The blade is likely unbalanced. Did you check it on a nail? Or maybe it is not centered. Check the star pattern.
Did you put it on upside down? It happens. The wings should point up. Towards the deck. Not towards the grass.
How often should I change or sharpen?
I do it every 25 hours of use. For me, that is twice a season. Or if I hit a rock.
A dull blade tears grass. It turns brown. A sharp blade slices it. The lawn stays green. It is worth the effort.
Are riding mower blades different?
Yes, often they are bigger. They are thicker. The mounting holes vary more.
Riding decks have belts. They have pulleys. The rotation depends on the belt routing. Always check the manual for riders.
Final Thoughts from the Shed
I hope this helps. Changing a blade is not hard. It just takes care. You have to watch the details.
Remember the main question. Are lawnmower blades reverse thread? Usually no. But sometimes yes. Checking takes a second.
Look at the chute. Look at the blade edge. Use a wood block. Protect your hands.
Do not fight the bolt. If it is stuck, use oil. Use heat. Be patient. The grass can wait an hour.
I love a fresh cut lawn. It smells good. It looks neat. A sharp blade makes it happen. You can do this.
Go out there. Check your mower. Get your hands a little dirty. Fix it up. Then enjoy the ride. Happy mowing.
Read More: Is it safe to leave a lawnmower in the rain?